
How to Build your own MP3 Player with Arduino
This is the first of three guides on building your own MP3 player with Arduino. In this guide I will walk you through the very basic setup and how to test it for errors. But here is what you can expect in these guides:
Part 1 Components:
- DFPlayer Mini.
- Arduino.
- Speaker.
- Jumpers.
- Breadboard.
Let’s Build!
Before we can begin here are some important steps to follow:
- Install DFPlayer Library. Follow our guide if you need to know how to do this: Installing Libraries
- Format SD Card to Fat-32.
- Load your SD Card with some music.
- Music must use the 0001, 0002, 0003 naming convention.
The instructions online suggest you use the 0001, 0002, 0003 naming convention. In my experience this isn’t necessary but if this is your first time using the MP3 module, I suggest you take the advice, it may help when troubleshooting issues later.
Basic MP3 Player
This build has no interactive functionality, it just loops through all the music added to the SD Card.
The Code:
#include "Arduino.h"
#include "SoftwareSerial.h"
#include "DFRobotDFPlayerMini.h"
SoftwareSerial mySoftwareSerial(10,11); // RX, TX
DFRobotDFPlayerMini myDFPlayer;
void setup() {
mySoftwareSerial.begin(9600);
myDFPlayer.begin(mySoftwareSerial);
myDFPlayer.volume(25); //Set volume value. From 0 to 30
myDFPlayer.enableLoopAll();
}
void loop() {
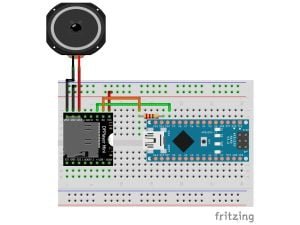
}The Circuit:
Assemble your components the exact same way as in the image below. This is the basic setup I found on the DF robot website. Don’t forget to connect 5v from the Arduino board to the red rail on the breadboard same with GND to the blue rail.
Upload the Code:
With the circuit built and the code uploaded, you should now have your Music playing, and looping.
Testing:
If by some chance you don’t have your music playing, open the serial monitor. If there are some warning messages like no SD-card inserted or check wiring, double check every connection against the circuit diagram above, re-format the card etc.
If problems persist, you can use the cardInfo test sketch to check your SD card and wiring is working correctly. Open your Arduino IDE, and follow this path:
File > Examples > SD > cardInfo
When the cardInfo sketch opens, upload it to your Arduino and then open the serial monitor to see the results. If the problem persists it’s possible your MP3 module is broken, try another module. When you get the SD Card statistic messages you can move on.
Conclusion
With the power of the DFPlayer module and the versatility of Arduino, you’ve unlocked a world of possibilities for adding music and sound to your projects. Whether you’re a hobbyist, a tinkerer, or a maker, this simple yet effective method for looping through MP3 tracks. As you embark on your creative journey with sound, remember that the only limit is your imagination. So, let the music play, and let your projects come alive with the power of sound and technology.
Remember this was just the first part of three guides working with the MP3 module, stay tuned because next we are going to add some interactive functionality.
Happy Tinkering!
Recommendations:
The Elegoo Super Starter Kit
If you don’t already own any Arduino hardware, we highly recommend this kit as it has everything you need to start programming with Arduino. You can find out more about this kit, including a list of its components here: Elegoo Super Starter Kit
You can find this kit on Amazon here: Elegoo Super Starter Kit
The 0.96-inch Mini-OLED Display
We highly recommend this mini-OLED bundle of five 0.96-inch OLED displays. We have bought these before and they all worked perfectly. You can read more about the mini-OLED here: Mini-OLED
You can find this bundle on Amazon here: OLED Displays
Elegoo Nano (Arduino Compatible)
We have bought these Nano boards many times and can highly recommend them. There are three Nano boards in this pack making them a total bargain for everyone.
You can find this pack on Amazon here: Arduino Nano

