


Mastering Arduino: A Guide to Basic Electronic Components and Circuit Building
Welcome to the exciting world of Arduino! Whether you’re a beginner eager to dive into electronics or a seasoned maker brushing up on the basics, understanding the fundamental electronic components is your first step to unlocking endless project possibilities. From resistors taming unruly currents to LEDs lighting up your creations, these tiny parts are the unsung heroes of every circuit. In this post, we’ll explore the essential Arduino components complete with explanations, practical examples, and a hands-on guide to building your first circuit. Let’s get started and bring your maker journey to life!
What Are Arduino Components?
“Arduino components” refer to the electronic parts and modules commonly paired with Arduino microcontrollers to build everything from simple LED blinkers to advanced robotics and IoT devices. These building blocks, when combined with an Arduino board and programmed via the Arduino IDE, empower you to create innovative projects with ease. Below, we’ve categorized them into passive and active components, along with some practical tools like breadboards, to give you a solid foundation.
Passive Components: The Steady Helpers
Passive components don’t need an external power source to function. Instead, they control or store energy in a circuit, shaping how electricity flows without amplifying it. Here’s a rundown of the key players:
- Resistors
Role: Traffic controllers for electricity, limiting current flow to protect components.
Measured In: Ohms (Ω).
Use Case: Pair them with LEDs to prevent burnout or control voltage levels.
Example: A 220Ω resistor keeps an LED glowing safely in your first circuit.
Want to know more? Read our guide on resistors here!
- Capacitors
Role: Tiny energy storage units that hold and release charge as needed.
Measured In: Farads (F).
Use Case: Smooth power spikes, filter signals, or time an LED blink.
Example: Add a capacitor to stabilize voltage in a noisy power supply.
Want to know more? Read our guide on capacitors here!
- Diodes
Role: One-way gates that let current flow in a single direction.
Use Case: Protect circuits from reverse voltage or convert AC to DC.
Star Player: LEDs (Light-Emitting Diodes), which glow when powered correctly. - Thermistors
Role: Temperature-sensitive resistors that change resistance with heat.
Use Case: Build a DIY thermometer or climate monitor.
Fun Fact: Resistance drops (or rises) with temperature, depending on the type. - Photoresistors (LDRs)
Role: Light-dependent resistors that adjust resistance based on light levels.
Use Case: Create a light sensor for automatic night lights or plant monitors.
How It Works: More light = less resistance. - Potentiometers
Role: Adjustable resistors controlled by a knob or slider.
Use Case: Dim an LED or adjust a buzzer’s volume.
Think Of It As: Your circuit’s hands-on dimmer switch. - Tactile Switches
Role: Small buttons that complete a circuit when pressed.
Use Case: Trigger actions like turning on an LED or starting a program.
Feel: Clicky and satisfying, think keyboard buttons! - Tilt Switches
Role: Detect tipping or tilting with a rolling ball or mercury inside.
Use Case: Sound an alarm when something’s knocked over or count steps in a pedometer.
Active Components: The Dynamic Doers
Active components require an external power source and can amplify, switch, or generate signals. They bring power and intelligence to your projects. Here’s the lineup:
- LEDs (Light-Emitting Diodes)
Role: Glow when current flows through them in the right direction.
Use Case: Indicators, decorations, or Morse code gadgets.
Why They Shine: Cheap, colorful, and versatile. - RGB LEDs
Role: Mix red, green, and blue to create any color.
Use Case: Mood lighting, displays, or artsy projects.
Control: Adjust each color’s brightness with Arduino code. - Buzzers
Role: Generate beeps or buzzes with electricity.
Use Case: Alarms, notifications, or simple tunes like a doorbell.
Pro Tip: Send a signal, and they’ll sing for you!
Want to know more? Read our guide on buzzers here!
- Transistors
Role: Tiny switches or amplifiers for current.
Use Case: Control motors or boost weak signals.
Power Move: Handle bigger tasks without overloading your Arduino. - Integrated Circuits (ICs)
Role: Miniature brains packed with components like transistors and resistors.
Use Case: The Arduino’s microcontroller is an IC, processing code and managing sensors. - Operational Amplifiers (Op-Amps)
Role: Amplify small signals (e.g., from sensors) to usable levels.
Use Case: Boost audio or fine-tune sensor readings. - Microprocessors
Role: The thinking core that runs your Arduino code.
Use Case: Crunch numbers and control your project like a mini computer. - Relays
Role: Electrically controlled switches for high-power devices.
Use Case: Turn on lamps or motors safely with a low-power signal. - DC Motors
Role: Spin with direct current for continuous motion.
Use Case: Drive wheels, fans, or robotics.
Control: Adjust voltage for speed and direction. - Servo Motors
Role: Move to precise angles (0–180°) with feedback.
Use Case: Robotic arms, camera gimbals, or steering. - Stepper Motors
Role: Move in exact steps for precise control.
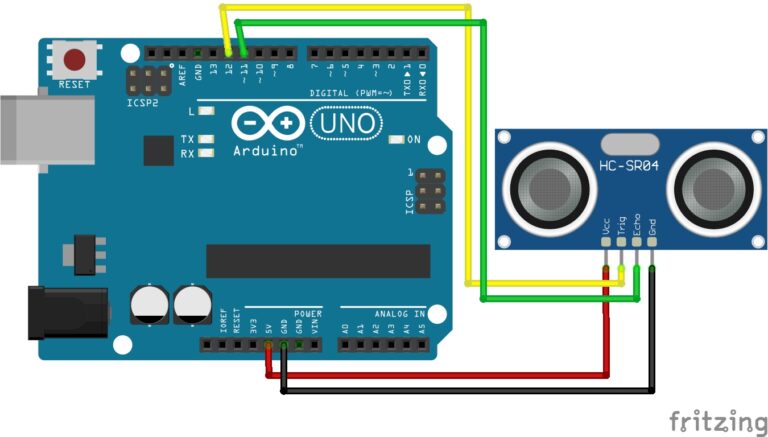
Use Case: 3D printers, CNC machines, or clocks. - Sensors
Types: Temperature (e.g., DHT-11), pressure, proximity (e.g., HC-SR04), motion (e.g., PIR).
Role: Measure environmental conditions and send data to Arduino.
Examples: Weather stations, obstacle-avoiding robots, or security alarms. - IR (Infrared) Modules
Role: Send and receive infrared signals.
Use Case: Remote controls or object detection. - Bluetooth/Wi-Fi Modules
Role: Enable wireless connectivity.
Use Case: Control projects via smartphone or integrate IoT features.

Essential Tools: The Breadboard
A breadboard is your prototyping playground, no soldering required! It’s a grid of holes where components and wires connect to build and test circuits quickly.
- Structure:
- Rows: Horizontal power rails (e.g., +5V and GND).
- Columns: Vertical groups of five connected holes for components.
- Power Rails: Long edge rows for positive (red) and ground (blue).
- How It Works:
- Insert components into holes; rows and columns connect internally.
- Use Case: Modify circuits on the fly, perfect for experimentation.
Recommended Starter Kit
New to Arduino? We recommend the Elegoo Super Starter Kit, which includes all the components mentioned here (resistors, LEDs, sensors, motors, breadboard, and more) to kickstart your journey. Check it out on our Products page.
Conclusion
There you have it, a crash course on Arduino components and your first circuit! These building blocks, passive and active alike are the foundation of every great project. Whether you’re blinking an LED, spinning a motor, or sensing the world around you, the possibilities are endless. Got a cool project idea? Drop it in the comments, we’d love to hear from you!
Happy tinkering!
