How to add some Interactive Functionality
This is the second of three guides on building your own MP3 player with Arduino. In this guide I will walk you through setting up some interactive functionality to skip tracks, pause tracks, and increase volume etc. by adding some push buttons to control the players functions. Then I will show you how to program your own functions:
Building upon the last part of these “Building an MP3 Player with Arduino guides” we are now going to add some user functionality to skip tracks, pause tracks, and increase volume etc.
What we have Done so Far
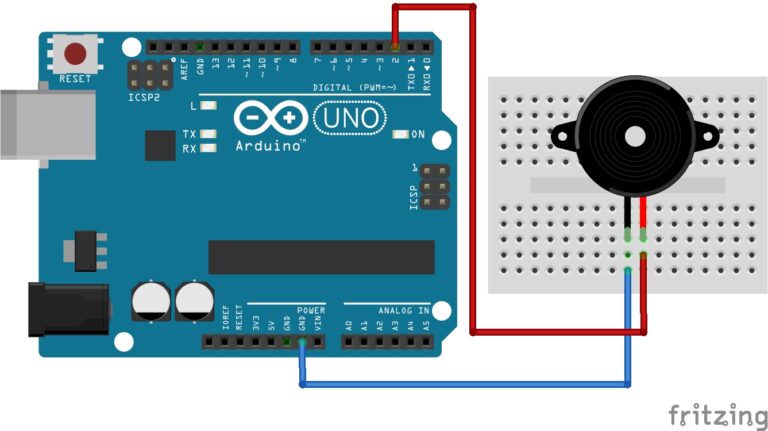
If you followed part 1 of this guide you should already have the basic circuit built, if not you can follow the diagram below and assemble your components in the exact same way:
Let's Build!
Components:
- DFPlayer Mini.
- Arduino.
- Speaker.
- Push buttons.
- Potentiometer.
- Jumpers.
- Breadboard.
Built in Functions
The Code:
This is the same code as in part 1 so you don’t need to make any changes if you already have this uploaded to your Arduino.
#include "Arduino.h"
#include "SoftwareSerial.h"
#include "DFRobotDFPlayerMini.h"

SoftwareSerial mySoftwareSerial(10,11); // RX, TX
DFRobotDFPlayerMini myDFPlayer;

void setup() {
mySoftwareSerial.begin(9600);
myDFPlayer.begin(mySoftwareSerial);
myDFPlayer.volume(25);  //Set volume value. From 0 to 30
myDFPlayer.enableLoopAll();
}

void loop() {
}
The Circuit:
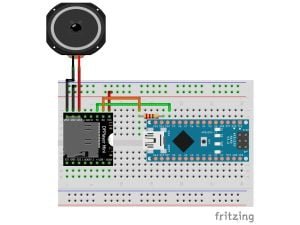
We are now going to add two push buttons to our previous circuit. Assemble your components in the same way as in the image below, remember to keep all Arduino connections connected, these new connections are additional to our previous circuit.
The left button will go to the previous track if pressed the right button will skip to the next track if pressed. Also, if you hold the left button, it will turn the volume down, if you hold the right button, it will turn the volume up. Simple!
Moving On
Now that’s the basic stuff out the way, I want to show you how to program your own buttons. Disconnect the buttons we just added and put them aside for a moment. We are going to program 3 buttons for the Play, previous and next functions but also include a pause function. Our buttons won’t connect to the DFPlayer this time, but to the Arduino board instead.
Programming Buttons to Control the MP3 Module
The Code:
Study the code below, especially the conditional statements in the loop section, this is where our commands are executed.
#include "Arduino.h"
#include "SoftwareSerial.h"
#include "DFRobotDFPlayerMini.h"

SoftwareSerial mySoftwareSerial(10,11);
DFRobotDFPlayerMini myDFPlayer;
int playBut=2;
int playVal;
int playState=0;
int nxtBut=4;
int nxtVal;
int rewBut=3;
int rewVal;

void setup() {
  Serial.begin(9600);
  pinMode(playBut,INPUT);
  digitalWrite(playBut,LOW);
  pinMode(nxtBut,INPUT);
  digitalWrite(nxtBut,LOW);
  pinMode(rewBut,INPUT);
  digitalWrite(rewBut,LOW);
  mySoftwareSerial.begin(9600);
  myDFPlayer.begin(mySoftwareSerial);
  myDFPlayer.volume(25);//Set volume value. From 0 to 30
}

void loop() {
  playVal=digitalRead(playBut);
  Serial.println(playVal);
  if(playVal==0){
    if(playState==0){
      Serial.println("Play");
      myDFPlayer.enableLoopAll();
      delay(1000);
      playState=1;
    }
    else if(playState==1){
       Serial.print("Pause");
       myDFPlayer.pause();
       delay(1000);
       playState=2;
    }
    else if(playState==2){
      Serial.print("Play");
      myDFPlayer.start();
      delay(1000);
      playState=1;
    }
  }
  nxtVal=digitalRead(nxtBut);
  Serial.println(nxtVal);
  if(nxtVal==0){
    Serial.println("Next");
    myDFPlayer.next();
    delay(1000);
  }
  rewVal=digitalRead(rewBut);
  Serial.println(rewVal);
  if(rewVal==0){
    Serial.println("Rewind");
    myDFPlayer.previous();
    delay(1000);
  }
}
The Circuit:
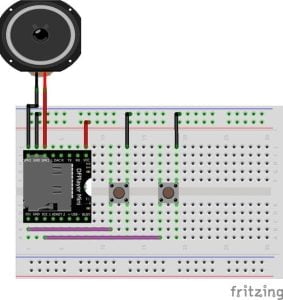
Keeping your previous build, I need you to assemble your components the exact same way as in the image below, leave the MP3 module connections connected, just add these new buttons as they are below.

Using three push buttons connected to 5v we can take a digital reading which will read a constant 1 until the button is pressed which then pulls the current down to ground and we will read a 0. when we read a 0 our command will be executed.
Upload the Code:
Once you circuit is built and the code is uploaded, you should have some functionality to your MP3 player. Here is how to control the player:
- Middle button is Play/Pause.
- Left button is previous song.
- Right button is next song.
Controlling the Volume on the MP3 Module
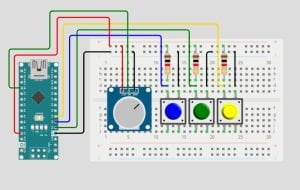
Now we are going to add a potentiometer, to adjust the volume. Leave all previous connections from last example, we are just adding the potentiometer and three jumpers.
The Code:
Study the code below, it’s the same as the previous example except we have added the variables for the potentiometer, and the map function to map our potentiometer to the volume control. Analog read, reads 0-1023, the volume control is 0-30 so we use map to make 1023, 30, but in this case when I read the pot pin, it would only reach 29 so I mapped it to 31 and made the condition anything greater than 30 is 30.
#include "Arduino.h"
#include "SoftwareSerial.h"
#include "DFRobotDFPlayerMini.h"

SoftwareSerial mySoftwareSerial(10,11);
DFRobotDFPlayerMini myDFPlayer;
int vol=A0;
int volVal;
int newVol;
int playBut=2;
int playVal;
int playState=0;
int nxtBut=4;
int nxtVal;
int rewBut=3;
int rewVal;

void setup() {
  Serial.begin(9600);
  pinMode(playBut,INPUT);
  digitalWrite(playBut,LOW);
  pinMode(nxtBut,INPUT);
  digitalWrite(nxtBut,LOW);
  pinMode(rewBut,INPUT);
  digitalWrite(rewBut,LOW);
  mySoftwareSerial.begin(9600);
  myDFPlayer.begin(mySoftwareSerial);
}

void loop() {
  Serial.print("PlayState = ");
  Serial.println(playState);
  volVal=analogRead(vol);
  newVol=map(volVal,0,1023,0,31);
  if(newVol>=30){
    newVol=30;
  }
  myDFPlayer.volume(newVol);
  Serial.println(newVol);
  playVal=digitalRead(playBut);
  Serial.println(playVal);
  if(playVal==0){
    if(playState==0){
      Serial.println("Play");
      myDFPlayer.enableLoopAll();
      delay(1000);
      playState=1;
    }
    else if(playState==1){
       Serial.println("Pause");
       myDFPlayer.pause();
       delay(1000);
       playState=2;
    }
    else if(playState==2){
      Serial.println("Play");
      myDFPlayer.start();
      delay(1000);
      playState=1;
    }
  }
  nxtVal=digitalRead(nxtBut);
  Serial.println(nxtVal);
  if(nxtVal==0){
    Serial.println("Next");
    myDFPlayer.next();
    delay(1000);
  }
  rewVal=digitalRead(rewBut);
  Serial.println(rewVal);
  if(rewVal==0){
    Serial.println("Rewind");
    myDFPlayer.previous();
    delay(1000);
  }
}
The Circuit:
Connect the potentiometer the exact same way as in the image below.
Upload the Code:
Once the circuit is built and the code uploaded to the Arduino, you should have control over the volume using the potentiometer.
Conclusion
In this exciting evolution of our DFPlayer project, we’ve taken control to a whole new level. By integrating tactile switches for play, pause, previous track, and next track, as well as a potentiometer for volume adjustment, we’ve empowered the user with complete command over their audio experience. Whether you’re building a music player, a sound effects generator, or anything in between, these enhancements bring interactivity and customization to the forefront. As your project now dances to your tune, remember that innovation knows no bounds. So, keep pressing those buttons and turning that dial, and let your imagination continue to shape the harmony of your creations.
Happy Tinkering!
Recommendations:
The Elegoo Super Starter Kit
If you don’t already own any Arduino hardware, we highly recommend this kit as it has everything you need to start programming with Arduino. You can find out more about this kit, including a list of its components here: Elegoo Super Starter Kit
You can find this kit on Amazon here: Elegoo Super Starter Kit
The 0.96-inch Mini-OLED Display
We highly recommend this mini-OLED bundle of five 0.96-inch OLED displays. We have bought these before and they all worked perfectly. You can read more about the mini-OLED here: Mini-OLED
You can find this bundle on Amazon here: OLED Displays
Elegoo Nano (Arduino Compatible)
We have bought these Nano boards many times and can highly recommend them. There are three Nano boards in this pack making them a total bargain for everyone.
You can find this pack on Amazon here: Arduino Nano