

Jingle All the Way!
Tis the season to be jolly, and what better way to spread holiday cheer than with our Arduino Christmas Project? Imagine a world where your home itself becomes a cheerful, musical host, greeting friends and family with the sweet sound of jingle bells as they step onto your doorstep or wander through your holiday-decorated halls.
In this enchanting Arduino project, we’ve combined the magic of Christmas and the power of technology to create an unforgettable experience for your loved ones. Our “Jingle Bell Greeting” uses a PIR sensor, Arduino, and a buzzer to turn your space into a winter wonderland filled with the spirit of the season.
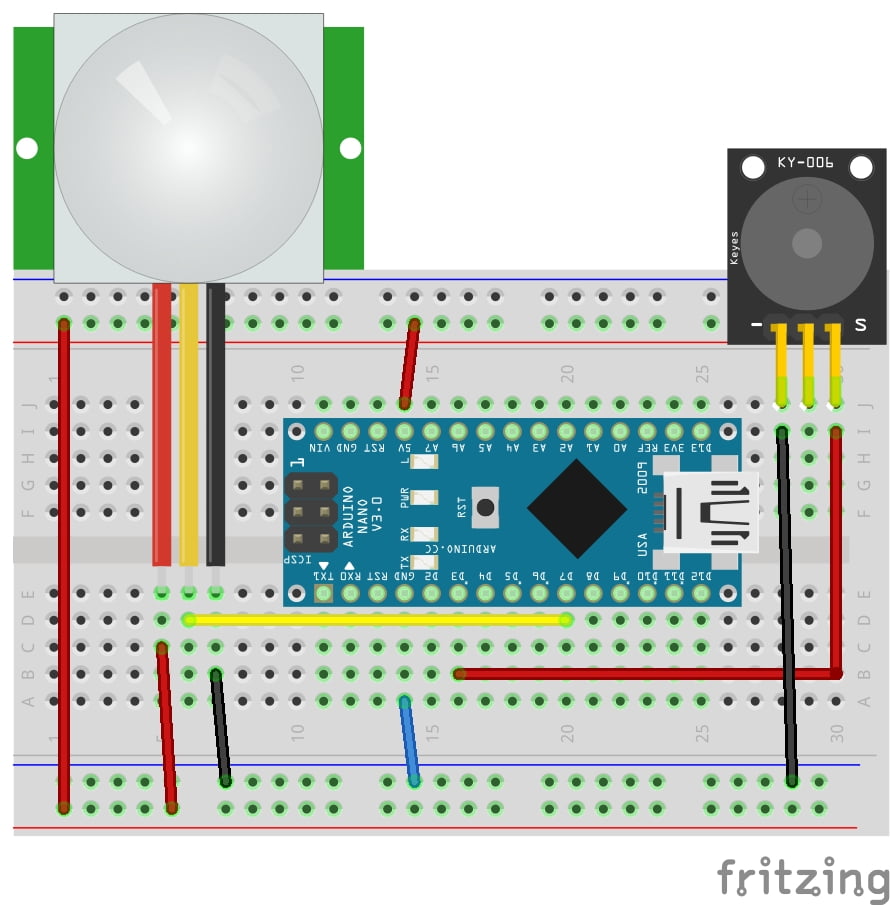
Components for this Project:
- Arduino
- PIR Sensor Module
- Buzzer
The Code:
/*
  Arduino Christmas Song

  Based on a project and code  by Dipto Pratyaksa

  Modified for Christmas 2023 by Meganano,  on Dec 15, 2023.
*/
#include "pitches.h"

#define melodyPin 3
#define pirPin 7
int pirVal;

// Jingle Bells
int melody[] = {
  NOTE_E5, NOTE_E5, NOTE_E5,
  NOTE_E5, NOTE_E5, NOTE_E5,
  NOTE_E5, NOTE_G5, NOTE_C5, NOTE_D5,
  NOTE_E5,
  NOTE_F5, NOTE_F5, NOTE_F5, NOTE_F5,
  NOTE_F5, NOTE_E5, NOTE_E5, NOTE_E5, NOTE_E5,
  NOTE_E5, NOTE_D5, NOTE_D5, NOTE_E5,
  NOTE_D5, NOTE_G5
};

int tempo[]  = {
  8, 8, 4,
  8, 8, 4,
  8, 8, 8, 8,
  2,
  8, 8, 8, 8,
  8,  8, 8, 16, 16,
  8, 8, 8, 8,
  4, 4
};

void setup(void) {
  Serial.begin(9600);
  pinMode(melodyPin, OUTPUT); // Buzzer
  pinMode(pirPin, INPUT);    // Sensor Pin
}

void sing() {
  // iterate over the  notes of the melody:
  Serial.println(" 'Jingle  Bells'");
  int size = sizeof(melody) / sizeof(int);
  for (int thisNote  = 0; thisNote < size; thisNote++) {
    int noteDuration = 1000 / tempo[thisNote];
    buzz(melodyPin, melody[thisNote], noteDuration);
    int pauseBetweenNotes = noteDuration * 1.30;
    delay(pauseBetweenNotes);
    // stop the tone playing:
    buzz(melodyPin, 0, noteDuration);
  }
}

void buzz(int targetPin, long frequency, long length) {
  long delayValue = 1000000 / frequency / 2; // calculate  the delay value between transitions
  long numCycles = frequency * length / 1000; // calculate the  number of cycles for proper timing
  for (long i = 0; i < numCycles; i++) { // for the calculated  length of time...
    digitalWrite(targetPin, HIGH); // write the buzzer pin  high to push out the diaphram
    delayMicroseconds(delayValue); // wait for  the calculated delay value
    digitalWrite(targetPin, LOW); // write the buzzer  pin low to pull back the diaphram
    delayMicroseconds(delayValue); // wait  again or the calculated delay value
  }
}

void  loop() {
  pirVal=digitalRead(pirPin);
  Serial.print("PIR Reading: ");
  Serial.println(pirVal);
  if (pirVal == 1){
    sing();
  }
}
The Circuit:
Upload the Code:
Once your circuit is built, go ahead and upload the code. After the code finishes uploading, wave your hand in front of the PIR sensor and Jingle Bells should start playing.
Conclusion
As our “Jingle All the Way” Project comes to a close, we hope you’re now equipped with the tools to bring joy, wonder, and the spirit of Christmas into your home. This project has showcased the enchanting blend of technology and tradition, where the sound of jingle bells and the warmth of the season merge seamlessly.
In your hands, you hold not just wires and components, but the power to create lasting memories. Every time a friend or family member hears those familiar jingles, they’ll be reminded of the magical welcome they received at your doorstep or the cozy ambiance of your festively adorned home.
Merry Christmas Folks!
Recommendations:
The Elegoo Super Starter Kit
If you don’t already own any Arduino hardware, we highly recommend this kit as it has everything you need to start programming with Arduino. You can find out more about this kit, including a list of its components here: Elegoo Super Starter Kit
You can find this kit on Amazon here: Elegoo Super Starter Kit
The 0.96-inch Mini-OLED Display
We highly recommend this mini-OLED bundle of five 0.96-inch OLED displays. We have bought these before and they all worked perfectly. You can read more about the mini-OLED here: Mini-OLED
You can find this bundle on Amazon here: OLED Displays
Elegoo Nano (Arduino Compatible)
We have bought these Nano boards many times and can highly recommend them. There are three Nano boards in this pack making them a total bargain for everyone.
You can find this pack on Amazon here: Arduino Nano
ESP8266 D1-Mini
D1-Mini is an Arduino compatible Wi-Fi board based on an ESP-8266-12F. This WLAN board has 9 digital I/O pins.
You can find this board on Amazon here: D1-Mini
