

Welcome to the World of Sensors and Modules with Arduino!
The Tap Sensor Module otherwise known as a Knock Sensor or Shock Sensor, is an intuitive and responsive tool, transforming physical touch into actionable commands. These sensors detect taps or touches, offering a seamless interface for user interaction in various electronic applications. In this sensors and modules guide, we’ll explore the tap sensors working principle, key features, applications, and how to integrate it with your Arduino projects.
If you’re new to Arduino, why not take a look at our Getting Started with Arduino guides. These guides are designed for beginners to learn the fundamental basics of Arduino programming.
How the Tap Sensor Works
Tap Sensor Module utilize capacitive or piezoelectric principles to detect changes in capacitance or vibrations when touched. These changes trigger a response, signaling the occurrence of a touch event.
Features and Specifications:
- Sensitivity: Detects gentle taps or vibrations
- Response Time: Swift response to touch events
- Output: Provides a digital signal upon detecting a tap
- Operating Voltage: 5V
- Size: 24.5mm x 15.5mm
- Compatibility: This sensor is also compatible with other devices like the Raspberry Pi, ESP32, and ESP8266 etc…
Necessary Equipment:
- Arduino board (e.g., Arduino Uno)
- Tap Module
- Jumper wires
- Breadboard (optional)
Pin Configuration
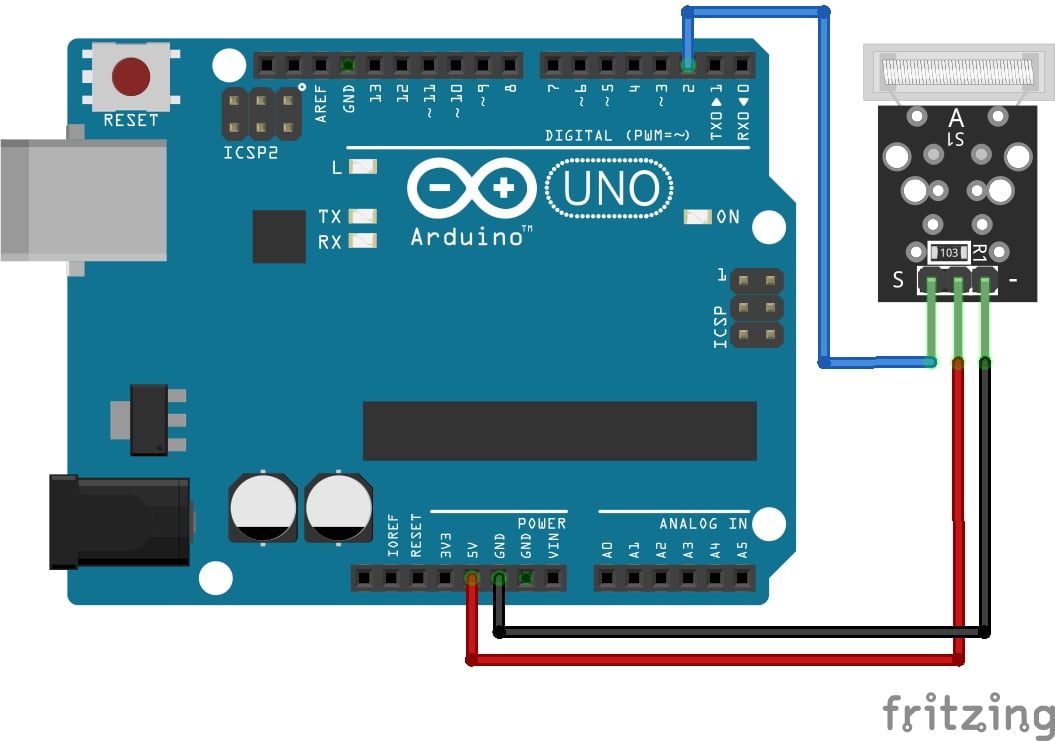
Connecting the Tap Sensor Module to an Arduino is fairly simple. The connections are as follows:
- VCC on the Tap Module (typically middle pin) to 5V on the Arduino.
- GND on the Tap Module (typically right pin) to GND on the Arduino.
- OUT on the Tap Module (typically left pin) to Digital Pin 2 on the Arduino.
Pin labels may vary.

KY-031 Knock Sensor Module Fritzing Part is created by arduinomodules.info and published under Creative Commons Attribution-ShareAlike 4.0 International license
Arduino Code Example
#define tapSensorPin 2 // Change this to the pin you're using

volatile bool tapped = false; // Flag to indicate tap detection

void setup() {
  pinMode(tapSensorPin, INPUT_PULLUP); // Set the sensor pin as input with internal pull-up resistor
  attachInterrupt(digitalPinToInterrupt(tapSensorPin), tapDetected, RISING); // Attach interrupt to the pin for rising edge detection
  Serial.begin(9600); // Initialize serial communication
}

void loop() {
  if (tapped) {
    Serial.println("Tap detected!");
    tapped = false; // Reset the tap flag
    // Add actions or responses when a tap is detected
  }
  delay(100); // Delay for stability and to prevent rapid consecutive detections
}

void tapDetected() {
  tapped = true; // Set the tap flag when a rising edge is detected
}
Breaking Down the Code
Setup Function
#define tapSensorPin 2: Defines a constant namedtapSensorPinand sets it to 2, representing the digital pin to which the Tap Sensor is connected. Modify this according to your setup.pinMode(tapSensorPin, INPUT_PULLUP);: Sets the specified pin (tapSensorPin) as an input pin with an internal pull-up resistor, enabling the detection of changes on the pin.attachInterrupt(digitalPinToInterrupt(tapSensorPin), tapDetected, RISING);: Attaches an interrupt to the specified pin (tapSensorPin) for rising edge detection. When a rising edge (change from LOW to HIGH) is detected on this pin, it triggers thetapDetected()function.
Loop Function
if (tapped) { ... }: Checks if thetappedflag is set, indicating a tap detection. If true, it prints “Tap detected!” to the serial monitor and performs any specified actions. Thetappedflag is then reset.delay(100);: Adds a delay of 100 milliseconds to stabilize readings and prevent rapid consecutive detections.
Interrupt Function
void tapDetected(): This function serves as the Interrupt Service Routine (ISR). When a rising edge is detected on the tap sensor pin, it sets thetappedflag totrue, indicating a tap has been detected.
This code continuously monitors the Tap Sensor pin for taps and prints a message to the serial monitor when a tap is detected. Modify and expand upon this code to include specific responses or actions triggered by a tap event, such as controlling devices or interacting with a user interface. Adjust the delay and response according to your project’s requirements.
Applications and Usage Scenarios
The tap sensor module can be used in various applications where touch-based interaction or sensing is required. Here are some common applications and usage scenarios for the tap sensor module:
Home Automation
Integrate tap sensor modules into home automation systems to control lights, fans, or appliances with a simple touch. For example, tapping a sensor next to the door could turn on the lights in a room.
Interactive Installations
Use tap sensor modules in interactive art installations or exhibits to trigger audiovisual effects, change lighting patterns, or activate displays in response to user interaction.
Alarm Systems
Incorporate tap sensor modules into security systems to detect unauthorized access or tampering. Tapping on a designated area could trigger an alarm or alert the user.
Wearable Technology
Implement tap sensor modules in wearable devices such as smartwatches or fitness trackers to enable users to navigate menus, switch between modes, or initiate actions with a tap on the device.
Gesture Control
Combine tap sensor modules with other sensors like accelerometers or gyroscopes to create gesture-controlled interfaces. Tapping or tapping gestures could be used to perform actions such as skipping songs, answering calls, or scrolling through content.
Game Controllers
Integrate tap sensor modules into custom game controllers for unique gameplay experiences. Tapping or tapping sequences could correspond to in-game actions or commands.
Access Control
Use tap sensor modules as part of access control systems to grant entry with a touch or tap. For example, tapping a sensor could unlock a door or activate a keypad for PIN entry.
Industrial Automation
Employ tap sensor modules in industrial environments for tasks such as equipment control, process monitoring, or safety systems. Tapping on a sensor could initiate or halt a specific operation or trigger an alarm in case of anomalies.
Conclusion
In this sensors and modules guide, we explained the functionality of the Tap Sensor, exploring its working principles, and demonstrating how to interface it with an Arduino for practical applications. By the end, you should now have a solid grasp of how these sensors translate physical touch into actionable signals, paving the way for interactive projects and user-friendly interfaces.
Discover the endless possibilities for Arduino projects with more of our Sensors and Modules guides.
