


Welcome to the World of Sensors and Modules with Arduino!
The HC-SR501 Passive Infrared Sensor (PIR) is widely used in electronics and automation for detecting motion. These sensors play a crucial role in various applications, ranging from security systems to energy-efficient lighting. In this sensors and modules guide, we’ll explore its working principle, key features, applications, and how it can enhance your Arduino projects.
If you’re new to Arduino, why not take a look at our Getting Started with Arduino guides. These guides are designed for beginners to learn the fundamental basics of Arduino programming.
How the Passive Infrared Sensor Works
The PIR sensor detects changes in infrared radiation emitted by objects. Every object with a temperature above absolute zero emits infrared radiation. PIR sensors consist of pyroelectric materials that generate a voltage when exposed to infrared radiation. When a warm object moves across the sensor’s field of view, it causes a change in the detected infrared radiation pattern. The PIR sensor processes the change in radiation and produces an electrical signal, indicating motion detection.
Features and Specifications:
- Operating Voltage: 3.3V ~ 5V
- Power Consumption: 65 mA
- Sensing Range: Up to 7m
- Output: Digital Signal
- Fresnel Lens: The use of a Fresnel lens allows PIR sensors to have a broader field of view and increases their efficiency in detecting motion across a specific area.
- Sensitivity Adjustment: The PIR sensor comes with sensitivity adjustment, enabling users to fine-tune the sensor according to specific requirements.
- Time Delay: PIR sensor includes a time delay setting, determining how long the output signal remains high after detecting motion. This feature is crucial for preventing false triggers.
- Compatibility: This sensor is also compatible with other devices like the Raspberry Pi, ESP32, and ESP8266 etc…
Necessary Equipment:
- Arduino (e.g., Arduino Uno)
- PIR Sensor Module
- Jumper wires
- Breadboard (optional)
Pin Configuration
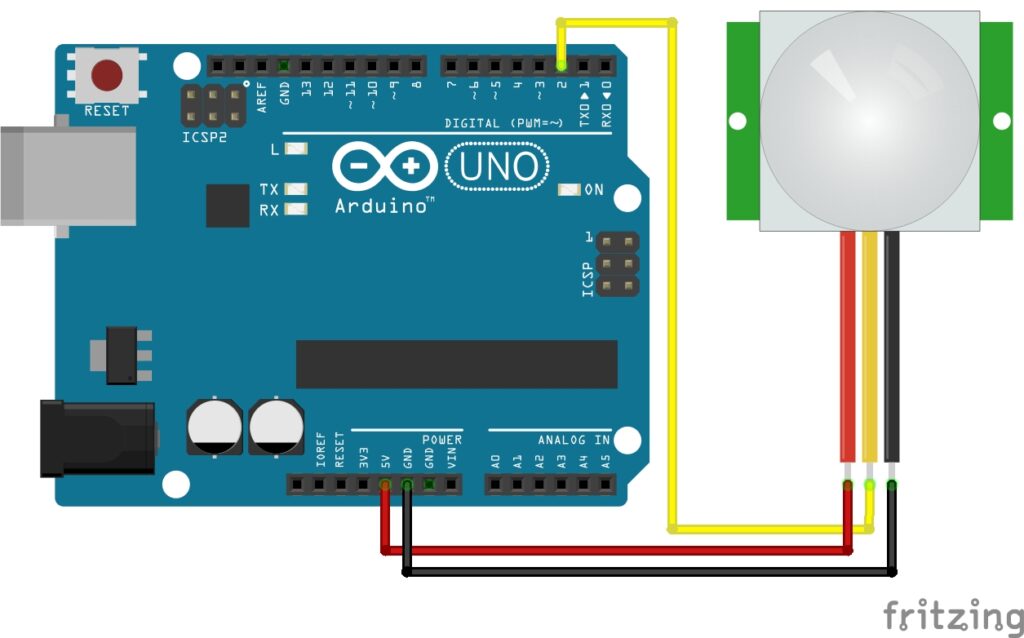
The connections for the Passive Infrared sensor module are fairly simple. The connections are as follows:
- VCC on the Passive Infrared Sensor to 5V on the Arduino.
- OUT on the Passive Infrared Sensor to Digital pin 2 on the Arduino.
- GND on the Passive Infrared Sensor to GND on the Arduino.
Pin labels may vary.
Arduino Code Example
// Define the pin to which the PIR sensor is connected
const int pirSensorPin = 2;  // Change this to the actual pin you're using

void setup() {
  // Set the PIR sensor pin as input
  pinMode(pirSensorPin, INPUT);

  // Initialize the Serial communication for debugging
  Serial.begin(9600);
}

void loop() {
  // Read the PIR sensor value
  int motionValue = digitalRead(pirSensorPin);

  // Check if motion is detected
  if (motionValue == HIGH) {
    Serial.println("Motion detected!");
  }else{
    Serial.println("No Motion Detected!");
  }
  // Add a delay to avoid rapid triggering
  delay(500);  // Adjust the delay time according to your requirements
}
Breaking Down the Code
Constant Declaration
const int pirSensorPin = 2;: Defines a constant variable representing the pin to which the PIR sensor is connected. This pin will be used to read data from the sensor.
Setup Function
void setup() {: Thesetupfunction is executed once when the Arduino starts.pinMode(pirSensorPin, INPUT);: Configures the pin connected to the PIR sensor as an input, indicating that it will be used to read data.Serial.begin(9600);: Initializes serial communication at a baud rate of 9600, enabling communication with the Serial Monitor for debugging purposes.
Loop Function
void loop() {: Theloopfunction is executed repeatedly after thesetupfunction.int motionValue = digitalRead(pirSensorPin);: Reads the digital value (HIGH or LOW) from the PIR sensor pin and stores it in the variablemotionValue.if (motionValue == HIGH) { ... } else { ... }: Checks if motion is detected based on the value read from the PIR sensor.Serial.println("Motion detected!");: Prints a message to the Serial Monitor if motion is detected.Serial.println("No Motion Detected!");: Prints a message to the Serial Monitor if no motion is detected.delay(500);: Introduces a delay of 500 milliseconds to avoid rapid triggering and to allow time for the PIR sensor to reset before checking for motion again.
Applications and Usage Scenarios
Security Systems
PIR sensors are commonly used in burglar alarms and security systems to detect unauthorized movement in homes, offices, or other secure areas.
Lighting Control
PIR sensors can be integrated into lighting systems to automatically turn on lights when motion is detected and turn them off when the area is vacant, contributing to energy conservation.
Home Automation
PIR sensors play a role in home automation by triggering actions such as turning on fans, adjusting thermostat settings, or activating surveillance cameras.
Robotics
In robotics, PIR sensors are used to provide a basic level of awareness by detecting nearby movement.
Smart Lighting System
Create an Arduino-based smart lighting system for rooms that automatically turns on lights when motion is detected and turns them off when the room is vacant.
Intruder Alert System
Develop a simple security system using PIR sensors to detect intruders and trigger an alarm or notification.
Energy-Efficient HVAC Control
Integrate PIR sensors into a home automation project to control heating, ventilation, and air conditioning (HVAC) systems based on occupancy.
Conclusion
In this sensors and modules guide, we explained the functionality of the Passive Infrared Sensor, exploring its working principles, and demonstrating how to interface it with an Arduino for practical applications. The Passive Infrared Sensor provides a reliable and cost-effective solution for motion detection in various electronic projects. Whether enhancing security, conserving energy, or adding automation to daily life, PIR sensors are versatile tools for Arduino enthusiasts and electronic hobbyists alike.
Discover the endless possibilities for Arduino projects with more of our Sensors and Modules guides.


