


Mastering FPS, Resolution, Shapes, and Text Enhancement
Welcome to the exciting world of visual enchantment with OpenCV! In this comprehensive guide, we delve into the pixel-perfect world, unraveling the intricacies of FPS, pixel resolution, adding shapes, and text, then pixel manipulation. Whether you’re a coding novice eager to explore or a seasoned developer seeking pixel precision, this tutorial is your gateway to mastering OpenCV essentials. Join us as we decode the magic behind crafting dynamic frames, where each pixel tells a story of precision and creativity. Let’s embark on this journey to elevate your visual creations with the power of OpenCV.
What’s Covered:
- Explaining Pixel Resolution.
- FPS vs Resolution.
- How to add FPS to frames.
- Adding Shapes and Text to Frames.
- Coverting Color Pixels to Grayscale.
- Manipulating pixels for fun.
Pixel Resolution Explained
Pixel resolution refers to the number of pixels that make up an image or display. It is usually expressed as the total number of pixels in the horizontal and vertical dimensions of the image. The pixel resolution is commonly given in terms of width x height. For example, an image with a resolution of 1920×1080 has a width of 1920 pixels and a height of 1080 pixels.
In the context of displays and digital images, resolution is a measure of the clarity and detail that can be seen. Higher resolutions generally mean more pixels, which can result in sharper and more detailed images. Here are some common resolutions:
SD (Standard Definition):
- 480p: 640×480 pixels
HD (High Definition):
- 720p: 1280×720 pixels
- 1080p: 1920×1080 pixels
Full HD (FHD):
- 1920×1080 pixels
2K (QHD – Quad High Definition):
- 2560×1440 pixels
4K (Ultra High Definition – UHD):
- 3840×2160 pixels
8K:
- 7680×4320 pixels
The higher the resolution, the more pixels there are, resulting in a more detailed image. However, it’s important to note that higher resolutions also require more processing power and memory, as mentioned in the previous response about the impact of resolution on frame rate in computer vision and image processing applications.
FPS Vs Resolution
The relationship between resolution and frame rate (FPS) in computer vision and image processing is often influenced by the computational demands of handling larger images. As the resolution of an image increases, the number of pixels that need to be processed also increases. This, in turn, requires more computational power and time.
Here are a few reasons why greater resolutions can result in lower FPS:
Increased Processing Load:
Higher-resolution images contain more details and pixels, which require more computational resources to process. Operations like filtering, feature detection, and image manipulation become more computationally expensive.
Memory Bandwidth:
Larger images occupy more memory, and accessing this memory for processing becomes a bottleneck. High-resolution images may strain the memory bandwidth, slowing down the overall processing speed.
Hardware Limitations:
The capabilities of the hardware, such as the processing unit (CPU/GPU) and memory, play a crucial role. If the hardware is not optimized for handling larger resolutions efficiently, it can lead to a decrease in frame rate.
Data Transfer:
In applications involving real-time video processing, there might be a need to transfer data between different components or devices. Higher resolution means more data needs to be transferred, and this can introduce delays.
Algorithm Complexity:
Some image processing algorithms have a complexity that scales with the image resolution. For example, object detection algorithms may need to search through a larger number of regions of interest in higher-resolution images.
Mitigating Impact:
To mitigate the impact of resolution on FPS, developers often optimize their code, use more powerful hardware, or implement techniques such as down sampling (reducing the image resolution) for processing and then upscaling for display if needed. It’s a balance between achieving the desired visual quality and maintaining a satisfactory frame rate, especially in real-time applications.
How to add FPS to Frames
We can set our resolution to 640×480 pixels to achieve a solid 15fps for now. Open Visual Studio and copy and paste the code below to a new file.
Python Code:
You should be familiar with most of the code except the four code blocks I have highlighted with comments (#) this will be explained shortly.
import cv2
import time

width=640
height=480

camera=cv2.VideoCapture(0)
camera.set(cv2.CAP_PROP_FRAME_WIDTH,width)
camera.set(cv2.CAP_PROP_FRAME_HEIGHT,height)

#FPS Settings
fpsFont=cv2.FONT_HERSHEY_SIMPLEX
fpsPOS=(480,30)
fpsSize=1
fpsBold=2
fpsColor=(0,0,0)

#Frame Time
newFrameTime=0
prevFrameTime=0

while True:
  ret,frame=camera.read()

  #Calculating FPS
  newFrameTime=time.time()
  fps=1/(newFrameTime-prevFrameTime)
  prevFrameTime=newFrameTime
  fps=int(fps)

  #Displaying FPS
  cv2.putText(frame,str(fps)+' FPS',fpsPOS,fpsFont,fpsSize,fpsColor,fpsBold)

  cv2.imshow('Camera Stream',frame)
  if cv2.waitKey(1)==ord('q'):
    break

camera.release()
cv2.destroyAllWindows()
#FPS Settings
I could have left the settings within the cv2.putText command further down, but it’s easier to make changes later, by declaring them in variables at the top. fpsFont is the font we have chosen for the text. fpsPOS is the position on the screen where we will display our frame rate. fpsSize is the selected size for our text. fpsBold is for the thickness of our text. fpsColor is for the color of our text.
#Frame Time
We have imprted the time library at the top so we can record the time at desired points of the process. We have created 2 variables to store those times.
newFrameTime will hold the time the new frame was captured.
prevFrameTime will hold the time of when the previous frame was captured.
#Calculating FPS
Here is where we do our calculations to figure out the frames per second, its not complicated to work out the math, but if you are curious to see if actually is working correctly, you can simply add a time delay below the last line of the block; time.sleep(.5) will show you 1fps.
#Displaying FPS
This is the command to tell OpenCV to add our data to the captured frame, I will be showing you some more examples of this next.
Run the code from your IDE, and please report back your FPS times in the comment section I’d be interested to know what you’re achieving at this point.
Adding Shapes and Text to Frames
We can add shapes and write text to each frame easily. When we run our object detection programs, we will need to highlight the detected object, we will be using rectangles or squares a lot with our detection projects. For now, here are some random shapes and text, I need you to experiment with these, so you get used to positioning the shapes where you want them to be displayed.
Python Code:
Open a new file in Visual Studio, then copy and paste the code below. Run the code to see what has been displayed. Once you have viewed the results hit ‘q’ to close the window.
import cv2

width=640
height=480

textFont=cv2.FONT_HERSHEY_DUPLEX

camera=cv2.VideoCapture(0)
camera.set(cv2.CAP_PROP_FRAME_WIDTH,width)
camera.set(cv2.CAP_PROP_FRAME_HEIGHT,height)

while True:
  ret, frame=camera.read()
  frame=cv2.putText(frame,'Random Text',(300,300),textFont,1.5,(255,255,255),6)
  frame=cv2.line(frame, (300,320),(630,320),(255,255,255),4) #(start),(finish),(color),(thickness)
  frame=cv2.arrowedLine(frame,(20,20),(290,260),(0,255,255),2)

  frame=cv2.rectangle(frame,(340,100),(400,170),(100,255,100),4) #(top left corner)(bottom right corner)(colour)(thickness)
  frame=cv2.circle(frame,(500,140),40,(0,0,100),-1)

  cv2.imshow('Drawing Shapes',frame)
  if cv2.waitKey(1)==ord('q'):
    break

camera.release()
cv2.destroyAllWindows()
Experiment
Now is a good time to take a brief pause and go experiment with your own shaped creations. Just copy the code to a new file and play around with it, have fun. You need to get used to the shapes, positions, colors etc…
Converting Color Pixels to Grayscale
When doing intense recognition processes, it’s important to convert the data to grayscale. As we mentioned before, the higher the Pixel resolution is, the slower our framerate will be, when we run our detection models the process is dramatically slowed down when trying to process RGB (red, green, and blue) colors. OpenCV actually uses the order BGR rather than RGB. We convert BGR to grayscale to increase the speed of our program.
Python Code:
Open a new file in Visual Studio then copy and paste the code below.
The code is very simple with only one new command in there: frame=cv2.cvtColor()
Run the code and you will see all red, green, and blue pixels have been converted to gray.
import cv2

width=640
height=480

camera=cv2.VideoCapture(0)
camera.set(cv2.CAP_PROP_FRAME_WIDTH,width)
camera.set(cv2.CAP_PROP_FRAME_HEIGHT,height)

while True:
  ret,frame=camera.read()

  #Convert Blue, Green, Red to Gray
  frame=cv2.cvtColor(frame,cv2.COLOR_BGR2GRAY)

  cv2.imshow('Camera Stream',frame)
  if cv2.waitKey(1)==ord('q'):
    break

camera.release()
cv2.destroyAllWindows()
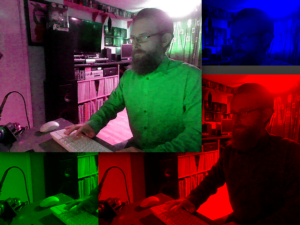
Manipulating Pixels for Fun
Now we are going to go a little crazy and experiment with colors. We are going to change the output of the BGR order to manipulate the pixels in the final frame. We will also include three other windows each with its own color mask.
Take note of blue shirt (it is blue honest!), it now looks green. You can test this yourself by holding up some colored items in front of the camera, you will see the colors are not what they are supposed to be.
This is just a fun experiment and will not be needed in future projects, the important part to remember is converting the BRG color pixels to grayscale for processing our frames when using detection models.
Python Code:
Open a new file in Visual Studio then copy and paste the code below. You will notice at the top I have imported the NumPy library, this is so we can create an array to store each pixel. If you are unfamiliar with NumPy you can read our NumPy Basics Guide
Run the code once you’re ready.
import cv2
import numpy as np

width=640
height=480

camera=cv2.VideoCapture(0)
camera.set(cv2.CAP_PROP_FRAME_WIDTH,width)
camera.set(cv2.CAP_PROP_FRAME_HEIGHT,height)

blank=np.zeros([480,640,1],np.uint8)

while True:
  ret, frame=camera.read()

  b,g,r=cv2.split(frame)
  blue=cv2.merge((b,blank,blank))
  green=cv2.merge((blank,g,blank))
  red=cv2.merge((blank,blank,r))

  mess=cv2.merge((g,b,r))

  cv2.imshow('Color Mess',mess)
  cv2.moveWindow('Color Mess',0,0)

  cv2.imshow('green',green)
  cv2.moveWindow('green',0,300)

  cv2.imshow('blue',blue)
  cv2.moveWindow('blue',380,0)

  cv2.imshow('red',red)
  cv2.moveWindow('red',380,300)

  if cv2.waitKey(1)==ord('q'):
    break

camera.release()
cv2.destroyAllWindows()
Conclusion
Congratulations! You’ve successfully delved into this realm of OpenCV and learned how to enhance frames with shapes, text, and FPS details. Armed with this knowledge, you have the tools to create visually appealing and informative content in your image and video processing projects. Remember, computer vision is a vast field, and OpenCV is your gateway to endless possibilities. Keep experimenting, exploring, and pushing the boundaries of what’s possible with this powerful library.
The journey doesn’t end here, in our next OpenCV for Beginners guide we will be learning how to Resize Windows or Frames
That’s All Folks!
You can find all of our OpenCV guides here: OpenCV for Beginners


I read this post completely about the difference of most
recent and previous technologies, it’s amazing article.