
Welcome to the World of Sensors and Modules with Arduino!
Laser technology has fascinated hobbyists and professionals alike for decades, offering a range of applications from simple pointers to advanced communication systems. The Laser Transmitter Module brings the power of lasers to your fingertips, allowing you to create mesmerizing displays, enhance security systems, or explore innovative communication methods.
If you’re new to Arduino, why not take a look at our Getting Started with Arduino guides. These guides are designed for beginners to learn the fundamental basics of Arduino programming.
How the Laser Transmitter Works
The Laser Transmitter Module operates on the principle of light amplification by stimulated emission of radiation (LASER). When powered, the module energizes a laser diode, causing it to emit coherent light in a specific direction. The laser diode is controlled by the Arduino through a digital pin. By setting the pin to HIGH, the laser is activated, emitting a laser beam. Setting the pin to LOW deactivates the laser.
Features and Specifications:
- Operating Voltage: 5V.
- Wavelength: 650nm
- Color: Red
- Size: 27mm x 15mm
- Type: Class 3B
- Compatibility: This module is also compatible with other devices like the Raspberry Pi, ESP32, and ESP8266 etc…
Necessary Equipment:
- Arduino (e.g., Arduino Uno)
- Laser Transmitter Module
- Jumper wires
- Breadboard (optional)
Pin Configuration
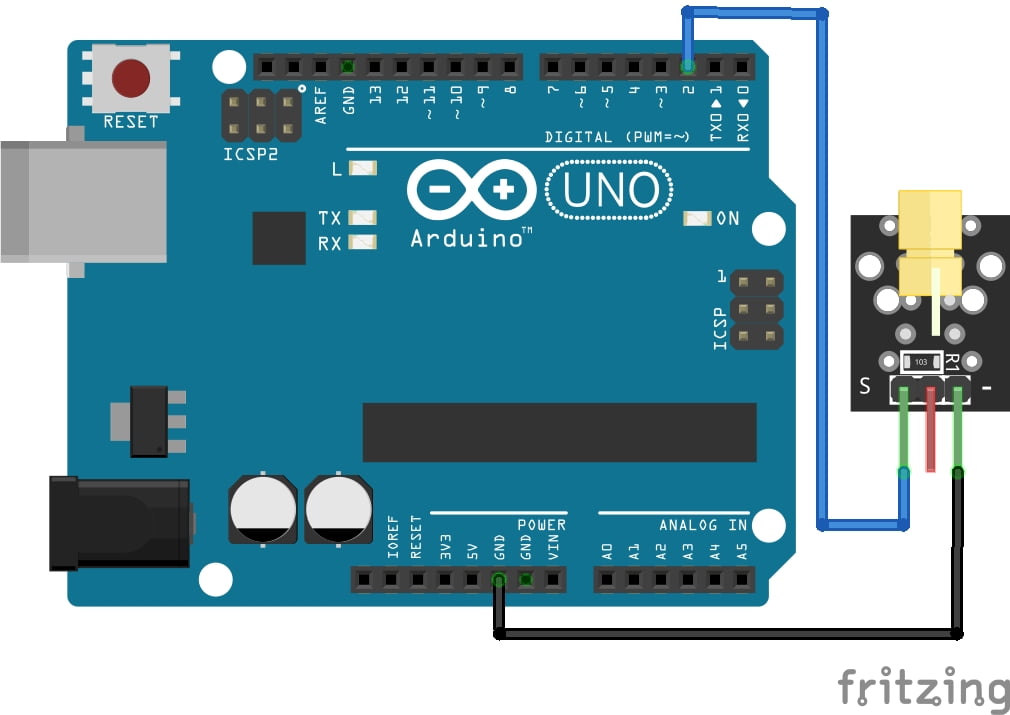
Connecting the Laser Transmitter Module to an Arduino is very simple. The connections are as follows:
- S (or left pin) of the Laser Transmitter Module to Digital pin 2 on the Arduino.
- – (or right pin) of the Laser Transmitter Module to GND on the Arduino.
Pin labels may vary.
KY-008 Laser Transmitter Module Fritzing Part is created by arduinomodules.info and published under Creative Commons Attribution-ShareAlike 4.0 International license
Arduino Code Example
// Define the pin to which the Laser Transmitter Module is connected
const int laserPin = 2;  // Connect the laser pin to this digital pin

void setup() {
  // Set the laser pin as output
  pinMode(laserPin, OUTPUT);
}

void loop() {
  // Turn on the laser
  digitalWrite(laserPin, HIGH);

  // Add a short delay to keep the laser on (adjust as needed)
  delay(1000);

  // Turn off the laser
  digitalWrite(laserPin, LOW);

  // Add a longer delay between laser pulses (adjust as needed)
  delay(2000);
}
Breaking Down the Code
Pin Declarations
- We define a constant integer variable
laserPinto specify the pin to which the Laser Transmitter Module is connected. In this example, it’s connected to digital pin 2.
Setup Function
- We set the
laserPinas an output usingpinMode(laserPin, OUTPUT). This configures the pin to send output signals to control the laser.
Loop Function
- We turn on the laser by setting the
laserPintoHIGHusingdigitalWrite(laserPin, HIGH). This sends a high signal to the laser pin, turning it on. - We add a short delay of 1000 milliseconds (1 second) to keep the laser on for a certain period. You can adjust this delay according to your requirement.
- We turn off the laser by setting the
laserPintoLOWusingdigitalWrite(laserPin, LOW). This sends a low signal to the laser pin, turning it off. - We add a longer delay of 2000 milliseconds (2 seconds) between laser pulses to allow for a distinct on-off pattern. You can adjust this delay as needed.
This code continuously cycles through turning the laser on and off in a loop. Adjust the delays according to your specific requirements for laser duration and interval. Make sure to connect the laser transmitter module to the correct pin specified in the code.
Applications and Usage Scenarios
Laser Pointers
The module can be used to create laser pointers for presentations, demonstrations, or entertainment purposes.
Laser Security Systems
It can be integrated into security systems to create laser tripwires or detection grids.
Laser-based Communication Systems
The laser beam can transmit data wirelessly over short distances.
Laser-based Distance Measurement
By detecting the reflection of the laser beam, distance measurement systems can be developed.
Conclusion
In this sensors and modules guide, we explained the functionality of the Laser Transmitter, exploring its working principles, and demonstrating how to interface it with an Arduino for practical applications. The Laser Transmitter Module offers a versatile and compact solution for generating laser beams in Arduino projects. By understanding its features, working principle, and applications, you can leverage its capabilities to enhance your projects and explore various creative possibilities.
Discover the endless possibilities for Arduino projects with more of our Sensors and Modules guides.

