Building a Basic Homemade Radio
Amidst the ever-advancing world of high-tech gadgets and wireless connectivity, there’s an undeniable charm in the simplicity of analog electronics. In a time when radios are typically hidden within our smartphones or smart speakers, we’re going to step back in time and rediscover the magic of building a basic homemade radio from scratch. With just a 4-pin crystal oscillator, an LM386 IC, and a humble transformer, we’re about to embark on a journey that harks back to the very roots of wireless communication.
Join us as we delve into the world of DIY radio construction, where every connection and component serve as a reminder of the ingenuity that once brought voices and music to life through the airwaves. I have wanted to learn how radio transmission happens for a long time.
As a hobbyist Dj I’ve had some contact with Pirate Radio, I have helped set-up location and build the websites, but never actually knew how the signals were transmitted.
About Radio
Guglielmo Marconi invented the radio in 1890 but the idea can be traced back as far as 1820 to a man called Hans Christian Ørsted, who’s work inspired André-Marie Ampère who then went on to inspire James Clerk Maxwell to develop his theory of electromagnetism, which predicted the existence of electromagnetic waves. Oliver Heaviside, later reformulated Maxwell’s equations into the equations that are known today as Maxwell’s equations. Neither Maxwell nor Heaviside transmitted or received a single radio wave, but their equations for electromagnetic fields established the principles for radio design and remain the standard for classical electromagnetism.
Radio Frequency
- AM Radio 535KHz – 1.7MHz
- FM Radio 88Mhz – 108MHz
- Shortwave Radio 5.9MHz – 26.1MHz
- Citizen Band 26.96MHz – 27.41MHz
- Television Stations – 54MHz – 88MHz (for channels 2-6)
- Television Stations 174MHz – 220MHz (for channels 7-13)
- Garage Doors and Alarm Systems 40MHz
- Older Cordless Phones 40MHz – 50MHz
- Modern Cordless Phones 900MHz
- Air Traffic Control Radar 960MHz – 1,215MHz
- Global Positioning Systems 1,227MHz – 1,575MHz
- Deep Space Radio 2290MHz -2300MHz
- Baby Monitors 49MHz
- RC Airplanes 72MHz
- RC Cars 75MHz
- Wildlife Tracking Collars 215MHz – 220MHz
- MIR Space Station 145MHz – 437MHz
- Cell Phones 824MHz – 849MHz
The Carrier
The Oscillator creates the carrier wave. To send information through the carrier we need to modulate the carrier.
Modulation = Information.
Modulation is measured in Space & Time. We will be using the AM Band because it’s the easiest to work with. AM = Amplitude Modulation.
Modulation
The carrier wave used by radio frequency (RF) transmissions doesn’t carry much information itself.
To include speech or data, another wave has to be superimposed on the carrier wave, thus changing the shape of the carrier wave.
The process of doing so is called modulation.
To transmit sound, the audio signal must first be converted into an electric signal, using a transducer.
After conversion, it is used to modulate a carrier signal.
Remember modulation is information.
To add actual information to the carrier we will need to use a transformer. The Transformer we are using 1000 Ohm to 8 Ohm.
Building a Basic Radio
Components
- 4-Pin Crystal Oscillator.
- LM386.
- Transformer.
- Power source (I used the Breadboard power supply module with a 9v battery).
- Antenna (I used a simple wire).
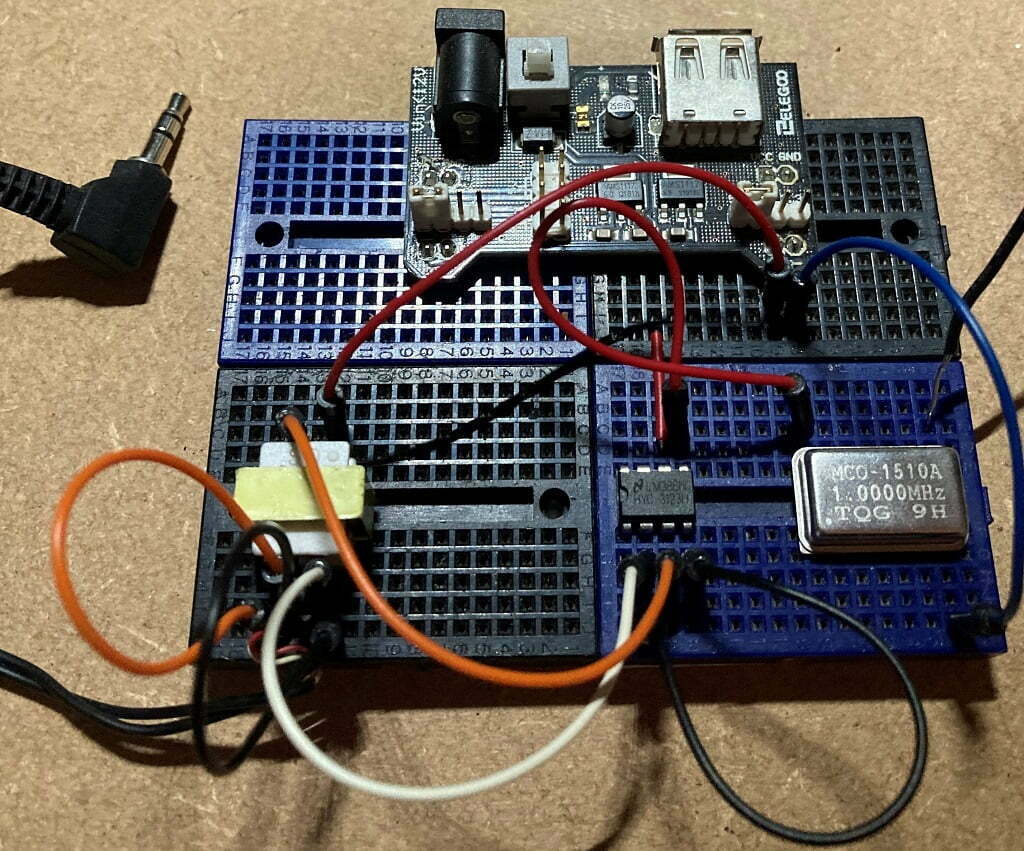
The 4-Pin Crystal Oscillator
The Pins start from the bottom left pin, Pin-1
- Pin-1 Not Used – Bottom Left Position (This pin should have a dot in the same corner)
- Pin-2 GND – Bottom Right Position
- pin-3 OUTPUT – Top Right Position
- Pin-4 VCC – Top Left Position
The OUTPUT pin connects to an Antenna.
The VCC connects to the power source and GND connects to ground.
That’s the basic carrier set up but so far it does nothing but occupy space.
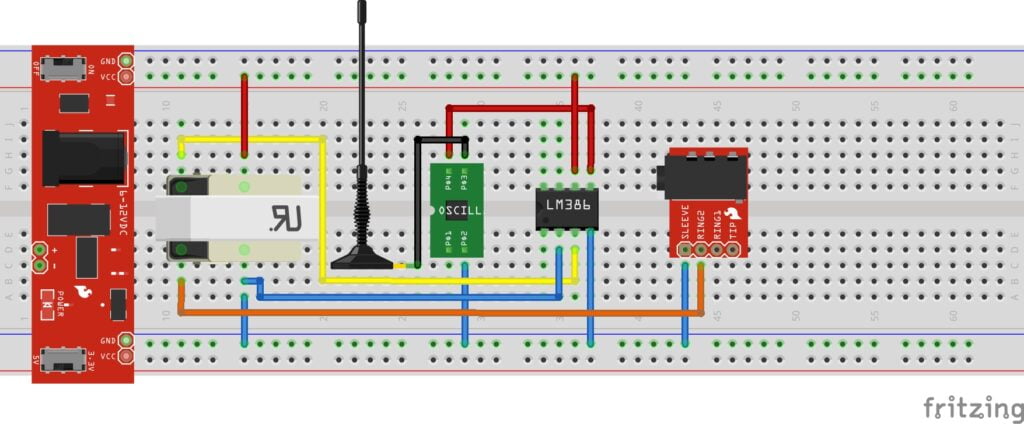
Transformer Connections
- Audio + top left pin.
- Audio – bottom left pin.
- OUTPUT top right pin.
- VCC bottom right pin.
Connect the audio pins to your Music player, connect OUTPUT to
Pin 4 on the Oscillator and connect your power supply to VCC on the transformer.
LM386 Connections
- pin1 Gain
- pin2 audio –
- pin3 audio +
- pin4 GND
- pin5 Output to pin4 (VCC) on oscillator
- pin6 VCC
- pin7 Not used
- pin8 Gain
Also need to use: 1000Mf cap down to GND off pin3 audio+ connection and a 10Uf cap in between pin6 and pin 5 then down to GND
The Circuit:
Conclusion
In my quest to resurrect the magic of homemade radios, we’ve journeyed from the bare essentials of a 4-pin crystal oscillator, an LM386 IC, and a modest transformer. Our achievement, though it may have reached a limited range, is a testament to the DIY spirit of exploration and creation. Building a functional radio from scratch is not only a reminder of the remarkable advances in technology but also a tribute to the pioneers who paved the way for modern wireless communication.
As we conclude this experiment, we do so with a greater appreciation for the intricate dance of components that make radios sing, and a sense of wonder for the possibilities that lie within the realm of amateur radio engineering. Whether you’re a seasoned electronics enthusiast or a newcomer to the world of DIY projects, remember that with each attempt, you’re getting one step closer to unlocking the full potential of your homemade radio. So, keep tinkering, keep experimenting, and who knows what extraordinary discoveries you’ll tune into next.
Happy Tinkering Folks!
More of our radio guides can be found here: Radio Guides
