


Welcome to the World of Sensors and Modules with Arduino!
This Digital Temperature Sensor plays a crucial role in projects where you need to detect changes in temperature rather than the actual temperature. If you need precise temperature measurements, a more accurate sensor like the DS18B20 Temperature Sensor might be a better choice. However, if your goal is to detect temperature changes or trends in a specific environment, the NTC thermistor-based sensor can still be a valuable tool. In this sensors and modules guide, we’ll explore the Digital Temperature Sensors working principle, key features, applications, and how it can enhance your Arduino projects.
If you’re new to Arduino, why not take a look at our Getting Started with Arduino guides. These guides are designed for beginners to learn the fundamental basics of Arduino programming.
How the Digital Temperature Sensor Works
As the temperature changes, the resistance of the NTC thermistor changes accordingly. This alters the voltage across the voltage divider circuit. The analog voltage across the NTC thermistor is read by the Arduino’s ADC pin. The Arduino converts the analog voltage into a digital value using the ADC. This value can be calibrated to represent the temperature in degrees Celsius or Fahrenheit.
Features and Specifications:
- NTC Thermistor: The NTC thermistor is the primary temperature-sensing component.
- Operating Voltage: 3.3V ~ 5.5V
- Temperature Range: -55 ~ 125C
- Accuracy: +/- 0.5C
- Output: Analog and Digital Signals
- Protocols: These sensors typically use protocols like OneWire or I2C to communicate with microcontrollers, providing a digital signal that simplifies data processing.
- Compatibility: This sensor is also compatible with other devices like the Raspberry Pi, ESP32, and ESP8266 etc…
Necessary Equipment:
- Arduino board (e.g., Arduino Uno)
- Digital Temperature Sensor Module
- Jumper wires
- Breadboard (optional)
Pin Configuration
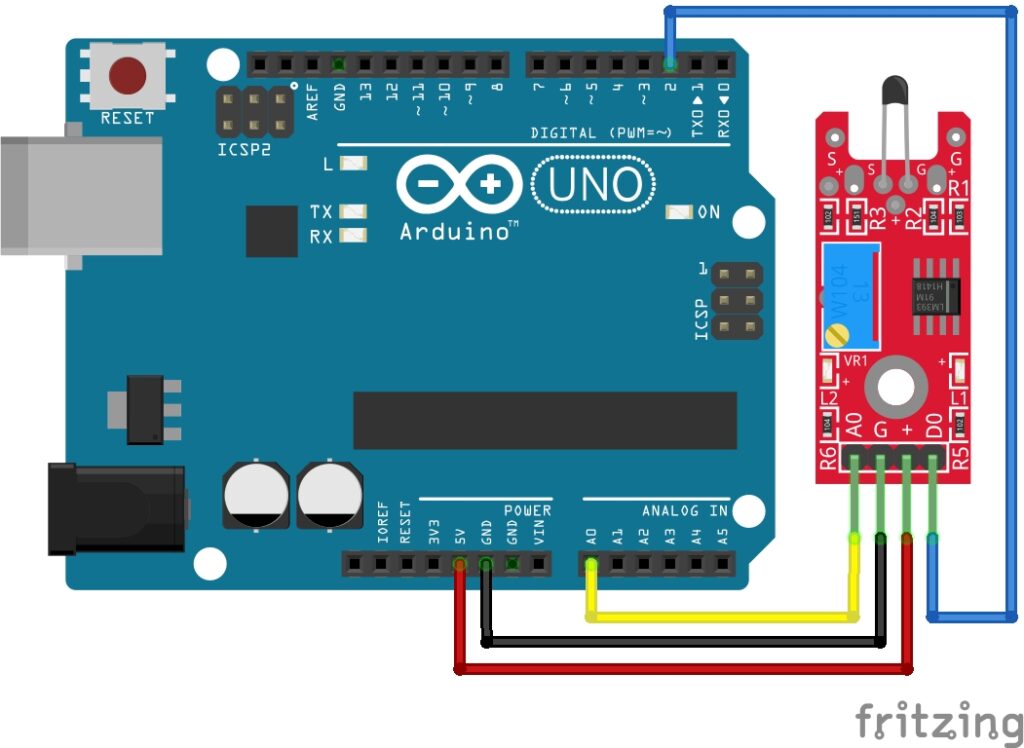
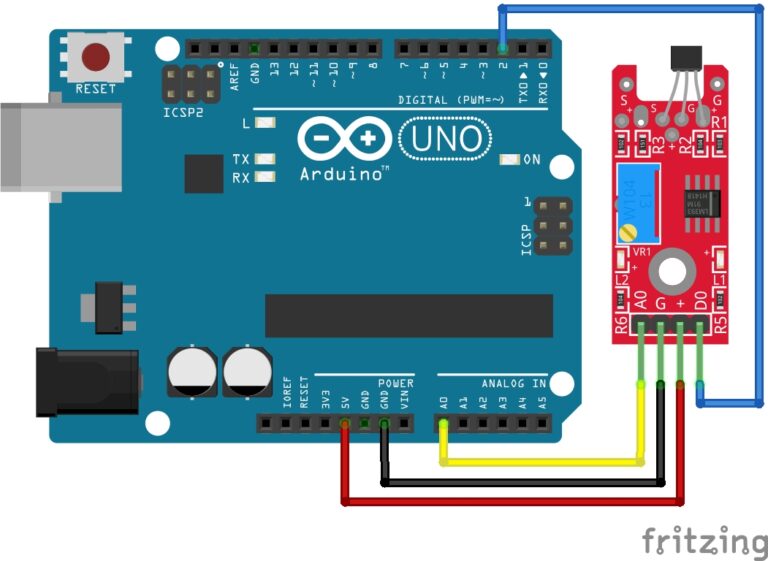
Connecting the Digital Temperature Sensor Module to an Arduino is fairly simple. The connections are as follows:
- A0 on the Digital Temperature Sensor to A0 on the Arduino (or any analog pin).
- G on the Digital Temperature Sensor to GND on the Arduino.
- + on the Digital Temperature Sensor to 5V on the Arduino.
- D0 on the Digital Temperature Sensor to Digital pin 2 on the Arduino (or any digital pin).
Pin labels may vary.
KY-028 Digital Temperature Sensor Module Fritzing Part is created by arduinomodules.info and published under Creative Commons Attribution-ShareAlike 4.0 International license
Arduino Code Example
const int analogPin = A0;  // Analog pin for analog output
const int digitalPin = 2;  // Digital pin for digital output

void setup() {
  Serial.begin(9600);
  pinMode(digitalPin, INPUT);
}

void loop() {
  // Read analog value
  int analogValue = analogRead(analogPin);
  int digitalValue = digitalRead(digitalPin);

  // Invert the mapping to account for sensor polarity
  float temperatureCelsius = map(analogValue, 0, 1023, 125, -40);
  float temperatureFahrenheit = (temperatureCelsius * 9 / 5) + 32;

  // Print temperature values
  Serial.print("Temperature: ");
  Serial.print(temperatureCelsius);
  Serial.print("°C | ");
  Serial.print(temperatureFahrenheit);
  Serial.println("°F");

  delay(1000);  // Adjust the delay as needed
}
Breaking Down the Code
Declarations
const int analogPin = A0;: Defines a constant integeranalogPinand assigns it to the analog pin A0. This pin is used for analog input.const int digitalPin = 2;: Defines another constant integerdigitalPinand assigns it to digital pin 2. This pin is used for digital input.
Setup Function
Serial.begin(9600);: Initializes serial communication with a baud rate of 9600 bits per second, enabling communication between the Arduino and a computer via the USB cable.pinMode(digitalPin, INPUT);: Sets the digital pin defined bydigitalPinas an input pin.
Loop Function
- Reading Analog and Digital Values:
int analogValue = analogRead(analogPin);: Reads the analog voltage from the pin specified byanalogPinand converts it to a digital value between 0 and 1023.int digitalValue = digitalRead(digitalPin);: Reads the digital value from the pin specified bydigitalPin.
- Temperature Calculation:
float temperatureCelsius = map(analogValue, 0, 1023, 125, -40);: Maps the analog value read from the sensor (which corresponds to temperature) to a temperature range in Celsius (-40°C to 125°C). This mapping function inverts the range since the sensor has a polarity.float temperatureFahrenheit = (temperatureCelsius * 9 / 5) + 32;: Converts the temperature value from Celsius to Fahrenheit.
- Output:
- Temperature values are printed to the Serial Monitor.
Serial.print("Temperature: ");: Prints the text “Temperature: “.Serial.print(temperatureCelsius);: Prints the temperature value in Celsius.Serial.print("°C | ");: Prints the symbol for degrees Celsius and a separator.Serial.print(temperatureFahrenheit);: Prints the temperature value in Fahrenheit.Serial.println("°F");: Prints the symbol for degrees Fahrenheit followed by a newline character.
- Delay:
delay(1000);: Introduces a delay of 1000 milliseconds (1 second) between temperature readings to control the rate at which the temperature is sampled. Adjust this delay as needed.
Applications and Usage Scenarios
Weather Stations
Digital temperature sensors are commonly used in DIY weather station projects, providing real-time temperature data.
Home Automation
Integrate these sensors into smart home systems to control heating, ventilation, and air conditioning (HVAC) systems based on room temperatures.
Industrial Monitoring
Monitor and control temperatures in industrial processes to ensure equipment operates within specified temperature ranges.
Health Monitoring Devices
In medical applications, digital temperature sensors can be used for monitoring body temperature and other health-related parameters.
Temperature Display
Create a digital thermometer that displays real-time temperature readings on an LCD or LED display.
Temperature-Activated Devices
Implement temperature-triggered actions, such as turning on a fan when the temperature exceeds a certain threshold.
Data Logging
Use digital temperature sensors to log temperature data over time, enabling analysis and trend identification.
Conclusion
In this sensors and modules guide, we explained the functionality of the Digital Temperature Sensor, exploring its working principles, and demonstrating how to interface it with an Arduino for practical applications. Digital temperature Sensors revolutionize temperature monitoring by detecting subtle changes in temperature, providing invaluable insight for your Arduino projects. Whether you’re orchestrating a weather-responsive system, fine-tuning environmental controls, or incorporating temperature dynamics into your creative ventures, these sensors offer unparalleled precision and simplicity.
Discover the endless possibilities for Arduino projects with more of our Sensors and Modules guides.
Your articles are always so helpful.
I am genuinely amazed by the deep Arduino insights and stellar ability to convey this information. Your expertise is evident in every piece you write. It’s obvious that you invest a great deal of effort into delving into your topics, and that effort does not go unnoticed. Thank you for sharing this valuable knowledge. Keep up the great work!