How to build an IR Remote Controlled Car
Discover the excitement of building your very own IR remote controlled car with Arduino! In this step-by-step guide, we’ll walk you through assembling the hardware, programming the Arduino, and achieving wireless control. Get ready to embark on a fun and educational journey into DIY robotics as we create a fully customizable remote car you can drive with ease.
Components:
- Arduino Board
- L293D IC
- DC Motors x2
- IR Module and Remote
- Power Module and Barrel Jack
- 9V battery
- Jumpers
IR Remote Controlled Car
The Code:
Study the code below, we have DC1 and DC2 for both motors. The code should be familiar by now.
#include <IRremote.h>
#define IR_RECEIVE_PIN 11
int DC1enable=5;
int DC1dir1=4;
int DC1dir2=3;
int DC2enable=10;
int DC2dir1=9;
int DC2dir2=8;

void setup(){
  Serial.begin(9600);
  IrReceiver.begin(IR_RECEIVE_PIN);
  pinMode(DC1enable,OUTPUT);
  pinMode(DC1dir1,OUTPUT);
  pinMode(DC1dir2,OUTPUT);
  digitalWrite(DC1enable,HIGH);
  pinMode(DC2enable,OUTPUT);
  pinMode(DC2dir1,OUTPUT);
  pinMode(DC2dir2,OUTPUT);
  digitalWrite(DC2enable,HIGH);
}

void loop() {
  if (IrReceiver.decode()) {
    IrReceiver.resume();
    Serial.println(IrReceiver.decodedIRData.command);
  }
  while(IrReceiver.decode()==0) {
  }
  IrReceiver.resume();
  if(IrReceiver.decodedIRData.command == 70) {
    Serial.println(IrReceiver.decodedIRData.command);
    Serial.println("Vol+ was pressed");
    digitalWrite(DC1dir1,HIGH);
    digitalWrite(DC1dir2,LOW);
    digitalWrite(DC2dir1,LOW);
    digitalWrite(DC2dir2,HIGH);
    delay(100);
  }
  if(IrReceiver.decodedIRData.command == 21) {
    Serial.println(IrReceiver.decodedIRData.command);
    Serial.println("Vol- was pressed");
    digitalWrite(DC1dir1,LOW);
    digitalWrite(DC1dir2,HIGH);
    digitalWrite(DC2dir1,HIGH);
    digitalWrite(DC2dir2,LOW);
    delay(100);
  }
  if(IrReceiver.decodedIRData.command == 64) {
    Serial.println(IrReceiver.decodedIRData.command);
    Serial.println("Play/pause was pressed");
    digitalWrite(DC1dir1,LOW);
    digitalWrite(DC1dir2,LOW);
    digitalWrite(DC2dir1,LOW);
    digitalWrite(DC2dir2,LOW);
    delay(100);
  }
  if(IrReceiver.decodedIRData.command == 68) {
    Serial.println(IrReceiver.decodedIRData.command);
    Serial.println("LEFT");
    digitalWrite(DC1dir1,LOW);
    digitalWrite(DC1dir2,HIGH);
    digitalWrite(DC2dir1,LOW);
    digitalWrite(DC2dir2,HIGH);
    delay(100);
  }
  if(IrReceiver.decodedIRData.command == 67) {
    Serial.println(IrReceiver.decodedIRData.command);
    Serial.println("RIGHT");
    digitalWrite(DC1dir1,HIGH);
    digitalWrite(DC1dir2,LOW);
    digitalWrite(DC2dir1,HIGH);
    digitalWrite(DC2dir2,LOW);
    delay(100);
  }
}
The Circuit:
You know the drill! Assemble your components in the exact same way as shown in the image below.
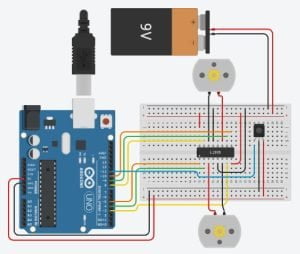
How you assemble your car is down to you, I’m just providing the circuit and code. A good car chassis for this project would be something like this one: DIY Car Project Chassis

Upload the Code:
After you have assembled your car and circuit you can upload the code to your Arduino. Once the code is uploaded you will be able to control the functions with the IR remote using these buttons:
- Vol+ = Move forwards
- Vol- = Move backwards
- Rewind = Move left
- Fast-forward = Move right
Conclusion
As we wrap up our adventure in creating an IR remote-controlled car with Arduino, you’ve unlocked a world of possibilities in the realm of DIY robotics. Armed with the knowledge of hardware assembly and programming, you’re now capable of crafting custom remote-controlled vehicles tailored to your imagination. Whether it’s for fun, learning, or even prototyping more advanced projects, the skills you’ve acquired here open doors to a universe of innovation. So, rev up your creativity, drive forward, and explore the endless horizons of remote control and automation with Arduino at your fingertips.
Final Word
If you have followed every single one of these “Getting Started with Arduino” guides, congratulations! not only do you now have a grasp on the basic fundamentals of coding, but you are also now ready to build your own fantastic Arduino projects.
I have thoroughly enjoyed writing this series of Arduino guides and I really hope you have enjoyed reading them. I will continue to release even more Arduino content for you in the future. So, keep coming back to this blog for even more Arduino project ideas and guides.
Recommendations:
If you don’t already own any Arduino hardware, we highly recommend purchasing the Elegoo Super Starter Kit. This kit has everything you need to start programming with Arduino.
You can find out more about this kit here: Elegoo Super Starter Kit