
Understanding Conditional Statements
In Arduino programming, Conditional statements, as in most programming languages, are used to make decisions and control the flow of your program based on certain conditions. The most commonly used conditional statements in Arduino are if, else if, and else.
We use if statements in our own lives everyday:
- If it’s cold, I wear a jumper.
- If it’s raining, I take an umbrella.
if(its cold outside){
  I wear a jumper;
}
Overview of how conditional statements work in Arduino:
If Statement:
The if statement is used to execute a block of code if a specified condition is true. If the condition is false, the code inside the if block is skipped.
if (condition) {
// Code to execute if the condition is true
}
Else Statement:
The else statement is used to execute a block of code if none of the previous conditions in the if and else if statements are true.
if (condition) {
// Code to execute if the condition is true
} else {
// Code to execute if the condition is false
}
Else If Statement:
The else if statement allows you to check multiple conditions sequentially. If the first if condition is false, it checks the next else if condition, and so on.
if (condition1) {
// Code to execute if condition1 is true
} else if (condition2) {
// Code to execute if condition2 is true
} else {
// Code to execute if no conditions are true
}
Introducing the DHT-11 Sensor

The DHT-11 sensor is a low-cost digital temperature and humidity sensor that is commonly used with Arduino and other microcontrollers. It can measure temperature in the range of 0°C to 50°C with an accuracy of ±2°C and relative humidity in the range of 20% to 80% with an accuracy of ±5%. It communicates with the Arduino over a single digital pin and provides data in a simple, easy-to-use format.
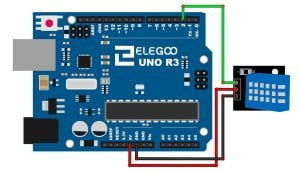
Hardware Connection:
Connect the DHT-11 sensor to your Arduino as follows:
- Positive (VCC) pin of the DHT-11 sensor to the 5V output on the Arduino.
- Negative (GND) pin of the DHT-11 sensor to the GND (ground) on the Arduino.
- Data (OUT) pin of the DHT-11 sensor to any available digital pin on the Arduino (e.g., D2).
Software Setup:
Install the DHT library for Arduino (if not already installed). To do this, open the Arduino IDE, go to “Sketch” -> “Include Library” -> “Manage Libraries…” and then type “DHT” in the search bar. Install the “DHT sensor library” by Adafruit.
Add Your Heading Text Here
Now, you can use the following code as an example to read data from the DHT-11 sensor:
#include <DHT.h>

#define DHTPIN 2         // The digital pin connected to the DHT sensor
#define TYPE DHT11    // DHT 11

DHT dht(DHTPIN, DHTTYPE);

void setup() {
  Serial.begin(9600); // Initialize serial communication
  dht.begin();        // Initialize DHT sensor
}

void loop() {
  // Read temperature and humidity data
  float humidity = dht.readHumidity();
  float temperatureC = dht.readTemperature();

  // Check if data reading was successful
  if (isnan(humidity) || isnan(temperatureC)) {
    Serial.println("Failed to read from DHT sensor!");
  } else {
    // Print data to the serial monitor
    Serial.print("Humidity (%): ");
    Serial.println(humidity);
    Serial.print("Temperature (°C): ");
    Serial.println(temperatureC);
  }

  delay(2000); // Wait for 2 seconds before taking another reading
}
Upload and Run:
- Connect your Arduino board to your computer using a USB cable.
- Select the appropriate board and COM port in the Arduino IDE.
- Upload the code to your Arduino.
- Open the Serial Monitor (Tools -> Serial Monitor) to view the sensor’s temperature and humidity readings.
Conclusion
These conditional statements allow you to create programs that respond to different situations and inputs. You can also use logical operators (&& for “and,” || for “or,” ! for “not”) to create more complex conditions in your Arduino code.
Experiment
Use what you have learnt here and incorporate Print Statements with 3 conditions:
- Too Hot (above 25c)
- Too Cold (below 15c)
- Perfect (between 18-20c)
Hint: You will need to use logical operators for the third condition.
Happy Tinkering!
Recommendations:
If you don’t already own any Arduino hardware, we highly recommend purchasing the Elegoo Super Starter Kit. This kit has everything you need to start programming with Arduino.
You can find out more about this kit here: Elegoo Super Starter Kit

