Raspberry Pi Security Camera Project: From Motion Detection to Image Capture!
In this comprehensive tutorial, we’ll guide you through the process of creating your own Raspberry Pi based security camera system. We’ll break the project down into four stages, each adding new features and functionality. From motion detection to image capture, you’ll learn how to enhance your home security using the power of Raspberry Pi.
Materials Needed:
Before we dive into the stages, here are the common materials you’ll need:
- Raspberry Pi (any model with GPIO pins)
- PIR (Passive Infrared) sensor
- LEDs (for status lights)
- 220-330 Ohm resistors for the LED’s.
- Alarm components (e.g., buzzer)
- Camera module (e.g., Raspberry Pi Camera or USB webcam)
- Breadboard and jumper wires
- Power supply for your Raspberry Pi
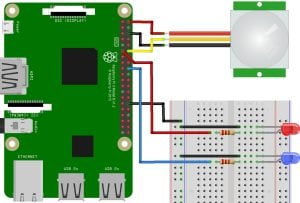
Stage 1: Adding Status Lights for Motion Detection
In this initial stage, we’ll set up motion detection using a PIR sensor and add status lights to indicate when motion is detected.
The Circuit:
Follow the circuit diagram below, the connections are as follows:
- Connect the VCC and GND pins of the PIR sensor to the appropriate power and ground pins on the Raspberry Pi.
- The OUT (signal) pin of the PIR sensor should be connected to a GPIO 12 on the Raspberry Pi.
- Connect the red LED to GPIO 11 as a warning status light.
- Connect the blue LED to GPIO 18 as a waiting status light.
Python Code:
import RPi.GPIO as GPIO
import time

sensorPin=12
redLed=11
blueLed=18

GPIO.setmode(GPIO.BOARD)
GPIO.setup(sensorPin, GPIO.IN)
GPIO.setup(redLed, GPIO.OUT)
GPIO.setup(blueLed, GPIO.OUT)

try:
    while True:
        motion=GPIO.input(sensorPin)
        print(motion)
        if (motion==1):
            print('Motion Detected')
            GPIO.output(blueLed,GPIO.LOW)
            GPIO.output(redLed,GPIO.HIGH)
            time.sleep(10) #Set to pause for 10 seconds
            GPIO.output(redLed,GPIO.LOW)
        else:
            GPIO.output(redLed,GPIO.LOW)
            GPIO.output(blueLed,GPIO.HIGH)


except KeyboardInterrupt:
    GPIO.cleanup()
    print('GPIO Shutdown, Pins cleared')
When this code is run, the blue LED will illumiate when there is no detection, and when motion is detected, the red LED will illuminate.
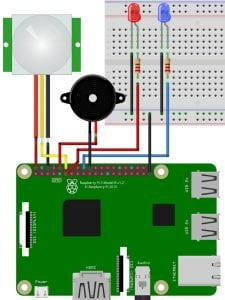
Stage 2: Adding an Alarm System
In the second stage, we’ll enhance your security camera by adding an alarm system that activates when motion is detected. This additional layer of security will ensure you’re alerted when suspicious activity occurs.
The Circuit:
Follow the circuit diagram below, the connections are as follows:
- Connect the alarm component (buzzer) to GPIO 10 on the Raspberry Pi.
Python Code:
import RPi.GPIO as GPIO
import time

sensorPin=12
redLed=11
blueLed=18
buzzerPin=10

GPIO.setmode(GPIO.BOARD)
GPIO.setup(sensorPin, GPIO.IN)
GPIO.setup(redLed, GPIO.OUT)
GPIO.setup(blueLed, GPIO.OUT)
GPIO.setup(buzzerPin,GPIO.OUT)

buzzer = GPIO.PWM(buzzerPin, 1000) # Set frequency to 1 Khz


try:
    while True:
        motion=GPIO.input(sensorPin)
        print(motion)
        if (motion==1):
            print('Motion Detected')
            GPIO.output(blueLed,GPIO.LOW)
            GPIO.output(redLed,GPIO.HIGH)
            for i in range(20):
                buzzer.start(50)
                time.sleep(.5)
                buzzer.stop()
                time.sleep(.5)
            GPIO.output(redLed,GPIO.LOW)
        else:
            GPIO.output(redLed,GPIO.LOW)
            GPIO.output(blueLed,GPIO.HIGH)


except KeyboardInterrupt:
    GPIO.cleanup()
    print('GPIO Shutdown, Pins cleared')
When this code is run, the buzzer will alert when motion is detected.
Stage 3: Adding a Camera for Image Capture
The final stage takes your security camera to the next level by adding a camera module. This allows you to capture images when motion is detected, providing visual evidence of any events.
The Raspberry Pi Camera Module
For this guide I will be using the picamera v2.1 module, but you can use any CSI (Camera Serial Interface) camera module. Before you connect your camera, you need to turn off the Raspberry Pi. Carefully lift the locking bar on the CSI connector.
Warning: The CSI connector is very delicate, so be careful not to break it.
Insert the cameras ribbon cable with the blue strip facing the USB ports on the Raspberry Pi, then push the locking bar back, locking the ribbon cable in place. Now you can turn your Raspberry Pi back on. Once the Raspberry Pi has fully booted, open the terminal to do an update, enter the following commands:
sudo apt update
sudo apt full-upgrade
Now your Raspberry Pi is ready to use the camera module.
Python Code:
from picamera2 import Picamera2, Preview
import RPi.GPIO as GPIO
import time
import datetime

piCam = Picamera2()
camera_config = piCam.create_still_configuration(main = {"size":(1920,1080)}, lores = {"size":(640,480)})
piCam.configure(camera_config)
piCam.start()

sensorPin=12
redLed=11
blueLed=18
buzzerPin=10

GPIO.setmode(GPIO.BOARD)
GPIO.setup(sensorPin, GPIO.IN)
GPIO.setup(redLed, GPIO.OUT)
GPIO.setup(blueLed, GPIO.OUT)
GPIO.setup(buzzerPin,GPIO.OUT)

buzzer = GPIO.PWM(buzzerPin, 1000)

try:
    while True:
        motion=GPIO.input(sensorPin)
        print(motion)
        if (motion==1):
            print('Motion Detected')
            GPIO.output(blueLed,GPIO.LOW)
            GPIO.output(redLed,GPIO.HIGH)

            for i in range(10):
                d = datetime.datetime.now()
                current_time = str(d - datetime.timedelta(microseconds = d.microsecond))
                captureName ="SecurityCam-{}.png".format(current_time)
                piCam.capture_file(captureName)
                print("{} image captured".format(captureName))
                buzzer.start(50)
                time.sleep(.6)
                buzzer.stop()
                time.sleep(.2)
            GPIO.output(redLed,GPIO.LOW)
        else:
            GPIO.output(redLed,GPIO.LOW)
            GPIO.output(blueLed,GPIO.HIGH)


except KeyboardInterrupt:
    GPIO.cleanup()
    piCam.stop()
    print('GPIO Shutdown, Pins cleared, Camera off')
When a detection event occurs, not only will the status lights change, the alarm alerts, now it will capture 10 images for each detection event. The images will also be labelled with the time of the event.
Stage 4: Automating the Script to Execute on Boot
Now the Full PIR Camera is built and working correctly, you will likely want it to start every time the Raspberry Pi boots, so you don’t need to run it manually when your Raspberry Pi turns on. This can be done by creating a simple bash script and adding it to the list of crontab jobs.
Creating Directory for the Security Camera Python Script
Open the Raspberry Pi terminal and enter the following command.
mkdir SecurityCamera
cd SecurityCamera
mkdir logs
Now, copy or move the secam.py script into the SecurityCamera directory.
Creating a Bash Script
We need to return to the home directory. You can quickly do this by entering the following command:
cd ~
Now let’s create a bash script, to launch the security camera program. Enter the following command into the terminal:
sudo nano secam.sh
With the nano editor open, copy the following code to the bash script:
#!/bin/sh
# secam.sh

cd /
cd home/pi/SecurityCamera/
sudo python secam.py
cd /
To save the file hit ctrl + s, then ctrl + x to close the editor. To confirm everything is correct type in terminal:
cat secam.sh
This will print the bash script contents to the terminal.
Change Bash Script Permissions
The script needs to be made executable, to do this, enter the following command into the terminal:
sudo chmod 755 secam.sh
Now to confirm our launcher script works type the following into the terminal:
sh secam.sh
The security camera program should now be running, use ctrl + c to cancel this process.
Automating the Script to Start at Boot
Finally, we need to add the launcher script to the crontab list of jobs.
In terminal type:
sudo crontab -e
If this is your first time using crontab, you will be prompted to choose which editor you want to use, select the nano editor. Now scroll down to the very bottom of the crontab file and enter the following line to the file:
@reboot sh /home/pi/secam.sh >/home/pi/SecurityCamera/logs/cronlog 2>&1
Hit ctrl + s to save the file, then ctrl + x to close the editor.
If you ever want to disable this file from running at boot, just remove the line of code we just entered to crontab, save and reboot.
All that’s left to do now is reboot the Raspberry Pi! If all went well, your PIR Security Camera should now be running without the need to start it manually.
Conclusion
By completing all four stages of this project, you’ve built a feature-rich Raspberry Pi security camera with motion detection, status lights, an alarm system, with image capture capabilities. The code will always be running once your Raspberry Pi boots up. Whether you’re monitoring your home or exploring the world of DIY security, this project offers a powerful, and cost-effective solution.
Happy Tinkering Folks!
You can explore more of our Raspberry Pi guides here: Raspberry Pi for Beginners
Unlock the Possibilities
We have put together a list of some great Raspberry Pi products and deals: Shop Raspberry Pi Goodies Now!

