
Keeping Your Pi Cool!
In this guide, we will explore the world of Raspberry Pi cooling by learning how to control a cooling fan to keep your Pi running at optimal temperatures. Overheating can be a concern, especially for resource-intensive projects, and a cooling fan can help mitigate this issue. We’ll cover the GPIO wiring, Python programming, and show you how to automatically adjust the fan speed based on the Pi’s temperature. Let’s dive into the cool side of Raspberry Pi!
Materials Needed:
Before we begin, gather the following materials:
- Raspberry Pi (any model with GPIO pins)
- 5V cooling fan
- Transistor (e.g., NPN transistor)
- 1kΩ resistor
- Breadboard and jumper wires
- Power supply for your Raspberry Pi
The Circuit:
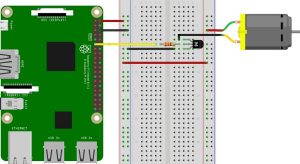
Follow the circuit diagram below, the connections are as follows:
- Connect the positive (red) wire of the cooling fan to the 5V pin on the Raspberry Pi.
- Connect the negative (black) wire of the cooling fan to the collector pin of the transistor.
- The emitter pin of the transistor should be connected to a ground (GND) pin on the Raspberry Pi.
- Connect the base pin of the transistor to GPIO 11.
- Place a 1kΩ resistor between the base pin of the transistor and the GPIO pin.
The image below has a DC Motor in place of the fan, but the function and connections are exactly the same.
Python Code:
Now, let’s write the Python code to control the cooling fan based on the Raspberry Pi’s temperature.
from gpiozero import CPUTemperature
import RPi.GPIO as GPIO
import time

fanPin=11
GPIO.setmode(GPIO.BOARD)
GPIO.setup(fanPin, GPIO.OUT)

cpu = CPUTemperature()
print(cpu.temperature)
try:
    while True:
        if cpu.temperature > 50.00:
            GPIO.output(fanPin,GPIO.HIGH)
        else:
            GPIO.output(fanPin,GPIO.LOW)

        cpu = CPUTemperature()
        print(cpu.temperature)
        time.sleep(10)
except KeyboardInterrupt:
    GPIO.cleanup()
    print('GPIO Shutdown, Pins cleared')
Explanation:
- Import
CPUTemperaturefromgpiozeroso we can read the temperature. - Import the
RPi.GPIOlibrary and set the GPIO mode to BCM. - Define the GPIO pin for controlling the fan.
- Set up the fan pin as an output and continuously monitor the Raspberry Pi’s temperature.
- If the temperature exceeds a threshold (50°C in this example), turn on the fan to cool the Pi.
Conclusion
With this basic fan control project, you can keep your Raspberry Pi running smoothly, even under heavy workloads. You can further enhance this setup by customizing temperature thresholds, implementing a PWM-based speed control, or integrating it into more advanced cooling systems.
Happy Tinkering Folks!
You can explore more of our Raspberry Pi guides here: Raspberry Pi for Beginners
Unlock the Possibilities
We have put together a list of some great Raspberry Pi products and deals: Shop Raspberry Pi Goodies Now!