The SD Card Module for Arduino Projects

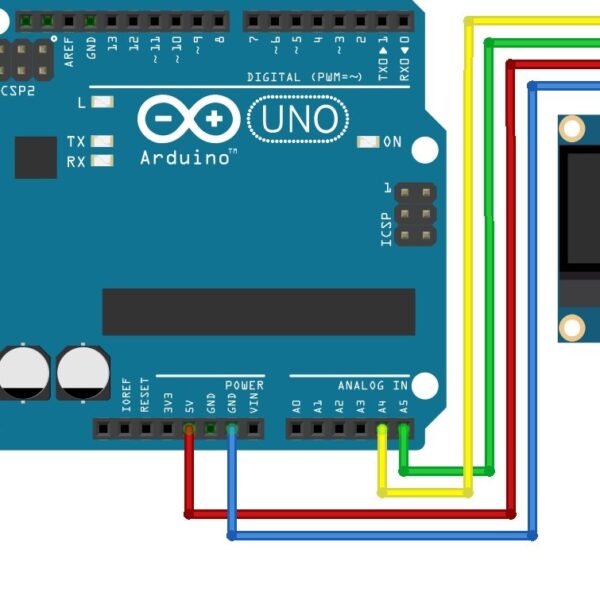
What is an SD Card Module? An SD (Secure Digital) card module, also known as an SD card reader or SD card interface, is a hardware component that allows you to interface an SD card with a microcontroller or other embedded systems like Arduino. Here's some information about the SD card module:Purpose: The primary purpose of an SD card module is to enable data storage and retrieval on SD memory cards. SD cards are commonly used for data storage in various…

0 Comments
GPS Module: Displaying GPS Data with Mini-OLED
Arduino

GPS Module: Displaying GPS Data with Mini-OLED

How to Display GPS Data on the Mini-OLED In this guide I will show you how to display the data returned from the GPS module to the mini-OLED display. This will help assist you to make this a truly portable project, without the need to be tethered to a computer to read the serial monitor in the Arduinos IDE. Let's Build! Components: Arduino GPS Neo 6M Mini-OLED Jumpers The Code: The code is very similar to our last guide: Programming…

0 Comments
GPS Module: Programming Arduino with GPS
Arduino

GPS Module: Programming Arduino with GPS

What is a GPS Module? A GPS (Global Positioning System) module is often used with Arduino and other microcontroller platforms, it's a device that allows you to determine your precise geographical location on Earth using signals received from satellites.How does the GPS Work? Satellite Communication: The GPS module communicates with a network of satellites orbiting the Earth. These satellites continuously transmit signals that contain information about their location and the exact time the signal was sent. Signal Reception: The GPS…

0 Comments
Arduino Gaming: Play Nano Pong
Arduino

Arduino Gaming: Play Nano Pong

It Doesn't get More Retro Than This! Ready for some more Arduino gaming? "Pong" is one of the earliest arcade video games and was released by Atari, Inc. The exact release date of "Pong" was November 29, 1972. It was designed by Atari founder Nolan Bushnell and became one of the first commercially successful video games, helping to establish the video game industry. Today we are going to play the Nano Pong game on the Arduino Nano. Excited yet? How…

0 Comments
Arduino Gaming: Play Deathstar vs X-Wing
Arduino

Arduino Gaming: Play Deathstar vs X-Wing

My First Experience Playing Games on the Arduino Ready for some Arduino gaming? Here's a simple game for the Arduino and Mini-OLED called Deathstar Vs X-Wing. Well, I love Star Wars so this should be a fun project. The aim is to defeat the Deathstar while piloting an X-wing. "Great! sound perfect"Components: To follow along with this guide, you will need the following components: Arduino board (e.g., Arduino Uno, Arduino Nano, etc.) Mini OLED display with compatible interface (I2C) Tactile…

0 Comments
0.96 OLED I2C Display with Arduino
0.96 OLED I2C Display with Arduino Diagram

0.96 OLED I2C Display with Arduino

How to Use the 0.96 OLED I2C Display with Arduino OLED (Organic Light-Emitting Diode) displays offer vibrant, high-contrast visuals, making them ideal for various projects ranging from simple data displays to intricate graphical interfaces. With its compact size and easy interfacing capabilities, the 0.96 OLED I2C Display module has become a popular choice among hobbyists, makers, and professionals alike. In this guide, we will walk you through the process of setting up the 0.96 OLED I2C Display with your Arduino…

0 Comments
IR Remote Controlled Car with Arduino
Getting Started with Arduino RC Car

IR Remote Controlled Car with Arduino

How to build an IR Remote Controlled Car Discover the excitement of building your very own IR remote controlled car with Arduino! In this step-by-step guide, we'll walk you through assembling the hardware, programming the Arduino, and achieving wireless control. Get ready to embark on a fun and educational journey into DIY robotics as we create a fully customizable remote car you can drive with ease.Components: Arduino Board L293D IC DC Motors x2 IR Module and Remote Power Module and…

0 Comments
IR Module: Programming the IR Module with Arduino
Getting Started with Arduino Infrared Module

IR Module: Programming the IR Module with Arduino

What is the Infrared Module used for? The IR module and a remote control can be used with an Arduino to enable wireless communication and control of electronic devices. Infrared communications are widely used for remote control applications, like controlling TVs, air conditioners, and other appliances.Updated Information: This guide has been re-written because of the latest update to the IRremote.h library. The old code from version 2 of the library that I used for this guide in 2020 no longer…

0 Comments
DC Motors: Programming DC Motors with Arduino
Getting Started with Arduino DC Motors

DC Motors: Programming DC Motors with Arduino

What are DC Motors? Direct Current (DC) motors are commonly used in various applications, including robotics, automation, and electronics projects. When combined with an Arduino microcontroller, you can control the speed and direction of DC motors, making them an essential component for many projects. It's important you remember this, do not connect the DC Motor to your Arduino 5v pin, Your Arduino board will quickly die, it cannot power it, instead we need a separate power supply to power the…

0 Comments
Servos: Programming Servos with Arduino
Getting Started with Arduino Servos

Servos: Programming Servos with Arduino

What are Servos? Servos, short for "servomechanisms" or "servomotors," are devices that are widely used in robotics and automation to control the position or orientation of various components, such as robot arms, camera gimbals, and model aircraft control surfaces. They are essential for tasks that require precise control of angular or linear position. A servo motor consists of three main components: Motor: The motor provides the physical movement. It typically has a DC motor that rotates a shaft. Gearbox: A…

1 Comment
Joysticks: Programming Joysticks with Arduino
Getting Started with Arduino Joysticks

Joysticks: Programming Joysticks with Arduino

How to use Joysticks with your Arduino Projects Using joysticks with Arduino is a common way to add manual control to your Arduino projects. Joysticks are input devices that allow users to provide analog input in two dimensions (X and Y axes) or even more with additional buttons. They are often used in applications like robotics, gaming, remote control systems, and more. This guide will show you exactly how to get started programming joysticks with your Arduino.Components You'll Need: Arduino…

0 Comments
Arduinos Map Function and How to Use it
arduino2

Arduinos Map Function and How to Use it

What is Arduinos Map Function? Arduinos Map Function is a useful utility function that helps you remap or scale a value from one range to another. It's often used to convert an input value (e.g., from a sensor or user input) that falls within one range to an output value that falls within a different range. This is particularly handy when you need to adapt sensor readings to control actuators or display data on a screen with Arduino. Here's a…

0 Comments
Pull-Up and Pull-Down Resistors with Arduino
Getting Started with Arduino Pull ups

Pull-Up and Pull-Down Resistors with Arduino

What are Pull-up and Pull-down Resistors? In Arduino programming, INPUT_PULLUP and INPUT_PULLDOWN are two options you can use when configuring digital pins as input pins. These options help you enable built-in pull-up or pull-down resistors on the pins to ensure a stable logic level when the pins are not actively being driven high or low by external components. There is also another way to create pull-up and pull-down resistors.INPUT_PULLUP: When you configure a digital pin as INPUT_PULLUP, you are enabling…

1 Comment
Program Tactile Switches with Arduino
Getting Started with Arduino Buttons

Program Tactile Switches with Arduino

What is a Tactile Switch? Tactile switches, often referred to as "tac switches" or "tact switches," are commonly used in electronic circuits and can be programmed with an Arduino microcontroller to perform various tasks or trigger actions when the button is pressed. The tac switch, like any normal switch, can be used to complete a circuits connection. In the image below, when the button is pressed A and B are connected, D and C are connected, this is the correct…

0 Comments
Programming the Light Dependent Resistor
Getting Started with Arduino LDR

Programming the Light Dependent Resistor

What is a Light Dependent Resistor A Light Dependent Resistor (LDR), also known as a photoresistor, is a type of passive electronic component that changes its resistance in response to changes in light levels. The resistance of an LDR decreases as the intensity of light falling on it increases. Conversely, its resistance increases as the light level decreases. LDRs are commonly used in various applications to sense and control light levels. Components To use an LDR with an Arduino, you'll…

0 Comments
Buzzers: A Comprehensive Guide
Buzzers with Arduino Diagram

Buzzers: A Comprehensive Guide

Exploring Basic Components with Arduino! Welcome to Meganano's series of comprehensive guides on using basic components with Arduino! In this particular guide, we'll be focusing specifically on buzzers, exploring their types, functions, applications, and how to integrate them into your Arduino projects.If you're new to Arduino, why not take a look at our Getting Started with Arduino guides. These guides are designed for beginners to learn the fundamental basics of Arduino programming.Introduction to BuzzersThe Active buzzer and passive buzzer are two…

0 Comments
Programming RGB LEDs with Arduino
Getting Started with Arduino RGB

Programming RGB LEDs with Arduino

What is an RGB? An RGB LED is a type of light-emitting diode (LED) that can produce multiple colors by mixing different intensities of red (R), green (G), and blue (B) light. It combines three individual LEDs, one for each color component, into a single package. By controlling the brightness of each of these three colors, you can create a wide range of colors (16 million+). This guide will walk you through programming RGB LEDs with Arduino.Components:To use an RGB…

0 Comments
Pulse Width Modulation with Arduino
Getting Started with Arduino PWM

Pulse Width Modulation with Arduino

Understanding Arduinos PWM Pins PWM stands for Pulse Width Modulation, and it's a technique used in electronics to simulate analog output using digital signals. PWM is commonly used in microcontroller platforms like the Arduino to control things like the brightness of an LED, the speed of a motor, or the position of a servo motor.Pulse Generation: When you use a PWM-enabled pin, you can set the analogWrite() function (in Arduino programming) to a value between 0 and 255. This value…

0 Comments