
Unlocking the Magic of Sound: Creating a Theremin-Like Device with Arduino
Imagine controlling music and sound with the wave of your hand, just like a magician conjuring melodies from thin air. While it might not be the mystical theremin of classic sci-fi and suspense films, we’ve again embarked on an exciting journey to bring the enchantment of electronic music to life with Arduino.
If you missed our first Theremin project, you could read about it here: Arduino Theremin Project. This time using an Arduino, an ultrasonic sensor, and a buzzer, we’ve crafted a musical instrument that responds to your gestures, casting a spell of innovation and wonder. Join us as we delve into the world of Arduino and explore how our creation may not be the traditional theremin but captures its essence, making music creation as simple as a wave of your hand.
Components Needed for this Project:
- Arduino
- Ultrasonic Sensor
- Buzzer
- Jumpers
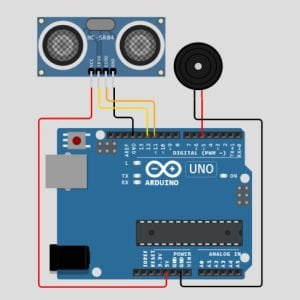
The Circuit:
Build your circuit in the same way as in the image shown below:
The Code:
int trigpin=12;
int echopin=11;
int pingtime;
float pingdistance;
float distance2target;
int buzzPin=5;

long maxFreq=2000;
long freq;
long newFreq;

void setup() {
  Serial.begin(9600);
  pinMode(trigpin,OUTPUT);
  pinMode(echopin,INPUT);
  pinMode(buzzPin,OUTPUT);
}

void loop() {
 digitalWrite(trigpin,LOW);
 delayMicroseconds(10);
 digitalWrite(trigpin,HIGH);
 delayMicroseconds(10);
 digitalWrite(trigpin,LOW);
 pingtime=pulseIn(echopin,HIGH);
 delay(25);
 pingdistance=(pingtime*765.*5280.*12.)/(3600.*1000000.);
 distance2target=pingdistance/2;
 Serial.print(pingtime);
 Serial.println(" Ping Time");
 Serial.print(distance2target);
 Serial.println(" inches");
 if(distance2target>20){
  distance2target=20;
 }
 if (pingtime>3000){
  pingtime=3000;
 }
 //These next lines make different sounds so uncomment 1 line at a time
 newFreq=map(distance2target,0,2,0,255); //  works ok
 //newFreq=(pingtime*maxFreq)/1023;     // high pitch continuos
 //newFreq=map(pingtime,0,2000,0,255); // low pitch continuos
 tone(buzzPin,newFreq);
}
Upload the Code:
Once you upload the code, you can raise and lower your hand over the ultrasonic sensor to change the pitch of the sound from the buzzer.
Conclusion
As we wrap up our adventure, we’re left with a melody of possibilities, a crescendo of inspiration, and the realization that the world of DIY electronics and music is an ever-expanding symphony. Whether you’re an experienced maker or just starting your journey into the world of Arduino, remember that the only limit is your own creativity.
It still doesn’t sound much like the spooky tones of the Theremin, but it certainly works in a similar way. I am however determined to achieve a true Theremin sound so stay tuned as I will definitely return to this project again.
Happy Tinkering Folks!
Recommendations:
The Elegoo Super Starter Kit
If you don’t already own any Arduino hardware, we highly recommend this kit as it has everything you need to start programming with Arduino. You can find out more about this kit, including a list of its components here: Elegoo Super Starter Kit
You can find this kit on Amazon here: Elegoo Super Starter Kit
The 0.96-inch Mini-OLED Display
We highly recommend this mini-OLED bundle of five 0.96-inch OLED displays. We have bought these before and they all worked perfectly. You can read more about the mini-OLED here: Mini-OLED
You can find this bundle on Amazon here: OLED Displays
Elegoo Nano (Arduino Compatible)
We have bought these Nano boards many times and can highly recommend them. There are three Nano boards in this pack making them a total bargain for everyone.
You can find this pack on Amazon here: Arduino Nano

