

How to use the PIR Sensor with Arduino
In this guide we will go through the basic steps of using a PIR sensor module with Arduino. Then we shall build a home security alarm system to protect your property.
Basic PIR Setup with Arduino
Starting simple, this is to test the PIR sensor works properly.
The Code:
Open the Arduino IDE. Now, copy and paste the code below to a new sketch. Study the code and make sure you understand what it is doing.
int pirPin = 7;
int motionDetected = 0;
int pirValue;

void setup() {
  Serial.begin(9600);
  pinMode(pirPin,INPUT);
  Serial.print("Initializing the sensor wait 1 minute");
  delay(60000);
}

void loop() {
  pirValue = digitalRead(pirPin);
  if (pirValue == 1){
    Serial.println("Motion Detected");
    motionDetected = 1;
    delay(3000);
  }
  else{
   Serial.println("No Motion Detected");
  }
  if (motionDetected == 1){
    delay(6000);//After trigger wait 6secs to re-arm
    motionDetected = 0;
  }
}
The Circuit:
Connect your PIR to the Arduino the same as in the image below.

Upload the Code:
With the circuit built, go ahead and upload the code to your Arduino. Once the code is uploaded, open the serial monitor to see the results being displayed. You should receive messages about whether or not motion has been detected.
Arduino Security Alarm System
We don’t want to have to rely on the Serial monitor, especially if you are going to use it for security. Let’s add some lights and an alarm to the program.
The Code:
int pirPin = 7;
int motionDetected = 0;
int pirValue;
int alarmLight=4;
int armingLight=5;
int noMotionLight=6;
int alarm=8;
long freq=2500;
int alarmReset=9;
int resetVal;
void setup() {
Serial.begin(9600);
pinMode(alarmLight,OUTPUT);
pinMode(armingLight,OUTPUT);
pinMode(noMotionLight,OUTPUT);
pinMode(alarm,OUTPUT);
pinMode(alarmReset,INPUT);
pinMode(pirPin,INPUT);
Serial.print("Initializing the sensor wait 1 minute");
digitalWrite(armingLight,HIGH);
delay(60000);
}
void loop() {
resetVal=digitalRead(alarmReset);
Serial.print(resetVal);
if(resetVal==0){
motionDetected=0; //Resets alarm
digitalWrite(noMotionLight,HIGH);
digitalWrite(alarmLight,LOW);
noTone(alarm);
}
digitalWrite(armingLight,LOW);
pirValue = digitalRead(pirPin);
if ((pirValue == 1) or (motionDetected==1)){
Serial.println("Motion Detected");
digitalWrite(noMotionLight,LOW);
motionDetected=1;
tone(alarm, freq);
digitalWrite(alarmLight,HIGH);
delay(500);
noTone(alarm);
digitalWrite(alarmLight,LOW);
delay(500);
}
else{
digitalWrite(noMotionLight,HIGH);
digitalWrite(alarmLight,LOW);
Serial.println("No Motion Detected");
}
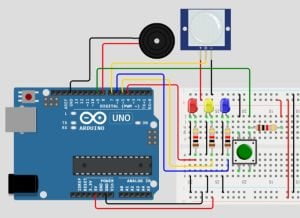
}The Circuit:
Assemble your components the same way as in the image below. I have used a Red LED for an Alert light, Yellow LED for the arming alarm light, and a Blue LED for a no motion detected light. If motion is triggered the alert light flashes and the alarm sounds, it will continue to do so, until the reset button is pressed.
Upload the Code:
Once your circuit is complete, upload the code to your Arduino board. Here’s what the status lights mean:
- The yellow LED will illuminate when the alarm is first turned on, to inform you the sensor is stabilizing, after it turns off, the alarm is armed.
- Once alarm is stabilized, the blue LED will be active until motion is detected.
- If motion is detected the red LED and buzzer will activate.
- To reset the alarm, press the push button to reset the alarm and sensor.
Conclusion
As we bring our Arduino motion detection and alarm project to a close, we’ve explored the fascinating world of sensor technology and security systems. With the PIR sensor’s ability to detect motion and the dynamic feedback of LEDs indicating the status of our alarm system, we’ve created a versatile and responsive guardian for our space. Whether you’re enhancing home security, experimenting with sensor technology, or simply enjoying the thrill of DIY electronics, this project demonstrates the power of Arduino to transform ideas into reality.
Happy Tinkering!
Recommendations:
The Elegoo Super Starter Kit
If you don’t already own any Arduino hardware, we highly recommend this kit as it has everything you need to start programming with Arduino. You can find out more about this kit, including a list of its components here: Elegoo Super Starter Kit
You can find this kit on Amazon here: Elegoo Super Starter Kit
The 0.96-inch Mini-OLED Display
We highly recommend this mini-OLED bundle of five 0.96-inch OLED displays. We have bought these before and they all worked perfectly. You can read more about the mini-OLED here: Mini-OLED
You can find this bundle on Amazon here: OLED Displays
Elegoo Nano (Arduino Compatible)
We have bought these Nano boards many times and can highly recommend them. There are three Nano boards in this pack making them a total bargain for everyone.
You can find this pack on Amazon here: Arduino Nano
