

Specter Analysis: Temperature Drop Sensor
Do you Believe in Ghosts?
“Let’s do some ghost hunting with Arduino!”
In the realm of the unknown, where shadows dance in the dimly lit corners of our imagination, and whispers of the supernatural send shivers down our spines, lies the timeless fascination with ghosts. For centuries, humans have been captivated by the idea of the afterlife and the enigmatic spirits that may linger among us. While some dismiss ghostly encounters as mere figments of our imagination, others remain resolutely convinced that there are forces beyond our comprehension at play.
In the pursuit of understanding the inexplicable, ghost hunters have employed an arsenal of tools and techniques, from electromagnetic field meters to EVP (Electronic Voice Phenomenon) recorders. But what if we told you that you could embark on your own paranormal investigation using something as commonplace as an Arduino and a simple temperature sensor?
Ghost Detection Theories
Here are some of the key theories associated with using temperature sensors for ghost detection:
Energy Drain Theory:
- This theory suggests that ghosts or spirits draw energy from their surroundings to manifest or interact with the physical world. As they do so, they may cause localized temperature drops, known as “cold spots,” due to the energy extraction. Paranormal investigators use temperature sensors to detect sudden, unexplained decreases in temperature as potential evidence of ghostly activity.
Residual Energy Theory:
- According to this theory, certain traumatic or emotionally charged events can leave residual energy imprints in a location. These imprints are believed to be associated with fluctuations in temperature. Investigating temperature changes may help ghost hunters identify areas where paranormal events are more likely to occur.
Spirit Manifestation Theory:
- Some paranormal enthusiasts believe that when spirits or entities attempt to manifest in our world, they may affect the ambient temperature. A sudden drop in temperature or the appearance of cold spots could be seen as an indication that a ghost is attempting to make its presence known.
Environmental Influence Theory:
- Ghost hunters also consider the possibility that ghosts manipulate their environment, including temperature, to communicate or interact with the living. Anomalous temperature fluctuations might be interpreted as deliberate attempts by a spirit to convey a message or draw attention.
Thermography and Apparition Theory:
- Infrared thermography, a more advanced technique, is sometimes used to detect temperature variations that cannot be observed with standard sensors. Some believe that these temperature fluctuations can correspond to the outline or presence of a ghostly apparition, which may be visible only in the infrared spectrum.
My Inspiration
It’s almost Halloween and I thought it’s a good time to make a spooky themed Arduino project. My daughter and I are massive fans the Supernatural genre and after watching movies such as Insidious and The Conjuring, I thought a ghost detection device would be perfect.
Let's Build!
Components:
- Arduino.
- DHT-11 Temp Sensor.
- Mini-OLED.
- LED.
- Buzzer.
- Potentiometer.
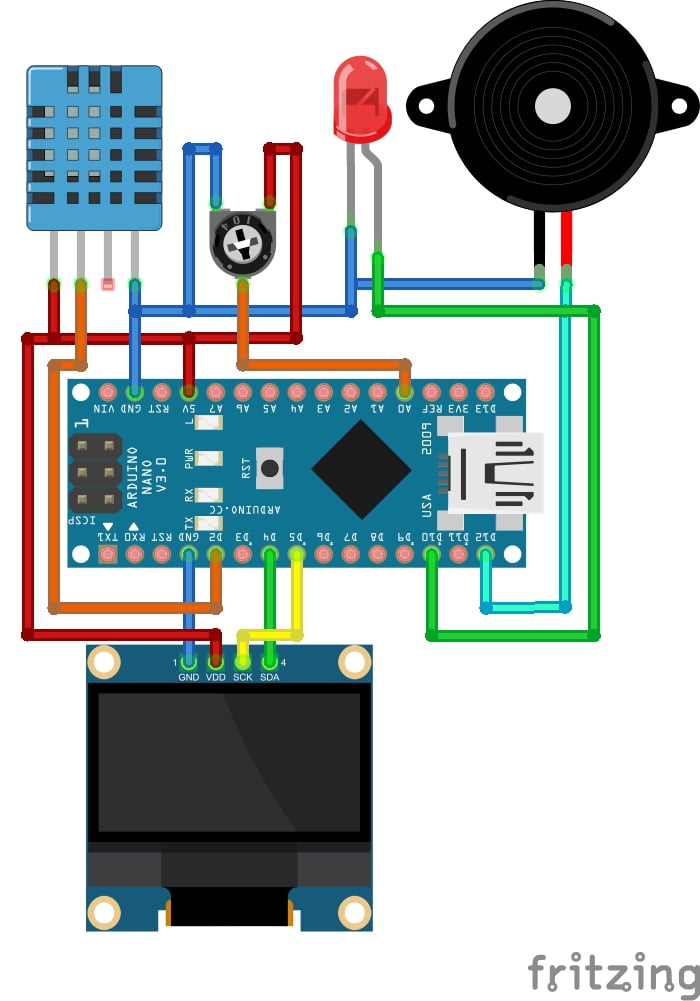
The Circuit:
There is a diagram below, but I will however detail every connection for you:
Mini-OLED:
- GND connects to GND on the Arduino.
- VCC connects to 5V on the Arduino.
- SCK connects to pin 5 on the Arduino.
- SDA connects to pin 4 on the Arduino.
DHT-11:
- VCC connects to 5V on the Arduino.
- Data pin connects to pin 2 on the Arduino.
- GND connects to GND on the Arduino.
LED:
- Long leg connects to pin 10 on the Arduino.
- Short leg connects to GND on the Arduino.
- Don’t forget to use a current limiting resistor in-between the long leg of the LED and pin 10.
Buzzer:
- Positive connects to pin 12 on the Arduino.
- Negative connects to GND on the Arduino.
Potentiometer:
- The middle leg to pin A0 on the Arduino.
- The other two legs connect to 5V and GND on the Arduino (doesn’t matter in which order).
The Code:
// Include Libraries
#include <Wire.h>
#include <Adafruit_GFX.h>
#include <Adafruit_SSD1306.h>
#include <DHT.h>

// Define Temp Sensor
#define DHTType DHT11
#define tempPin 2
DHT HT(tempPin, DHTType);

//Define OLED Settings
#define SCREEN_WIDTH 128
#define SCREEN_HEIGHT 64
Adafruit_SSD1306 display(SCREEN_WIDTH, SCREEN_HEIGHT, &Wire, -1);

//Declare Potentiometer To Control Detection Sensitivity
int potPin = A0; // Analog input pin for the potentiometer
float ALERT_THRESHOLD = 0.01;   // Variable to store the threshold value
float thresholdPotValue;   // Variable to store the potentiometer reading

float currentTemp;
float previousTemp = 0.0;
int ledPin = 10;
int buzzerPin = 12;

void setup() {
  pinMode(ledPin,OUTPUT);
  pinMode(buzzerPin,OUTPUT);
  Serial.begin(9600);
  HT.begin();
  if(!display.begin(SSD1306_SWITCHCAPVCC, 0x3C)) { // Address 0x3D for 128x64
    Serial.println(F("SSD1306 allocation failed"));
    for(;;);
  }
  display.display(); //Display logo
  delay(1000);
  display.clearDisplay();
}

void loop() {
  // Read the potentiometer value
  thresholdPotValue = analogRead(potPin);

  // Map the potentiometer value to your temperature range (e.g., 0.01 to 2.0 degrees Celsius)
  ALERT_THRESHOLD = map(thresholdPotValue, 0, 1023, 1, 100) / 100.0; // Adjust the mapping as needed and convert to float
  Serial.println(ALERT_THRESHOLD);

  // Read Temp Sensor
  currentTemp = HT.readTemperature();
  Serial.println(currentTemp);

  // Display Temp on OLED
  oledDisplay();

  // Check if the temperature has dropped below the threshold
  if ((previousTemp - currentTemp) >= ALERT_THRESHOLD) {

    // Temperature has dropped suddenly; trigger an alert
    Serial.println("Temperature has dropped suddenly!");

    // LED and buzzer alerts
    for (int i = 0; i < 2; i++) { // Flash the LED 5 times
      digitalWrite(buzzerPin, HIGH); // Turn the LED on
      delay(200); // Delay for 200 milliseconds (adjust as needed)
      digitalWrite(buzzerPin, LOW);  // Turn the LED off
      delay(200); // Delay for 200 milliseconds
      for (int i = 0; i < 3; i++) { // Sound the buzzer 3 times
        digitalWrite(ledPin, HIGH); // Turn the buzzer on
        delay(500); // Delay for 500 milliseconds (adjust as needed)
        digitalWrite(ledPin, LOW);  // Turn the buzzer off
        delay(500); // Delay for 500 milliseconds
      }
    }
  }
  previousTemp = currentTemp;
  delay(1000);
}

// OLED display function
void oledDisplay() {
  display.clearDisplay();
  display.setTextSize(2);
  display.setTextColor(WHITE);
  display.setCursor(40, 0);
  display.print("Temp");
  display.setCursor(38, 40);
  display.print(currentTemp);
  display.display();
}
Upload the Code:
Once the circuit is built and you have copied the code to your IDE you can upload the code to your Arduino.
The Ghost Detector will monitor and then alert if the temperature drops suddenly. The detection sensitivity can be adjusted using the potentiometer.
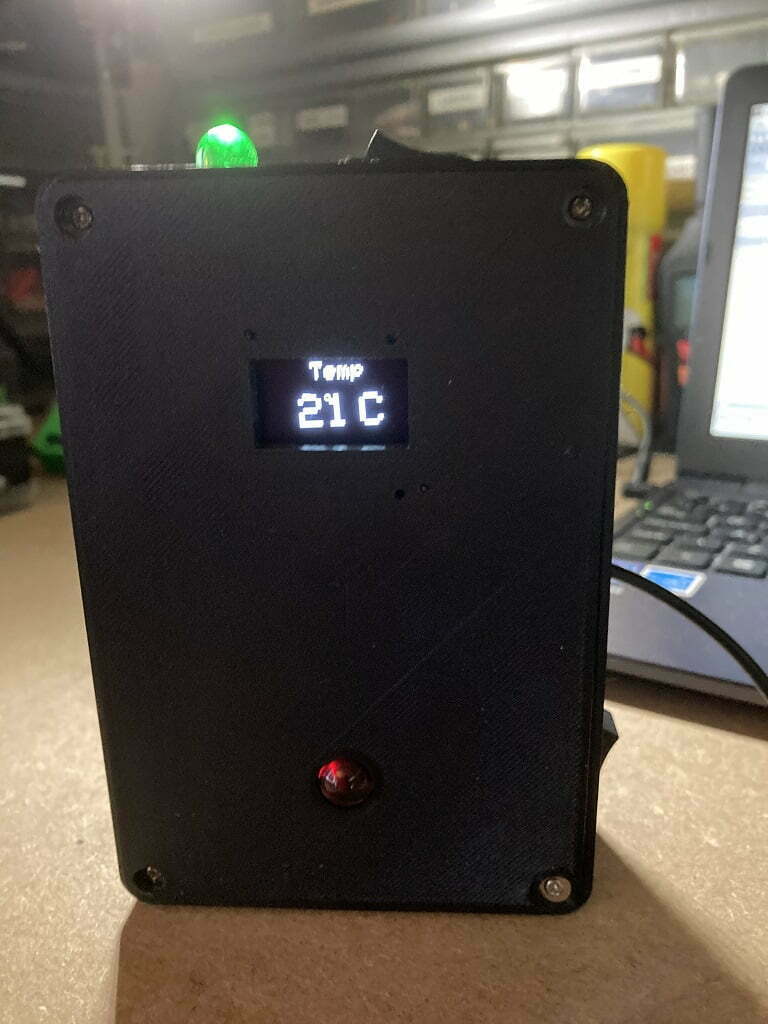
My Finished Ghost Hunting Prototype
To finish my project off, I printed this case for my circuit. It was just a project box I found on Thingyverse which I altered for my project.
Conclusion
In the realm where science and the supernatural converge, there are questions yet to be answered, stories yet to be told, and mysteries yet to be unraveled. And perhaps, one day, with the aid of technology and unwavering curiosity, we may inch closer to deciphering the enigma that is the world of ghosts and the uncharted territories of the afterlife. Until then, keep your temperature sensors at the ready, your senses finely tuned, and your spirit of exploration alive. The unknown awaits.
Happy Halloween!
Other Halloween Projects
If you enjoyed this post, please check out our previous Halloween project:
- PIR Prank. Arduino Halloween Project 2021.
Recommendations:
The Elegoo Super Starter Kit
If you don’t already own any Arduino hardware, we highly recommend this kit as it has everything you need to start programming with Arduino. You can find out more about this kit, including a list of its components here: Elegoo Super Starter Kit
You can find this kit on Amazon here: Elegoo Super Starter Kit
The 0.96-inch Mini-OLED Display
We highly recommend this mini-OLED bundle of five 0.96-inch OLED displays. We have bought these before and they all worked perfectly. You can read more about the mini-OLED here: Mini-OLED
You can find this bundle on Amazon here: OLED Displays
Elegoo Nano (Arduino Compatible)
We have bought these Nano boards many times and can highly recommend them. There are three Nano boards in this pack making them a total bargain for everyone.
You can find this pack on Amazon here: Arduino Nano
ESP8266 D1-Mini
D1-Mini is an Arduino compatible Wi-Fi board based on an ESP-8266-12F. This WLAN board has 9 digital I/O pins.
You can find this board on Amazon here: D1-Mini
