

A Guide to Object Detection with OpenCV
In the expansive canvas of computer vision, the ability to perceive and recognize objects is a groundbreaking capability. Welcome to the world of object detection with OpenCV, where algorithms breathe life into pixels, enabling machines to ‘see’ and understand the visual world. In this exploration, we delve into the intricate workings of object detection, from basic shapes to the identification and tracking of complex entities. Join us as we demystify the magic behind OpenCV, unveiling the unseen and opening doors to a future where machines comprehend the visual tapestry as we do.
What’s Covered:
- What is Object Detection?
- The SSD MobileNet v2 Convolutional Neural Network
- Nvidia’s Object Detection Program.
- Creating our own Object Detection Program.
- Object Detection on Images.
What is Object Detection?
Object Detection uses computer vision and image processing to identify objects of a specific class. Classes such as humans, vehicles, and animals are regularly monitored using object detection software. Object detection can be used for many tasks such as, vehicle counting, people counting, face detection, image annotation, image retrieval, animal monitoring, monitoring consumer activities and habits, even tracking an objects movement like a ball or a bat in a sports match. Object detection is commonly used everywhere. The consumer giant Amazon uses a robotic arm called “Sparrow” which is programmed using computer vision technology to recognize and handle millions of different products efficiently without human intervention.
The SSD MobileNet v2 Convolutional Neural Network
I will be using the SSD MobileNet v2 neural network, which is a combination of two detection models, SSD and MobileNet. SSD (single shot detector) is a family of algorithms used to create classification and bounding boxes for detected objects. MobileNet v2 is a CNN (convolutional neural network) architecture that does classification, object detection and semantic segmentation. MobileNet v2 is designed to work well on low end devices such as mobile devices, raspberry pi’s and in my case the Jetson Nano.
Together, the MobileNet base works as a feature extractor for the SSD layer which will then classify the detected objects.
NVidia’s Object Detection Program
Below is NVidia’s Object Detection program. It’s very effective and has only 10 lines of code. But as this is a post about OpenCV, my aim is to replicate what Dusty from NVidia has done but using OpenCV instead. To run Dusty’s code, you will need to install the Jetson Inference library for Python.
Python Code:
import jetson.inference
import jetson.utils

net = jetson.inference.detectNet("ssd-mobilenet-v2", threshold=0.5)
camera = jetson.utils.videoSource('/dev/video0')
display = jetson.utils.videoOutput()

while True:
  img=camera.Capture()
  detections = net.Detect(img)
  print(detections)
  display.Render(img)
  display.SetStatus("Object Detection | Network {:.0f} FPS".format(net.GetNetworkFPS()))

Creating our own Object Detection Program
I tried to replicate NVidia’s Object detection with OpenCV as close as i could, and while they look very similar, mine would only display the data and bounding box around one detection at a time. This was mainly due to the way I used cv2.FILLED to create the bounding box filled with color. I won’t bother sharing the code for the replica yet, as it wasn’t as successful as I hoped.
The Final Program
My code is full of comments describing each process, so I won’t go into too much detail about the code as we proceed through this post. If you have any questions, please leave them in the comment sections and I will answer them all as soon as possible.
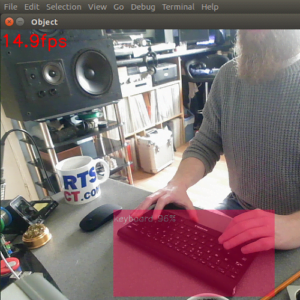
To achieve multiple detections at a time I had to remove the color fill from the bounding boxes. I also changed the bounding box color depending on the confidence values.
Python Code:
import cv2
import jetson_inference
import jetson_utils
import time
import numpy as np

#Create Inference Object
net = jetson_inference.detectNet("ssd-mobilenet-v2",threshold=.5)

#Set Desired Font for Text
font=cv2.FONT_HERSHEY_SIMPLEX

#Set up Camera
width=640
height=480
camera=cv2.VideoCapture(0)
camera.set(cv2.CAP_PROP_FRAME_WIDTH,width)
camera.set(cv2.CAP_PROP_FRAME_HEIGHT,height)

#Create Objects for FPS Results
fpsTime=time.time()
fpsAVG=0

while True:
  ret,frame=camera.read()

  #Grab Frame Height and Width
  height=frame.shape[0]
  width=frame.shape[1]

  #Convert Frame to RGBA so it can be Processed by Cuda
  img=cv2.cvtColor(frame, cv2.COLOR_BGR2RGBA).astype(np.float32)
  img=jetson_utils.cudaFromNumpy(img)

  #Run Detections on Captured Frame
  detections=net.Detect(img,width,height)

  #Create Loop to Grab Detection Data
  for obj in detections:
    print(obj)
    ID=obj.ClassID
    Confidence=obj.Confidence
    top=int(obj.Top)
    bottom=int(obj.Bottom)
    left=int(obj.Left)
    right=int(obj.Right)
    item=net.GetClassDesc(ID)

    #Format the Confidence Values
    newConf='{:.2f}'.format(Confidence)
    myConf=float(newConf)*100
    myConf2=int(myConf)

    #Create Bounding Box Color Based On Confidence
    if myConf2>=75: #Green
      objColor=(100,255,100)
    elif myConf2<75 and myConf2>=55: #Yellow
      objColor=(0,180,255)
    elif myConf2<55: #Red
      objColor=(100,100,255)

    #Add Bounding Box and Text to Detected Object
    cv2.rectangle(frame, (left,top), (right,bottom), (objColor), 2)
    cv2.putText(frame, str(myConf2)+'%'+' '+ item, (left,top+20), font, .5, (255,255,255), 2)

  #Add FPS to Frame
  dt=time.time()-fpsTime
  fpsTime=time.time()
  fps=1/dt
  fpsAVG=.9*fpsAVG+.1*fps
  cv2.putText(frame, str(round(fpsAVG,1))+'fps',(10,20),font,.5,(0,0,0),2)

  #Display Final Frame
  cv2.imshow('Object Detection',frame)

  if cv2.waitKey(1)==ord('q'):
    break

camera.release()
cv2.destroyAllWindows()
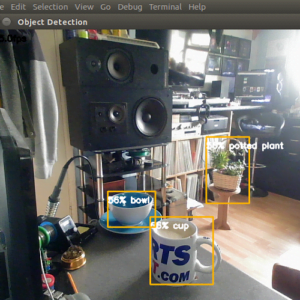
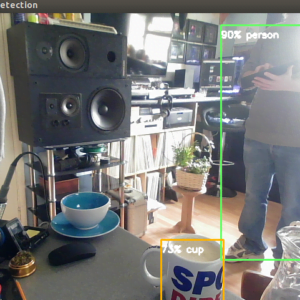
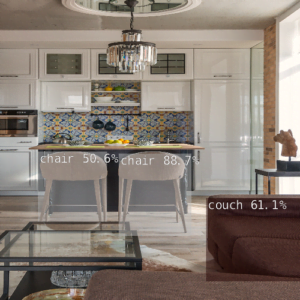
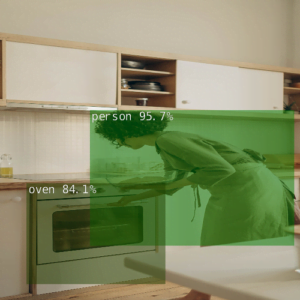
As you can see from the images above, multiple detections were successful. If the detection had a confidence value above 75%, the bounding box would be green. If the value was above 55% and less than 75%, the bounding box would be yellow. If the value was less than 55%, the bounding box would be red. I was pleased with the end result, though I do wish I had figured out how to keep the color fill in the bounding boxes, but I will return and make this work.
Object Detection on Images
The code for detecting objects within images is slightly different than on live video, mainly because all the color conversions I had to do, to display the detections.
Python Code:
import cv2
import jetson_inference
import jetson_utils
import numpy as np

#Create Inference Object
net = jetson_inference.detectNet("ssd-mobilenet-v2",threshold=.5)

#Set Image Window Parameters
width=800
height=650
dim=width,height

#Location of images
imgDIR='/home/meganano/Desktop/Python-AI/ObjectDetection/objectImages/'

#Start with first image
image=1

while True:
  #read image
  img=cv2.imread(imgDIR+str(image)+'.jpg')

  #resize image
  resImg=cv2.resize(img,dim)

  #Convert image to RGBA so it can be processed by Cuda
  imgRGB=cv2.cvtColor(resImg, cv2.COLOR_BGR2RGBA).astype(np.float32)
  imgRGB=jetson_utils.cudaFromNumpy(imgRGB)

  #Run detections on image
  detections=net.Detect(imgRGB, width, height)

  #Convert image from Cuda back to Numpy array
  imgRGB=jetson_utils.cudaToNumpy(imgRGB)

  #Convert RGBA image to RGB
  imgRGB=cv2.cvtColor(imgRGB, cv2.COLOR_RGBA2RGB).astype(np.uint8)

  #Convert RGB image back to BGR
  imgRGB=cv2.cvtColor(imgRGB, cv2.COLOR_RGB2BGR)

  #Display image
  cv2.imshow('image', imgRGB)

  #Add Pause, press any key to continue
  cv2.waitKey(0)

  #Next image control
  image+=1

  #Exit program if last image has been displayed
  if image>8:
    print('Program Exited Cleanly')
    break

cv2.destroyAllWindows()
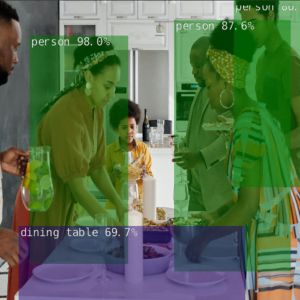
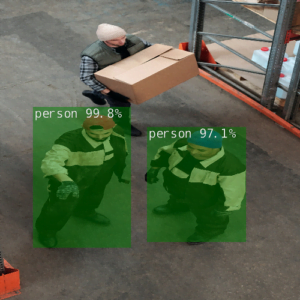
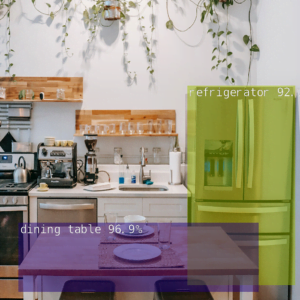

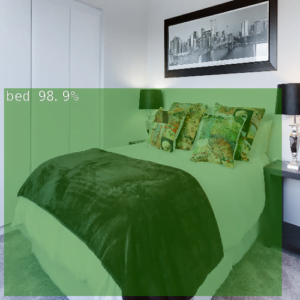
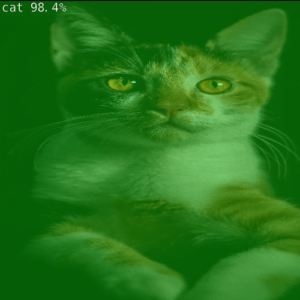
To my surprise I realized I didn’t need to add the bounding boxes and confidence values, as they appeared without my input, I’m guessing this was applied by the SSD side of the SSD MobileNet v2 neural network. Maybe this was the key to making the perfect replica of Dusty’s Object Detection program. I will hopefully return soon with an updated program.
Conclusion
As we conclude our expedition through the fascinating landscape of object detection with OpenCV, it’s evident that the ability to recognize and understand visual elements is a cornerstone of modern technology. From surveillance systems to autonomous vehicles, the applications are as diverse as the objects themselves. Armed with the insights gained from this journey, you now hold the key to unlocking the potential of object detection with OpenCV. As you venture into your own projects, remember that every detected object tells a story, and OpenCV empowers you to reveal and interpret these narratives.
In the next installment of our OpenCV for Beginners guide we will be learning Color Detection
That’s All Folks!
You can find all of our OpenCV guides here: OpenCV for Beginners

