

Welcome to the World of Sensors and Modules with Arduino!
Microphone Sound Sensors are essential components in electronic projects for detecting and measuring sound levels. These sensors are designed to capture variations in sound intensity and convert them into electrical signals, providing a reliable method for monitoring audio environments. One of the notable features of these sensors is their ability to generate both analog and digital outputs, offering flexibility in interfacing with microcontrollers like Arduino. In this sensors and modules guide, we’ll explore the High Sensitivity Sound Sensor, Low Sensitivity Sound Sensor, their working principles, key features, applications, and how to integrate them with your Arduino projects.
If you’re new to Arduino, why not take a look at our Getting Started with Arduino guides. These guides are designed for beginners to learn the fundamental basics of Arduino programming.
How the Microphone Sound Sensors Work
Microphone Sound Sensors involve capturing sound waves and converting them into electrical signals. Inside the sensor, a sensitive microphone element detects the variations in air pressure caused by sound waves. These variations are then transformed into electrical signals. For the analog output, the sensor provides a voltage level corresponding to the intensity of the detected sound. In the case of the digital output, a comparator circuit determines whether the sound level exceeds a predefined threshold, generating a binary signal accordingly.
Features and Specifications:
- Operating Voltage: 3.3V ~ 5V
- Frequency Response range: 50Hz~20kHz
- Sensitivity: 48 ~ 66dB
- Impedance: 2.2KΩ
- Output: Analog and Digital Signals.
- Adjustable Sensitivity: Using the onboard trimmer potentiometer, you can set the min/max threshold.
- Status Indicator: Onboard LED
- Comparator Threshold Indicator: Onboard LED
- Polar Pattern: Universal
- Operating temperature: -40 to 85C
- Operating humidity: < 90%
- Size: 41mm x 15mm
- Compatibility: This sensor is also compatible with other devices like the Raspberry Pi, ESP32, and ESP8266 etc…
Necessary Equipment:
- Arduino board (e.g., Arduino Uno)
- High Sensitivity or Low Sensitivity Sound Sensor
- Jumper wires
- Breadboard (optional)
Pin Configuration
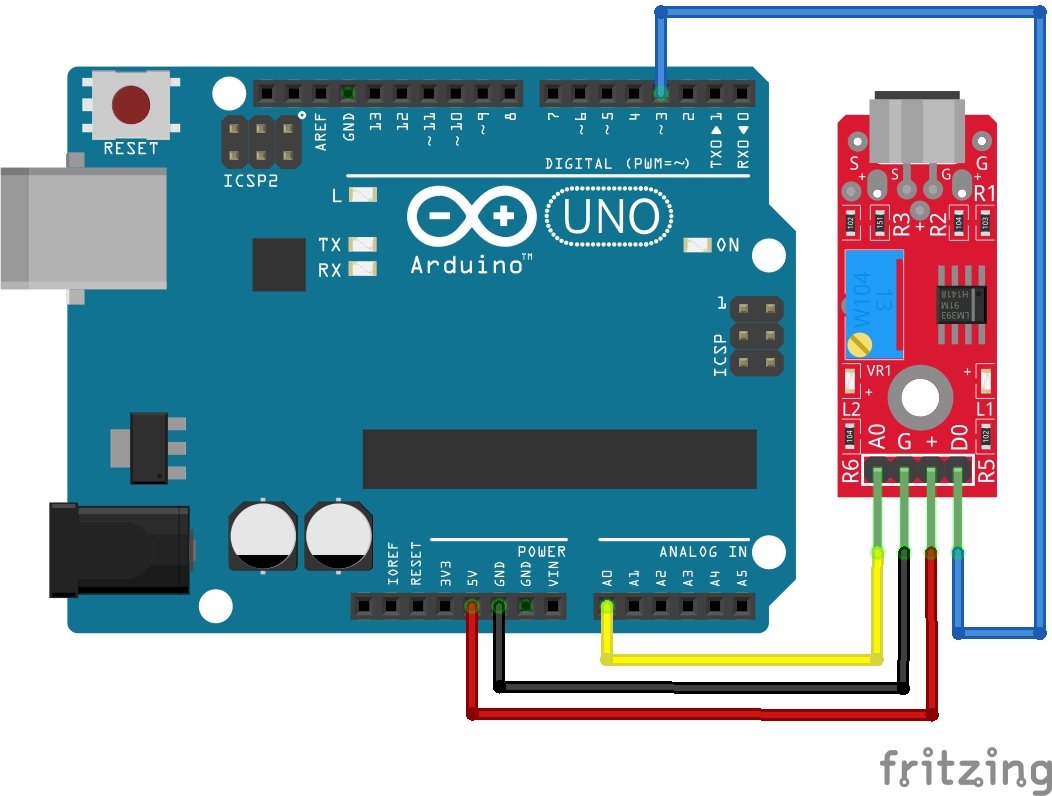
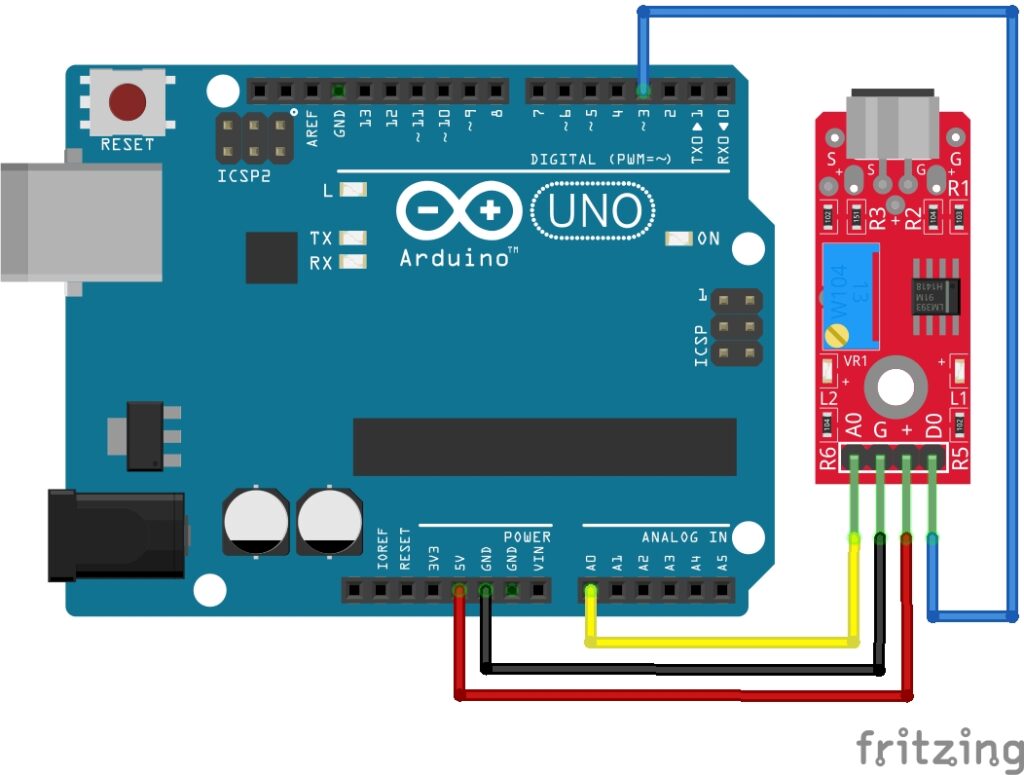
Wiring the Microphone Sound Sensor to an Arduino is fairly simple. The connections are as follows:
- A0 on the Microphone Sound Sensor to A0 (or any analog pin) on the Arduino.
- G on the Microphone Sound Sensor to GND on the Arduino.
- + on the Microphone Sound Sensor to 5V on the Arduino.
- D0 on the Microphone Sound Sensor to Digital pin 3 (or any digital pin) on the Arduino.
Pin labels may vary.
The diagram below displays connecting the KY-037 High Sensitivity Sound Sensor Module to an Arduino, you can follow the same diagram for the Low Sensitivity Sound Sensor module too.
KY-037 High Sensitivity Sound Detection Module Fritzing Part is created by arduinomodules.info and published under Creative Commons Attribution-ShareAlike 4.0 International license
Arduino Code Example
const int soundSensorPin = A0;          // Analog pin connected to the sound sensor
const int digitalInputPin = 2;         // Digital pin connected to the comparator output

void setup() {
  Serial.begin(9600);                  // Initialize serial communication
  pinMode(soundSensorPin, INPUT);      // Set sound sensor pin as input
  pinMode(digitalInputPin, INPUT);     // Set digital input pin
}

void loop() {
  // Read analog value from the sound sensor
  int sensorValue = analogRead(soundSensorPin);

  // Convert analog value to voltage
  float voltage = sensorValue * (5.0 / 1023.0);

  // Read digital value from the comparator output
  int digitalValue = digitalRead(digitalInputPin);

  // Print the voltage value to the serial monitor
  Serial.print("Sound Sensor Voltage: ");
  Serial.print(voltage);
  Serial.println(" V");

  // Check if the digital value is HIGH, indicating threshold reached
  if (digitalValue == HIGH) {
    Serial.println("Threshold Reached!");  // Sound exceeded threshold
  } else {
    Serial.println("Threshold Not Yet Reached.");  // Sound is lower than the threshold
  }

  // Wait for a short delay before reading again
  delay(1000);
}
Breaking Down the Code
Constants Definition
const int soundSensorPin = A0;Defines the analog pin connected to the sound sensor.const int digitalInputPin = 2;Defines the digital pin connected to the comparator output.
Setup Function
Serial.begin(9600);Initializes serial communication at a baud rate of 9600.pinMode(soundSensorPin, INPUT);Sets the sound sensor pin as input.pinMode(digitalInputPin, INPUT);Sets the digital input pin (connected to the comparator output) as input.
Loop Function
- Analog Reading:
int sensorValue = analogRead(soundSensorPin);Reads analog value from the sound sensor.float voltage = sensorValue * (5.0 / 1023.0);Converts analog value to voltage (assuming a 5V reference voltage).
- Digital Reading:
int digitalValue = digitalRead(digitalInputPin);Reads digital value from the comparator output.
- Serial Output:
Serial.print("Sound Sensor Voltage: ");Prints a message indicating the start of the output.Serial.print(voltage);Prints the voltage value read from the sound sensor.Serial.println(" V");Prints units (volts) and a newline character.
- Threshold Check:
if (digitalValue == HIGH) { ... }Checks if the digital value is HIGH, indicating the threshold (set by the comparator) is reached.Serial.println("Sound detected!");Prints “Sound detected!” if the threshold is reached.else { Serial.println("No sound detected."); }Prints “No sound detected.” if the threshold is not reached.
- Delay:
delay(1000);Waits for 1 second before reading the sensors again.
Applications and Usage Scenarios
Noise Level Monitoring
Microphone Sound Sensors are used in noise level monitoring systems, helping to assess and control ambient noise in various environments.
Security Systems
These sensors can be integrated into security systems to detect unusual sounds, acting as a part of an alarm system.
Smart Home Applications
Microphone Sound Sensors contribute to smart home applications, such as automated lighting or security systems that respond to specific sound triggers.
Industrial Automation
In industrial settings, these sensors are employed to monitor machine sounds, ensuring that equipment operates within acceptable noise levels.
Clap Switch
Create a hands-free control system by using the digital output to trigger actions, such as turning on/off lights or appliances with a simple clap.
Noise Pollution Monitoring
Build a portable noise pollution monitoring device using the analog output to measure and log sound levels in different locations.
Conclusion
In this sensors and modules guide, we explained the functionality of Microphone Sound Sensors, exploring their working principles, and demonstrating how to interface them with an Arduino for practical applications. Utilizing these modules with both analog and digital outputs provide a versatile solution for a range of applications, from hobbyist projects to industrial automation. Experiment with different sensitivity settings and explore innovative ways to utilize sound as a trigger for various actions in your electronic endeavors.
Discover the endless possibilities for Arduino projects with more of our Sensors and Modules guides.
This is exactly what I was looking for. Thanks for the useful information.