
How to Build your own War Driving Device with Arduino
War Driving with Arduino
In this Arduino Hacking Tools guide, we are going to learn about war driving. Then we will make our own war driving device using a D1-Mini, GPS module, and an SD Card module to log the captured data.
Components Needed:
What is War Driving?
War driving is the act of using a vehicle to search for and exploit vulnerable wireless networks, such as Wi-Fi networks, while driving or moving around in an area. The term is a play on the words “wardriving” and “war driving.”
Key Points About War Driving:
Objective:
The primary objective of war driving is to identify and potentially access wireless networks that are inadequately secured or left open intentionally. Hackers and security researchers often engage in war driving to discover networks with weak or no encryption.
Tools:
War drivers typically use specialized software and hardware to scan for and log information about wireless networks in their vicinity. Common tools include laptops, smartphones, or dedicated devices with Wi-Fi cards capable of detecting networks and capturing data.
Mapping and Database Creation:
As war drivers move around, they create maps of Wi-Fi networks’ locations and characteristics. This information can be used to create databases of vulnerable networks for various purposes.
Legality:
The legality of war driving depends on the intent and actions of the individual. While it is generally legal to passively scan for and identify open Wi-Fi networks, actively attempting to gain unauthorized access or using the data for malicious purposes is illegal in many jurisdictions.
Security Risks:
War driving highlights the importance of securing wireless networks. Open or poorly secured Wi-Fi networks can be exploited by malicious individuals to steal data, launch cyberattacks, or engage in other illegal activities.
Prevention:
To prevent unauthorized access and reduce the risk of being targeted by war drivers, network owners should secure their Wi-Fi networks with strong passwords, encryption (WPA2/WPA3), and other security measures. Regularly changing default router credentials is also essential.
Countermeasures:
There are also countermeasures to detect and deter war drivers, such as intrusion detection systems (IDS) and intrusion prevention systems (IPS). Network administrators can monitor for suspicious activities and automatically respond to potential threats.
Ethical War Driving:
Some individuals engage in ethical war driving to help network owners identify and secure their vulnerable networks. They may contact network owners to inform them of security issues and suggest solutions.
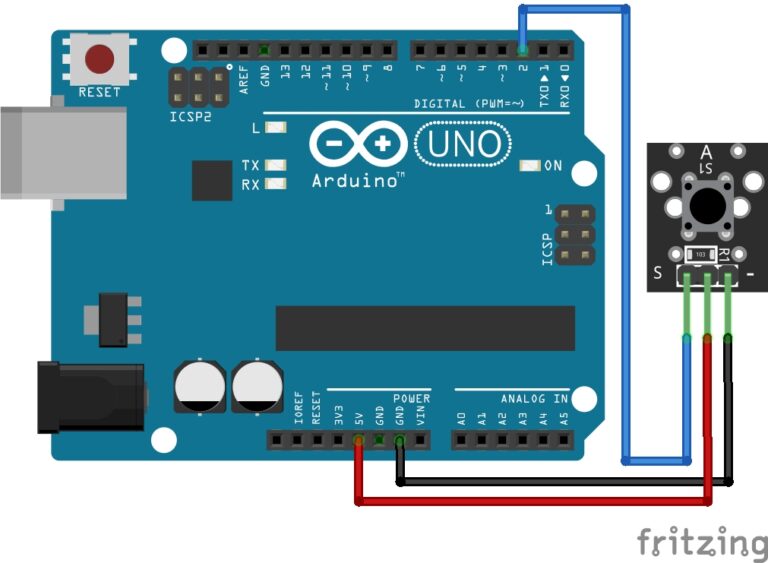
The Circuit:
I recommend using the D1-Mini SD Card Shield as you can just sit it onto the D1-Mini easily, but if you are using a different SD Card module you can follow the connections below.
SD Card Module:
- D5 to CLK
- D6 to MISO
- D7 to MOSI
- D8 to CS
GPS Module:
- D4 to TX
- D3 to RX
VCC on both modules goes to 5V and GND to G or GND.

The Code:
To use the D1-Mini, you need to have the ESP8266 boards manager installed to your Arduino IDE, if you need to, you can follow our guide on setting up the D1-Mini here: D1-Mini Setup Guide
You will need to have the following libraries installed:
- TinyGPSPlus
- ESP8266WiFi
- SD
If you need help installing libraries, you can read our guide here: How to install Arduino Libraries
/**************************************************************************
 *                  tinyWARMACHINE Modified by Meganano                   *
 *  War Driving Arduino Wi-Fi Access Point Scanner with GPS Coordinates   *
 **************************************************************************
 IDE Board Settings:
 boards manager : LOLIN(WEMOS)D1 R2 & mini
 upload speed   : 921600
 cpu frequency  : 160mhz
 ***************************************************************************/

#include <TinyGPS++.h>
#include <SoftwareSerial.h>
#include <ESP8266WiFi.h>
#include <SD.h>

#define SD_CS      D8
SoftwareSerial serial_connection(D4, D3); // tx,rx
TinyGPSPlus gps;

String logFileName = "";
int networks = 0;
int LOG_RATE = 1000;
//int blank=D2;


void initializeSD() {
  Serial.println("Creating Log File");
  int i = 0;
  logFileName = "log0.txt";
  while (SD.exists(logFileName)) {
    i++; logFileName = "log" + String(i) + ".txt";
  }
  File logFile = SD.open(logFileName, FILE_WRITE);
  if (logFile) {
    Serial.println("Log File Created");
    logFile.println("WarDriving Report");
    logFile.close();
  }
}


void setup() {
  Serial.begin(9600);
  serial_connection.begin(9600);
  Serial.println("GPS Starting");
  delay(30000);
  WiFi.mode(WIFI_STA);
  WiFi.disconnect();

  while (!SD.begin(SD_CS)) {
    Serial.println("SD Not Found");
  }
  Serial.println("SD Found");
  initializeSD();
  delay(500);
  Serial.println("tinyWARMACHINE Started");
}

String getEncryption(uint8_t network, String src) { // return encryption for WiGLE or print
  byte encryption = WiFi.encryptionType(network);
  switch (encryption) {
    case 2:
      if (src == "screen") {
        return "WPA";
      }
      return "[WPA-PSK-CCMP+TKIP][ESS]";
    case 5:
      if (src == "screen") {
        return "WEP";
      }
      return "[WEP][ESS]";
    case 4:
      if (src == "screen") {
        return "WPA2";
      }
      return "[WPA2-PSK-CCMP+TKIP][ESS]";
    case 7:
      if (src == "screen") {
        return "NONE" ;
      }
      return "[ESS]";
    case 8:
      if (src == "screen") {
        return "AUTO";
      }
      return "[WPA-PSK-CCMP+TKIP][WPA2-PSK-CCMP+TKIP][ESS]";
    default:
      return "?";;
  }
}

void loop() {
  //Start Wi-Fi Scan
  WiFi.disconnect();
  delay(100);
  int n = WiFi.scanNetworks();
  if (n == 0){
    Serial.println("No Networks Found");
  }else{
    File logFile = SD.open(logFileName, FILE_WRITE);
    logFile.println("");
    logFile.print(n);
    logFile.println(" Networks Found");
    Serial.print(n);
    Serial.println(" Networks Found");
    for (int i = 0; i < n; ++i) {
      Serial.print(i + 1);
      Serial.print(": ");
      Serial.print("SSID: "); Serial.print(WiFi.SSID(i));
      Serial.print(" | Channel: "); Serial.print(WiFi.channel(i));
      Serial.print(" | Strength: "); Serial.print(WiFi.RSSI(i));
      Serial.print(" | MAC: "); Serial.print(WiFi.BSSIDstr(i));
      Serial.print(" | Security: "); Serial.print(getEncryption(i, ""));
      Serial.print((WiFi.encryptionType(i) == ENC_TYPE_NONE) ? " Unsecured" : " Secured");

      //Log Wi-Fi Data
      logFile.print(i + 1); logFile.print(": ");
      logFile.print("SSID: "); logFile.print(WiFi.SSID(i));
      logFile.print(" | Channel:"); logFile.print(WiFi.channel(i));
      logFile.print(" | Strength:"); logFile.print(WiFi.RSSI(i));
      logFile.print(" | MAC:"); logFile.print(WiFi.BSSIDstr(i));
      logFile.print(" | Security:"); logFile.print(getEncryption(i, ""));
      logFile.print((WiFi.encryptionType(i) == ENC_TYPE_NONE) ? " Unsecured" : " Secured");
      //Start GPS Scan
      while(serial_connection.available()){
        gps.encode(serial_connection.read());
      }
      Serial.print(" | Longitude: "); Serial.print(gps.location.lng(), 6);
      Serial.print(" | Latitude: "); Serial.print(gps.location.lat(), 6);
      Serial.println("");
      //Log GPS Data
      logFile.print(" | Longitude:"); logFile.print(gps.location.lng(), 6);
      logFile.print(" | Latitude:"); logFile.print(gps.location.lat(), 6);
      logFile.println("");
    }
    logFile.close();
    delay(LOG_RATE);
  }
}
Upload the Code:
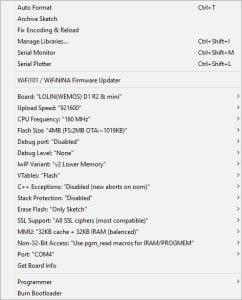
Once you have your circuit built, you can go ahead and upload the code. The image below shows you the Arduino IDE board settings I used to successfully upload the code to the D1-Mini. Once uploaded, the GPS takes 30 seconds to balance and hopefully make a connection to any satellites above.
The Result:
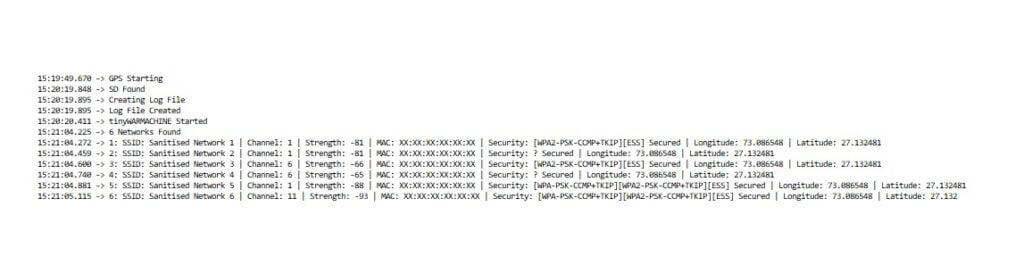
In the images below you can see it is finding Wi-Fi access points nearby and logging each of the network’s details:
- SSID.
- Wi-Fi Channel.
- Signal Strength.
- MAC Address.
- Wireless Encryption Type.
- Longitude and Latitude.
This data can be seen in the Arduino’s serial monitor and it is logged to the SD Card, so you can drive around and capture Wi-Fi access points wherever you go.

Conclusion
War driving has been around for many years and has evolved with changes in technology and security practices. While it can be used for malicious purposes, it can also serve as a reminder of the importance of securing wireless networks to protect personal and sensitive data. We have more Arduino Hacking guides to come, so stay tuned.
Happy Hacking Folk’s
Arduino Recommendations:
The Elegoo Super Starter Kit
If you don’t already own any Arduino hardware, we highly recommend this kit as it has everything you need to start programming with Arduino. You can find out more about this kit, including a list of its components here: Elegoo Super Starter Kit
You can find this kit on Amazon here: Elegoo Super Starter Kit
The 0.96-inch Mini-OLED Display
We highly recommend this mini-OLED bundle of five 0.96-inch OLED displays. We have bought these before and they all worked perfectly. You can read more about the mini-OLED here: Mini-OLED
You can find this bundle on Amazon here: OLED Displays
Elegoo Nano (Arduino Compatible)
We have bought these Nano boards many times and can highly recommend them. There are three Nano boards in this pack making them a total bargain for everyone.
You can find this pack on Amazon here: Arduino Nano
ESP8266 D1-Mini
D1-Mini is an Arduino compatible Wi-Fi board based on an ESP-8266-12F. This WLAN board has 9 digital I/O pins.
You can find this board on Amazon here: D1-Mini

