

Welcome to the World of Sensors and Modules with Arduino!
The Ultrasonic Sensor stands as a beacon of accuracy, simplicity, and versatility. This module utilizes ultrasonic waves to measure distances and is widely employed in robotics, automation, and countless other Arduino projects. In this sensors and modules guide, we’ll explore its working principle, key features, applications, and how it can enhance your Arduino projects.
If you’re new to Arduino, why not take a look at our Getting Started with Arduino guides. These guides are designed for beginners to learn the fundamental basics of Arduino programming.
How the Ultrasonic Sensor Works
The HC-SR04 sensor operates on the principle of ultrasonic echoes. It emits ultrasonic waves and calculates distance by measuring the time it takes for the waves to bounce back after hitting an object. This process enables precise and non-contact distance measurements, making it an ideal choice for various applications.
Features and Specifications
- Operating Voltage: 5V
- Detection Range: 2cm ~ 500cm
- Resolution: 1cm
- Ultrasonic Frequency: 40kHz
- Compatibility: This sensor is also compatible with other devices like the Raspberry Pi, ESP32, and ESP8266 etc…
Necessary Equipment:
- Arduino
- HC-SR04 ultrasonic sensor
- Jumper wires
- Breadboard (optional)
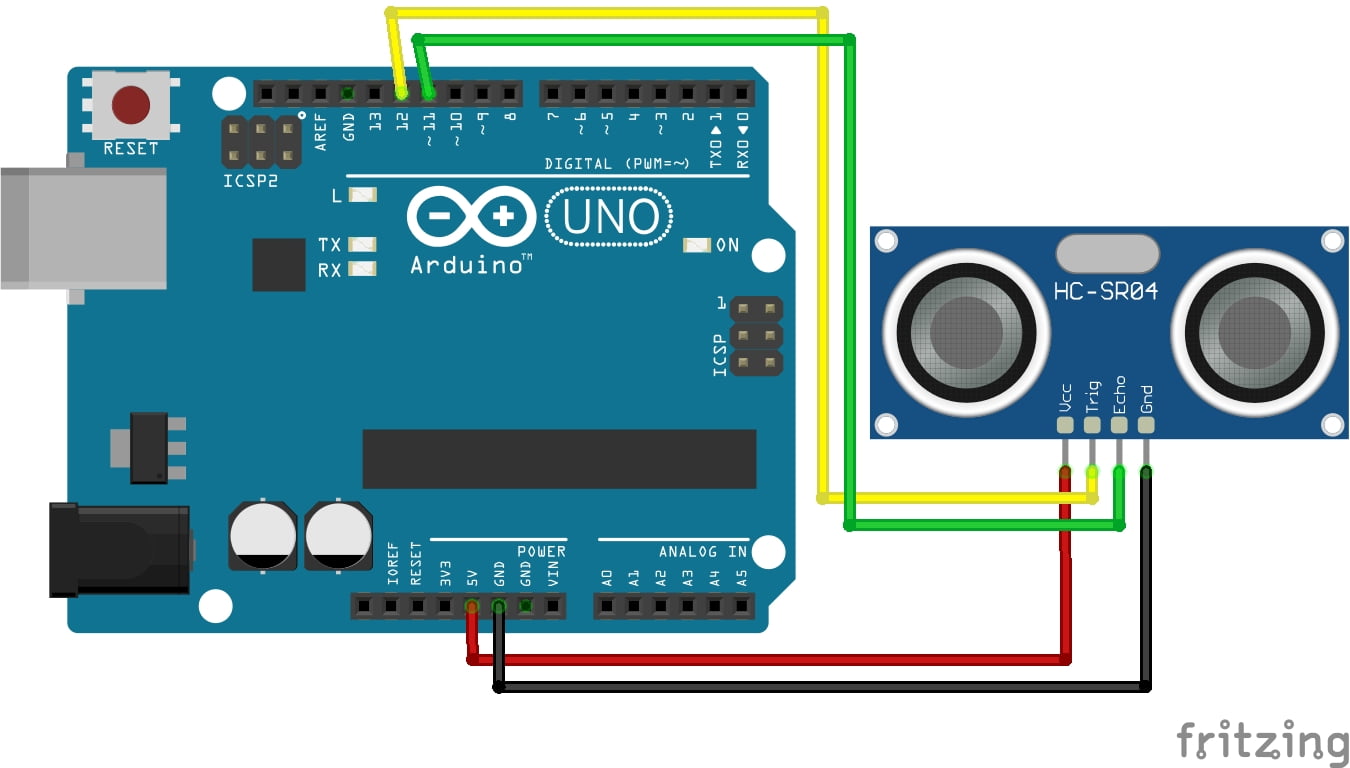
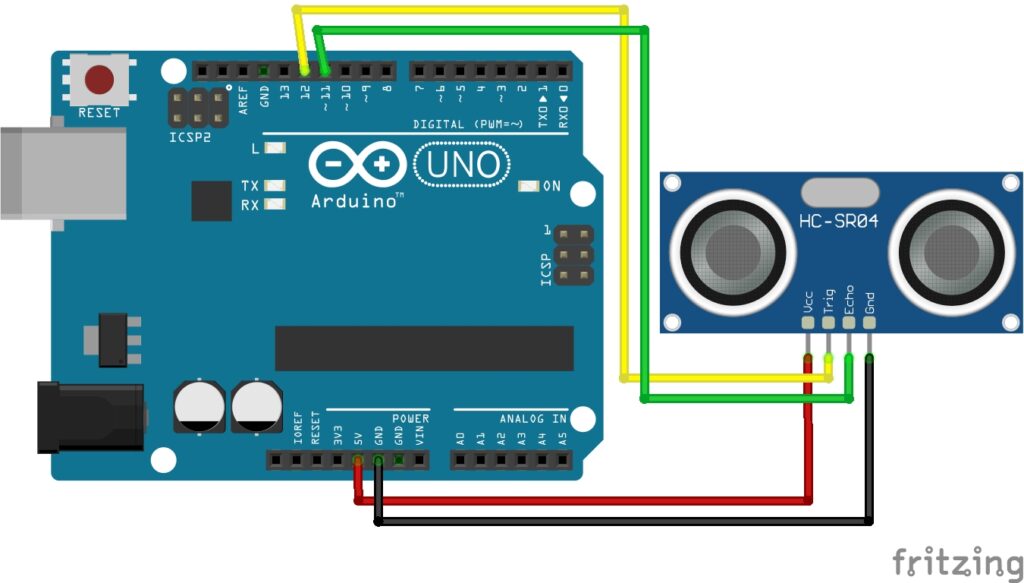
Pin Configuration
Connecting the Ultrasonic Sensor to an Arduino is fairly simple. The connections are as follows:
- VCC on the Ultrasonic Sensor to 5V on the Arduino.
- Trig (trigger) on the Ultrasonic Sensor to Digital pin 12 on the Arduino.
- Echo on the Ultrasonic Sensor to Digital pin 11 on the Arduino.
- GND on the Ultrasonic Sensor to GND on the Arduino.
Pin labels may vary.
Arduino Code Example:
// Define the pins for the trigger and echo
const int trigPin = 12;
const int echoPin = 11;

void setup() {
  // Initialize serial communication for debugging
  Serial.begin(9600);

  // Define the trigger pin as an OUTPUT
  pinMode(trigPin, OUTPUT);
  // Define the echo pin as an INPUT
  pinMode(echoPin, INPUT);
}

void loop() {
  // Trigger a pulse by setting the trigger pin HIGH for 10 microseconds
  digitalWrite(trigPin, HIGH);
  delayMicroseconds(10);
  digitalWrite(trigPin, LOW);

  // Measure the duration of the pulse on the echo pin
  long duration = pulseIn(echoPin, HIGH);

  // Convert the duration into distance in centimeters
  // (speed of sound is approximately 343 m/s)
  float distanceCM = (duration / 2.0) * 0.0343;

  // Print the distance to the Serial Monitor
  Serial.print("Distance: ");
  Serial.print(distanceCM);
  Serial.println(" cm");

  // Wait a moment before taking the next measurement
  delay(1000);
}
Breaking Down the Code
Declarations
- The code defines two constant integers
trigPinandechoPinrepresenting the pins used for trigger and echo signals respectively.
Setup Function
Serial.begin(9600): Initializes serial communication with a baud rate of 9600 bits per second, allowing communication between the Arduino and a computer via the USB cable.pinMode(trigPin, OUTPUT): Sets the trigger pin (trigPin) as an output pin, indicating that it will send out signals.pinMode(echoPin, INPUT): Sets the echo pin (echoPin) as an input pin, indicating that it will receive signals.
Loop Function
- Triggering:
digitalWrite(trigPin, HIGH): Sets the trigger pin (trigPin) to HIGH, triggering the ultrasonic sensor to send out an ultrasonic pulse.delayMicroseconds(10): Delays the execution for 10 microseconds to ensure the trigger signal is stable.digitalWrite(trigPin, LOW): Sets the trigger pin (trigPin) back to LOW.
- Distance Measurement:
long duration = pulseIn(echoPin, HIGH): Measures the duration of the pulse received on the echo pin (echoPin) when the ultrasonic pulse is reflected back from an object.float distanceCM = (duration / 2.0) * 0.0343: Converts the duration of the pulse into distance in centimeters. The speed of sound is approximately 343 m/s.
- Output:
Serial.print("Distance: "): Prints the text “Distance: ” to the Serial Monitor.Serial.print(distanceCM): Prints the distance calculated earlier to the Serial Monitor.Serial.println(" cm"): Prints ” cm” to the Serial Monitor followed by a newline character.
- Delay:
delay(1000): Introduces a delay of 1000 milliseconds (1 second) between measurements to prevent the code from executing too quickly. During this delay, the Arduino is idle, not executing any code.
Applications and Usage Scenarios
Obstacle Avoidance Robot
Utilize the HC-SR04 sensor mounted on a robot to detect obstacles in its path, enabling autonomous navigation. Process distance measurements from the sensor and control the robot’s motors to avoid collisions with detected obstacles.
Smart Parking System
Install HC-SR04 sensors in parking spaces to detect vehicle presence and indicate available spots. Arduino monitors multiple sensors, providing real-time feedback on parking availability using LEDs or digital displays.
Security System
Use HC-SR04 sensors to detect motion or intruders near entry points of buildings. Trigger alarms or send notifications when the sensors detect movement, enhancing security measures.
Conclusion
In this sensors and modules guide, we explained the functionality of the Ultrasonic Sensor, exploring its working principles, and demonstrating how to interface it with an Arduino for practical applications.
By leveraging the capabilities of Arduino and the HC-SR04 Ultrasonic sensor, developers can create a wide range of projects, including robotics, automation systems, smart devices, and environmental monitoring solutions. Arduino’s versatility, coupled with the precision and reliability of the HC-SR04 sensor, enables the development of custom solutions tailored to specific needs and requirements. Additionally, Arduino’s user-friendly platform facilitates rapid prototyping, experimentation, and educational initiatives, making it an ideal choice for hobbyists, students, and professionals alike.
Discover the endless possibilities for Arduino projects with more of our Sensors and Modules guides.
