


Welcome to the World of Sensors and Modules with Arduino!
The Two-Color LED stands as versatile component, offering a spectrum of colors and lighting effects within a single package. These LEDs, often known as bi-color or dual-color LEDs, allow for the emission of two distinct colors, enabling captivating lighting solutions and creative visual displays. In this sensors and modules guide, we’ll explore the Two-Color LED Modules working principle, key features, applications, and how it can enhance your Arduino projects.
How the Two-Color LED Works
The Two-Color LED integrates two light-emitting diodes (LEDs) in one housing, each emitting a different color (typically red and green or red and blue). By controlling the current flow to each LED within the package, various colors can be produced, providing flexibility in lighting design.
If you’re new to Arduino, why not take a look at our Getting Started with Arduino guides. These guides are designed for beginners to learn the fundamental basics of Arduino programming.
Features and Functionality
- Dual LEDs: Houses two LEDs in a single package.
- Color: Green and Red.
- LED Size: 5mm.
- Operating Voltage:
- Red: 1.9 ~ 2.2V.
- Green: 2.3 ~ 2.6V.
- Operating Current: 20mA.
- Luminous Intensity:
- Red: 60 ~ 80 millicandelas.
- Green: 20 ~ 40 millicandelas.
- Compatibility: This module is also compatible with other devices like the Raspberry Pi, ESP32, and ESP8266 etc…
It’s important to note that these are values are from the Two-Color LED Module supplied with the Elegoo 37 Sensor Kit V2 datasheet. The actual operating voltage of your Two-Color LED may vary depending on the specific LED model, manufacturer.
Necessary Equipment:
- Arduino board (e.g., Arduino Uno)
- Two Color LED Module
- x2 220Ω Resistors (if required)
- Breadboard
- Jumper wires
Some Two-Color LED Modules, like the ones found in the Elegoo 37 Sensor Kit already have the resistors soldered onto the board.
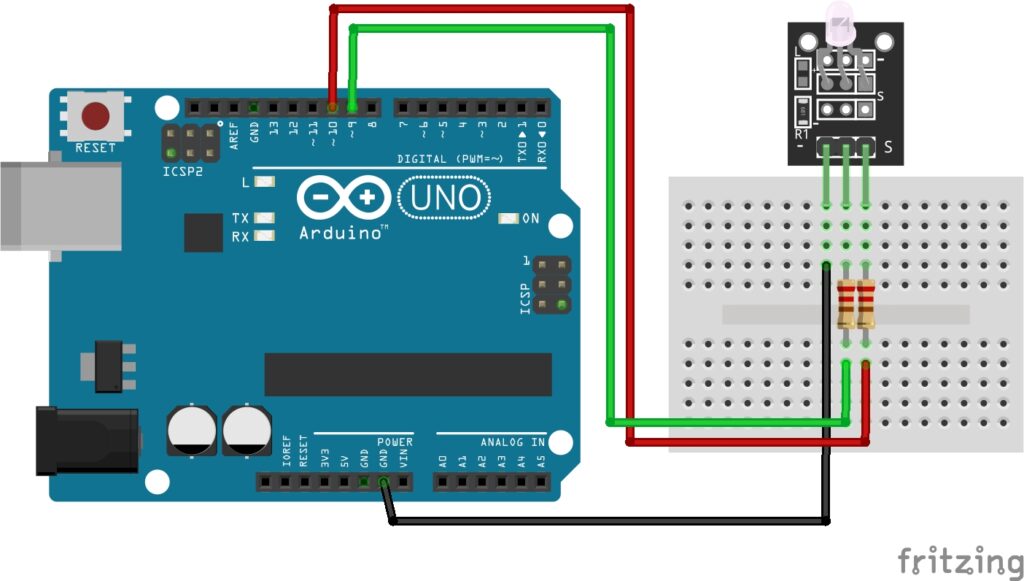
Pin Configuration
Connecting the Two-Color LED Module to an Arduino is fairly simple. The connections are as follows:
- G on the Two-Color LED Module to GND (Left Pin) Arduino.
- R on the Two-Color LED Module to Digital pin 9 (Middle Pin) on the Arduino.
- Y on the Two-Color LED Module (Right Pin) to Digital pin 10 on the Arduino
Pin labels may vary.
Important: If you’re not using the Two-Color LED module from the Elegoo 37 sensor kit and your module does not have current limiting resistors soldered to the module, you will need to add resistors between each of the color pins on your circuit to avoid permanent damage to the LEDs. The operating voltage of each color is slightly different, we can use different value resistors to make the color intensity the same across the colors or you can adjust the intensity values in the code. I have kept the resistors the same value in this guide to keep it as simple as possible.
KY-011 Two Color LED Module Fritzing Part is created by arduinomodules.info and published under Creative Commons Attribution-ShareAlike 4.0 International license
Arduino Code Example
#define redPin 9   // Red LED pin
#define greenPin 10 // Green LED pin

void setup() {
  pinMode(redPin, OUTPUT);
  pinMode(greenPin, OUTPUT);
}

void loop() {
  // Turn on red, turn off green (produces red color)
  digitalWrite(redPin, HIGH);
  digitalWrite(greenPin, LOW);
  delay(1000); // Delay for 1 second

  // Turn off red, turn on green (produces green color)
  digitalWrite(redPin, LOW);
  digitalWrite(greenPin, HIGH);
  delay(1000); // Delay for 1 second

  // Turn on both red and green (produces yellow color)
  digitalWrite(redPin, HIGH);
  digitalWrite(greenPin, HIGH);
  delay(1000); // Delay for 1 second

  // Turn off both red and green (LED is off)
  digitalWrite(redPin, LOW);
  digitalWrite(greenPin, LOW);
  delay(1000); // Delay for 1 second
}
Breaking Down the Code
Pin Definitions
#define redPin 9and#define greenPin 10: Define constants for the pins connected to the red and green LEDs, respectively.
Setup Function
pinMode(redPin, OUTPUT);andpinMode(greenPin, OUTPUT);: Set the red and green LED pins as output pins to control the LEDs.
Loop Function
digitalWrite(redPin, HIGH);anddigitalWrite(greenPin, LOW);: Turns on the red LED and turns off the green LED, producing a red color.digitalWrite(redPin, LOW);anddigitalWrite(greenPin, HIGH);: Turns off the red LED and turns on the green LED, producing a green color.digitalWrite(redPin, HIGH);anddigitalWrite(greenPin, HIGH);: Turns on both the red and green LEDs, producing a yellow color.digitalWrite(redPin, LOW);anddigitalWrite(greenPin, LOW);: Turns off both the red and green LEDs, making the LED remain off.
This code demonstrates how to control a Two-Color LED to emit different colors (red, green, and yellow) by selectively controlling the red and green LEDs using an Arduino. Adjust the delays or add more patterns to create different color combinations or dynamic lighting effects according to your project’s requirements.
Applications and Usage Scenarios
Traffic Signals
Two-color LED modules can be used in traffic signals where red, green and yellow lights are required. They can be employed in pedestrian signals, traffic lights, and railway signals.
Indicator Lights
These modules are commonly used as indicator lights in various electronic devices and appliances. For instance, they can indicate the status of power (red for off, green for on), battery charging (red for charging, green for fully charged), or system status (red for error, green for normal operation).
Notification Systems
In electronic devices, two-color LED modules can be used to provide visual notifications to users. For example, they can indicate incoming messages or calls on smartphones (blinking red for missed calls, blinking green for new messages).
Security Systems
In security systems, these modules can serve as status indicators for armed/disarmed states or indicate system faults or breaches.
Control Panels
Two-color LED modules are often used in control panels or user interfaces to indicate different operational modes or settings. For instance, in industrial control panels, they can indicate whether a machine is in setup mode (red) or operational mode (green).
Gaming Devices
In gaming devices such as consoles or controllers, these modules can provide visual feedback to the player, such as indicating health status (green for good health, red for low health) or player turn status.
Outdoor Advertising
Two-color LED modules can be used in outdoor signage to display dynamic messages or advertisements. By controlling the colors, attention-grabbing effects can be achieved.
Decorative Lighting
These modules can be used in decorative lighting applications, such as holiday decorations, architectural lighting, or artistic installations, to create dynamic and colorful lighting effects.
Medical Devices
In medical equipment, such as patient monitors or diagnostic devices, two-color LED modules can be used to indicate different states or alarms, providing critical visual feedback to healthcare providers.
Conclusion
In this sensors and modules guide, we explained the functionality of Two-Color LED, exploring its capabilities in emitting different colors, and demonstrating how to control them using an Arduino for lighting applications. By the end, you should now have the insights needed to utilize these versatile LEDs to illuminate your projects with an array of vibrant colors and dynamic lighting effects.
Discover the endless possibilities for Arduino projects with more of our Sensors and Modules guides.

