


Welcome to the World of Sensors and Modules with Arduino!
The Metal Touch Sensor is an electronics sensor that is triggered when it touches another conductive element. In this sensors and modules guide, we’ll explore its working principle, key features, applications, and how it can enhance your Arduino projects.
If you’re new to Arduino, why not take a look at our Getting Started with Arduino guides. These guides are designed for beginners to learn the fundamental basics of Arduino programming.
How the Metal Touch Sensor Works
A metal touch sensor operates on the principle of capacitive touch sensing. It detects changes in capacitance when a conductive object (like a human finger) comes in contact with or near the sensor’s surface. The capacitance changes trigger the sensor to register a touch, enabling various actions or responses.
Features and Specifications:
- Operating Voltage: Typically, 3.3V ~ 5.5V.
- Sensitivity: Adjustable sensitivity levels to detect various touch intensities.
- Output: Analog and Digital signals.
- Size: 43.5mm x 15.5mm.
- Compatibility: This sensor is also compatible with other devices like the Raspberry Pi, ESP32, and ESP8266 etc…
Necessary Equipment:
- Arduino board (e.g., Arduino Uno)
- Metal Touch Sensor Module
- Jumper wires
- Breadboard (optional)
Pin Configuration
Connecting the Metal Touch Sensor to an Arduino is fairly simple. The connections are as follows:
- A0 on the Metal Touch Sensor to A0 on the Arduino (or any analog pin).
- G on the Metal Touch Sensor to GND on the Arduino.
- + on the Metal Touch Sensor to 5V on the Arduino.
- D0 on the Metal Touch Sensor to Digital pin 2 on the Arduino (or any digital pin).
Pin labels may vary.
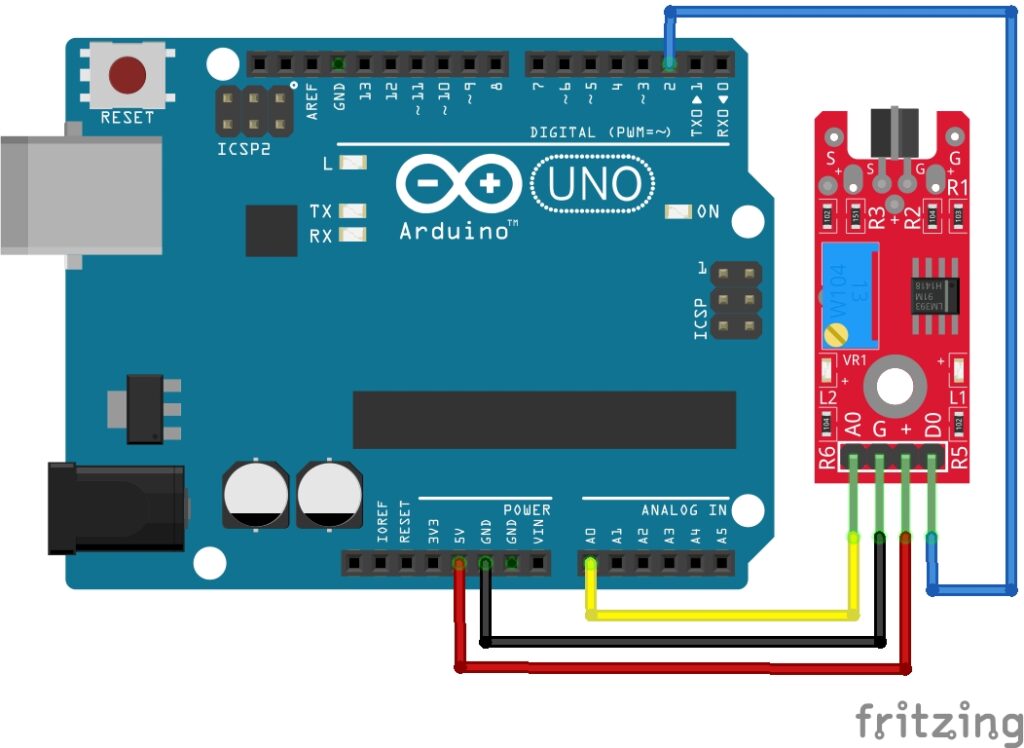
KY-036 Metal Touch Sensor Module Fritzing Part is created by arduinomodules.info and published under Creative Commons Attribution-ShareAlike 4.0 International license
Why Take Analog and Digital Readings?
Having both digital and analog outputs can offer more versatility in how you interact with the sensor. The digital output provides a straightforward touch/no-touch signal, while the analog output might offer additional information, such as differentiating between light touches and firm touches, or detecting the proximity of an object without direct contact.
Digital Pin (D2): Provides a digital output signal, meaning it produces a binary state (either HIGH or LOW). It’s often used to indicate a touch or no-touch event in a simple on/off manner. When touched, it might output HIGH; otherwise, it stays LOW.
Analog Pin (A0): Provides an analog output signal. Unlike digital signals that are binary, analog signals can have a range of values (from 0 to 1023 on an Arduino). This pin can give varying values depending on the intensity of the touch or proximity of a conductive object. It could help gauge the level or strength of touch or proximity.
Arduino Code Example
const int touchSensorDigitalPin = 2; // Connect the sensor's digital pin to Arduino pin 2
const int touchSensorAnalogPin = A0; // Connect the sensor's analog pin to Arduino A0

void setup() {
  Serial.begin(9600); // Start serial communication
  pinMode(touchSensorDigitalPin, INPUT); // Set the sensor's digital pin as input
}

void loop() {
  int touchValue = digitalRead(touchSensorDigitalPin); // Read the digital output value

  if (touchValue == HIGH) { // If the sensor is touched (assuming HIGH state for touch)
    int touchAnalogValue = analogRead(touchSensorAnalogPin); // Read the analog value
    Serial.print("Metal touch detected! Analog value: "); // Print message to Serial Monitor
    Serial.println(touchAnalogValue); // Print the analog value
    delay(1000); // Delay to avoid multiple rapid detections
  }
}
Breaking Down the Code
Constants and Variables Initialization
const int touchSensorDigitalPin = 2;: Defines the digital pin where the touch sensor’s digital output is connected.const int touchSensorAnalogPin = A0;: Specifies the analog pin where the touch sensor’s analog output is connected.
Setup Function
Serial.begin(9600);: Starts serial communication at a baud rate of 9600 for debugging and monitoring.pinMode(touchSensorDigitalPin, INPUT);: Sets the touch sensor’s digital pin as input to read its digital output.
Loop Function
int touchValue = digitalRead(touchSensorDigitalPin);: Reads the digital output value from the touch sensor.if (touchValue == HIGH) { /* ... */ }: Checks if the sensor’s digital output indicates a touch event (assumes HIGH state represents touch).
Touch Detection and Analog Reading
int touchAnalogValue = analogRead(touchSensorAnalogPin);: If a touch is detected, reads the analog value from the sensor.Serial.print("Metal touch detected! Analog value: ");: Displays a message in the Serial Monitor when a touch is detected, along with the analog value.Serial.println(touchAnalogValue);: Prints the analog value to the Serial Monitor for further analysis.delay(1000);: Introduces a delay to prevent multiple rapid detections and ensure smoother serial output.
This code structure continuously monitors the sensors digital output, detecting a touch event when the digital pin reads HIGH. Upon touch detection, it reads the analog value from the sensor (assuming it provides additional information like touch intensity) and displays it in the Serial Monitor. Adjust pin connections and logic based on your specific sensor’s behavior and specifications for accurate readings.
Applications and Usage Scenarios
Consumer Electronics
Integrated into touchscreens, buttons, or touch-sensitive controls.
Automotive
Used in car panels, door handles, or proximity detection.
Industrial Automation
For touch-sensitive panels in machinery or controls.
Smart Home Devices
Implemented in touch-sensitive switches or interfaces.
Proximity Detection
For triggering actions based on proximity without direct touch.
Conclusion
In this sensors and modules guide, we explained the functionality of the Metal Touch Sensor, exploring its working principles, and demonstrating how to interface it with an Arduino for practical applications. The Metal Touch Sensor opens doors to innovative interactions in electronics. Whether for user interfaces or novel applications, understanding their workings and deployment techniques empowers creators to craft touch-sensitive marvels.
Discover the endless possibilities for Arduino projects with more of our Sensors and Modules guides.
