


Welcome to the World of Sensors and Modules with Arduino!
The LCD1602 Display Module is a low power 16×2 character display. This means it can display 16 characters per line on two lines, allowing for a total of 32 characters to be displayed at once. In this sensors and modules guide, we’ll explore its working principle, key features, applications, and how it can enhance your Arduino projects.
If you’re new to Arduino, why not take a look at our Getting Started with Arduino guides. These guides are designed for beginners to learn the fundamental basics of Arduino programming.
How the LCD1602 Display Module Works
The LCD1602 Display Module operates on the principle of liquid crystals responding to electric signals. When voltage is applied, the liquid crystals untwist, allowing light to pass through and create visible characters on the screen. This electro-optical phenomenon enables the dynamic display of information.
Features and Specifications:
- Operating Voltage: 5V
- Display Type: 16×2 Character LCD
- Backlight: Bottom Lights
- Interface: 8-Bit Parallel Interface
- Address: 0x27 (I2C)
- Library: LiquidCrystal
- Compatibility: This module is also compatible with other devices like the Raspberry Pi, ESP32, and ESP8266 etc…
Installing the LCD1602 Library
The LiquidCrystal library is a standard library that comes pre-installed with the Arduino IDE, so you don’t need to install it separately. It’s part of the core libraries and should be available for use without any additional steps.
If you are experiencing issues or if you are using a non-standard version of the library, here are the general steps to manually install a library in the Arduino IDE:
Download the Library: If you need to download the library, go to the Arduino Library Manager or the official Arduino website.
Extract the Library: If the library is downloaded as a zip file, extract it to a location on your computer.
Copy to Libraries Folder: Copy the extracted folder to the “libraries” folder in your Arduino sketchbook. The sketchbook location can be found in the Arduino IDE under File > Preferences > Sketchbook location.
Restart Arduino IDE: After copying the library, restart the Arduino IDE to make sure it recognizes the new library.
Verify Installation: To verify that the library is installed, open the Arduino IDE, go to Sketch > Include Library, and you should see the library listed.
Since the LiquidCrystal library is part of the standard Arduino libraries, you generally don’t need to perform these steps. If you’re using a specific variant or a different library, follow the specific instructions provided with that library.
Necessary Equipment:
- Arduino (e.g., Arduino Uno)
- LCD1602 Display Module
- Potentiometer (10k)
- Jumper wires
- Breadboard
The LCD1602 Module Pins
The LCD1602 has 16 pins, here is a brief overview for each of the pins:
- VSS (Pin 1): Connects to the ground (GND) of your circuit.
- VDD (Pin 2): Connects to the positive power supply, usually 5 volts (VCC).
- V0 (Pin 3): This pin is used to adjust the contrast of the LCD. Connect it to a potentiometer for contrast control.
- RS (Pin 4): RS stands for “Register Select.” It determines whether the data sent to the LCD is a command or character data.
- RW (Pin 5): RW stands for “Read/Write.” Connect it to ground (GND) if you only want to write data to the LCD. If you want to read as well, connect it to the Arduino and manage the read/write functionality in your code.
- EN (Pin 6): The EN pin, or Enable pin, is used to enable the LCD. It’s used to latch the data present on the data bus.
- D0 to D7 (Pins 7 to 14): Data Bus. These pins (D0 to D7) are used for the eight-bit data transfer between the LCD and the microcontroller. The most common configuration is to use only D4 to D7 in a 4-bit mode, which reduces the number of required pins.
- A (Pin 15): Anode (Backlight Positive). This pin is for the positive voltage supply for the backlight, if your LCD module has one.
- K (Pin 16): Cathode (Backlight Ground) This pin is the ground for the backlight.
Make sure to check the datasheet or documentation for your specific LCD1602 module, as the pinout might vary slightly between different manufacturers.
Pin Configuration
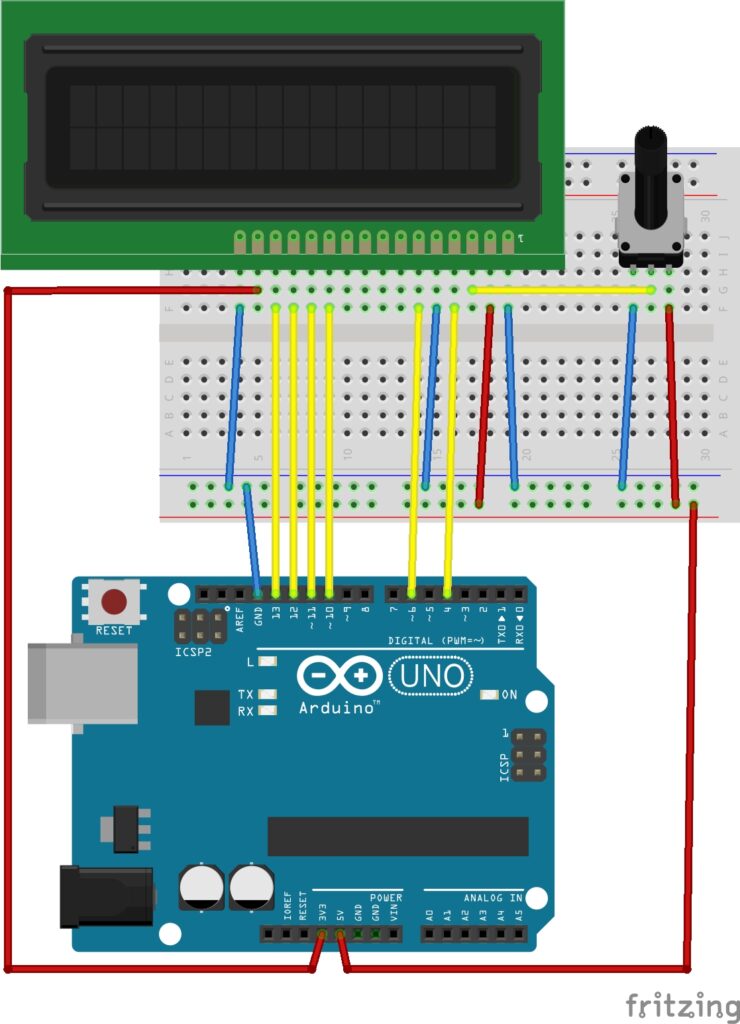
Connecting the LCD1602 module to an Arduino is slightly more complicated to other modules we have used in the past. The connections to the LCD1602 module are as follows:
- K on the LCD1602 to GND on the Arduino.
- A on the LCD1602 to 3.3V on the Arduino.
- D7 on the LCD1602 to Digital pin 13 on the Arduino.
- D6 on the LCD1602 to Digital pin 12 on the Arduino.
- D5 on the LCD1602 to Digital pin 11 on the Arduino.
- D4 on the LCD1602 to Digital pin 10 on the Arduino.
- E on the LCD1602 to Digital pin 6 on the Arduino.
- RW on the LCD1602 to GND on the Arduino.
- RS on the LCD1602 to Digital pin 4 on the Arduino.
- VO on the LCD1602 to the Center pin of the potentiometer.
- VDD on the LCD1602 to 5V on the Arduino.
- VSS on the LCD1602 to GND on the Arduino.
That’s a lot of connections but carefully follow the diagram below and you should not have a problem.
Arduino Code Example
#include <LiquidCrystal.h>

// Initialize the LiquidCrystal library with the numbers of the interface pins
LiquidCrystal lcd(4, 6, 10, 11, 12, 13);

void setup() {
  // Set up the LCD's number of columns and rows
  lcd.begin(16, 2);

  // Print a message to the LCD
  lcd.print("Starting LCD!");
  lcd.clear();                // Clear the LCD screen
  delay(1000);
}

void loop() {
  lcd.setCursor(0, 0);        // Set cursor to the first column, first row
  lcd.print("Hello, LCD!");   // Display a message
  delay(2000);                // Wait for 2 seconds
  lcd.clear();                // Clear the LCD screen
  delay(1000);                // Wait for 1 second
}
Breaking Down the Code
Library Inclusion
- The code includes the
LiquidCrystallibrary, allowing for interaction with Liquid Crystal Displays (LCDs).
LCD Object Initialization
- An instance of the
LiquidCrystalclass is created, representing the LCD. - The numbers passed during initialization are the digital pins to which the LCD is connected (RS, EN, D4, D5, D6, D7).
Setup Function
- The
setupfunction is called once at the beginning of the program. lcd.begin(16, 2)initializes the LCD with the specified number of columns (16) and rows (2).lcd.print("Starting LCD!")prints a starting message to the LCD.lcd.clear()clears the LCD screen.delay(1000)introduces a 1-second delay.
Loop Function
- The
loopfunction contains the main execution logic, running repeatedly. lcd.setCursor(x, y)sets the cursor to the specified column (x) and row (y) on the LCD.lcd.print("Hello, LCD!")displays the specified message on the LCD screen.delay(2000)introduces a 2-second delay.lcd.clear()clears the LCD screen.delay(1000)introduces a 1-second delay.
Useful Commands for the LCD1602 Module
The LiquidCrystal library provides various functions that allow you to manipulate the display on the LCD1602 module. Here are some useful commands and functions:
lcd.begin(cols, rows)
- Initializes the LCD with the specified number of columns and rows. For example,
lcd.begin(16, 2)initializes a 16×2 LCD.
lcd.clear()
- Clears the display and sets the cursor position to the home position (column 0, row 0).
lcd.setCursor(col, row)
- Sets the cursor to a specific column and row on the display.
lcd.print(data)
- Displays characters or data at the current cursor position.
lcd.scrollDisplayLeft()
- Scrolls the entire display to the left.
lcd.scrollDisplayRight()
- Scrolls the entire display to the right.
lcd.autoscroll()
- Enables automatic scrolling of the display. New characters will shift the entire display.
lcd.noAutoscroll()
- Disables automatic scrolling, allowing you to control the cursor position manually.
lcd.createChar(location, charMap[])
- Allows you to create custom characters for display. This is useful for creating custom symbols or icons.
lcd.blink() and lcd.noBlink()
- These functions control whether the cursor on the display blinks or not.
lcd.cursor() and lcd.noCursor()
- These functions turn the cursor on or off on the display.
lcd.home()
- Sets the cursor to the home position (column 0, row 0) without clearing the display.
These commands can be combined to achieve various effects. For example, you can use lcd.scrollDisplayLeft() or lcd.scrollDisplayRight() to create scrolling text effects, and lcd.createChar() to display custom characters. Experimenting with these commands will give you a wide range of options for presenting information on the LCD1602 Display Module.
Applications and Usage Scenarios
Information Display
Showcase real-time data, sensor readings, or system status.
Interactive Menus
Create user interfaces with navigable menus.
Clock and Timer Displays
Utilize the LCD for displaying time or countdowns.
Project Debugging
Output debugging information during development.
Conclusion
In this sensors and modules guide, we explained the functionality of the LCD1602 Display Module, exploring its working principles, and demonstrating how to interface it with an Arduino for practical applications. The LCD1602 Display Module, with its clear text display and backlight capabilities, proves invaluable in applications ranging from simple information displays to more complex data presentation. Whether you’re monitoring sensor readings, creating interactive menus, or displaying system status, the LCD1602 Display Module empowers you to convey information in a tangible and user-friendly format.
Discover the endless possibilities for Arduino projects with more of our Sensors and Modules guides.
