


Welcome to the World of Sensors and Modules with Arduino!
The Flame Sensor is designed to detect the presence of fire or flames by responding to specific wavelengths of light emitted by flames. This capability allows for swift detection and response, contributing significantly to fire safety measures in various settings. In this sensors and modules guide, we’ll explore its working principle, key features, applications, and how it can enhance your Arduino projects.
If you’re new to Arduino, why not take a look at our Getting Started with Arduino guides. These guides are designed for beginners to learn the fundamental basics of Arduino programming.
How the Flame Sensor Works
The Flame Sensor uses a photodiode which is sensitive to flame wavelengths, the sensor detects the characteristic light emitted by flames. This triggers a response in the sensor, indicating the presence of a fire source within its detection range.
Features and Functionality
- Operating Voltage: 5V for Analog, 3.3V for Digital.
- Output: Analog and Digital Signals
- Detection IR Range: 760nm ~ 1100nm
- Sensitivity: Adjustable
- Response Time: Swift response to flame presence
- Size: 45mm x 15mm
- Compatibility: This sensor is also compatible with other devices like the Raspberry Pi, ESP32, and ESP8266 etc…
Necessary Equipment:
- Arduino board (e.g., Arduino Uno)
- Flame Sensor Module
- Jumper wires
- Breadboard (optional)
Pin Configuration
Connecting the Flame Sensor Module to an Arduino is fairly simple. The connections are as follows:
- A0 on the flame Sensor to A0 on the Arduino.
- GND on the Flame Sensor to GND on the Arduino.
- + on the Flame Sensor to 5V on the Arduino.
- D0 on the Flame Sensor to Digital pin 2 on the Arduino.
Pin labels may vary.
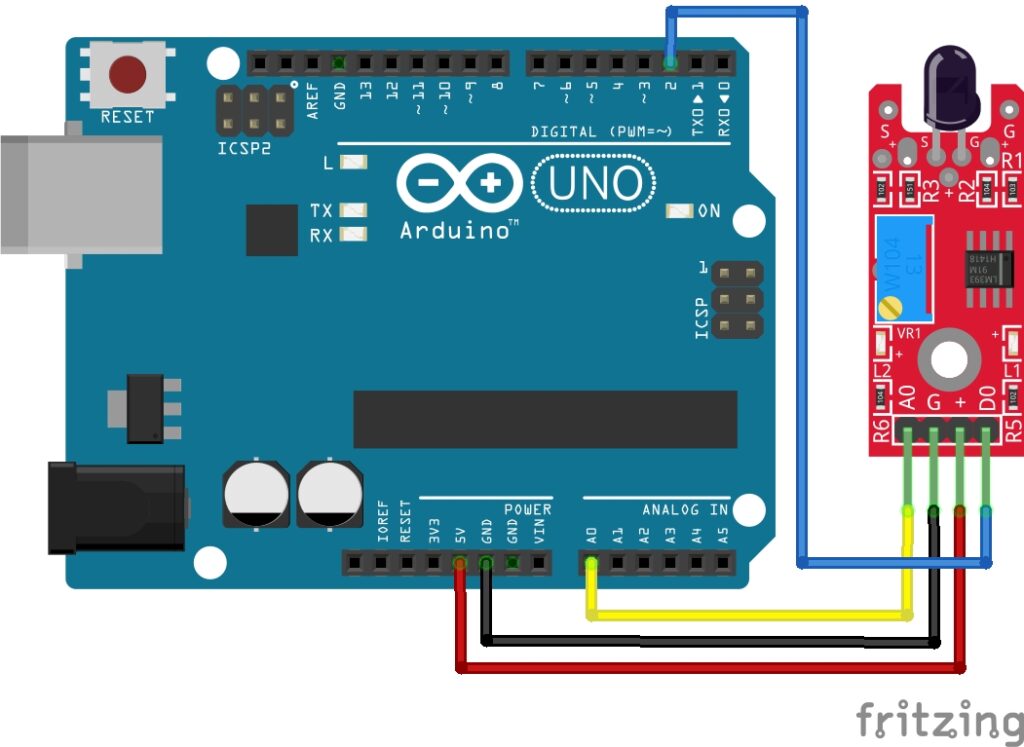
KY-026 Flame Sensor Module Fritzing Part is created by arduinomodules.info and published under Creative Commons Attribution-ShareAlike 4.0 International license
Arduino Code Example
// Define the pin to which the Flame Sensor is connected
#define flameSensorPin 2 // Change this to the pin you're using

void setup() {
  pinMode(flameSensorPin, INPUT); // Set the sensor pin as input
  Serial.begin(9600); // Initialize serial communication
}

void loop() {
  int flameDetected = digitalRead(flameSensorPin); // Read the flame sensor value

  if (flameDetected == HIGH) {
    Serial.println("Flame detected!"); // Print a message when flame is detected
    // You can add actions here, such as triggering an alarm or activating a relay for fire suppression
  } else {
    Serial.println("No flame detected.");
    // Add any actions for when no flame is detected
  }

  delay(1000); // Delay to stabilize readings
}
Breaking Down the Code
Declarations
- The code declares a macro
flameSensorPinand sets it to2, representing the pin number to which the flame sensor is connected.
Setup Function
pinMode(flameSensorPin, INPUT): Configures the pin specified byflameSensorPinas an input pin, indicating that data will be read from this pin. This is where the flame sensor is connected.Serial.begin(9600): Initializes serial communication with a baud rate of 9600 bits per second, allowing communication between the Arduino and a computer via the USB cable.
Loop Function
flameDetected = digitalRead(flameSensorPin): Reads the digital value from the pin specified byflameSensorPinand stores it in the variableflameDetected. ThedigitalRead()function returnsHIGHif voltage is detected on the pin, andLOWotherwise.- Conditional Statement:
- If a flame is detected (
flameDetected == HIGH), it prints “Flame detected!” to the Serial Monitor. - If no flame is detected (
flameDetected == LOW), it prints “No flame detected.” to the Serial Monitor.
- If a flame is detected (
delay(1000): Introduces a delay of 1000 milliseconds (1 second) between readings to stabilize the readings and prevent the code from executing too quickly. During this delay, the Arduino is idle, not executing any code.
This code continuously checks the status of the flame sensor and prints messages to the serial monitor based on whether a flame is detected or not. You can modify and expand this code by adding actions or reactions when a flame is detected, like activating alarms, sending notifications, or triggering safety systems.
Adjusting Sensitivity
The trim potentiometer (trim pot) on a flame sensor controls the sensitivity of the sensor. It adjusts the threshold or trigger point at which the sensor detects a flame or fire. By turning the trim pot, you can fine-tune the sensor’s sensitivity to detect flames of different intensities or distances. This adjustment allows you to optimize the sensor’s response to varying levels of flame or ambient light, making it more or less sensitive to the presence of fire.
In essence, adjusting the trim potentiometer alters the sensitivity level of the flame sensor, enabling you to customize its detection capabilities based on the specific requirements of your project or environment.
Applications and Usage Scenarios
Fire Alarm Systems
Flame sensors are integral components of fire alarm systems in residential, commercial, and industrial buildings. They detect the presence of flames and trigger alarms to alert occupants and authorities of potential fire hazards.
Industrial Safety
In industrial settings such as factories, warehouses, and manufacturing plants, flame sensors are used to monitor equipment and machinery for any signs of fire or overheating. They play a crucial role in preventing accidents and minimizing damage to property.
Gas Stove Safety
Flame sensors are commonly found in gas stoves and cooktops to ensure the safety of users. They detect the presence of flames and automatically shut off the gas supply if the flame goes out unexpectedly, reducing the risk of gas leaks and fire accidents.
HVAC Systems
Flame sensors are used in heating, ventilation, and air conditioning (HVAC) systems to monitor the combustion process in furnaces and boilers. They help maintain optimal combustion efficiency and safety by detecting flame presence and ensuring proper ignition.
Automotive Applications
Flame sensors are utilized in automotive engines and exhaust systems to monitor combustion processes and detect any abnormalities or malfunctions. They contribute to improving engine performance and reducing emissions.
Kitchen Appliances
Apart from gas stoves, flame sensors are also used in other kitchen appliances such as grills and ovens to ensure safe operation and prevent fire hazards.
Power Plants
Flame sensors are employed in power plants, especially those using fossil fuels, to monitor combustion processes in boilers and turbines. They help ensure efficient energy generation while minimizing the risk of fires and explosions.
Firefighting Robots
Flame sensors can be integrated into firefighting robots to detect the presence of flames in hazardous environments, allowing the robots to autonomously navigate and extinguish fires while keeping human firefighters out of harm’s way.
Conclusion
In this sensors and modules guide, we explained the functionality of the Flame Sensor Module, exploring its working principles, and demonstrating how to interface it with an Arduino for practical applications.
Using flame sensors with Arduino opens up a wide range of possibilities for building custom fire detection systems and integrating them into various projects. Arduino provides a convenient platform for interfacing flame sensors with other components such as LEDs, buzzers, LCD displays, and wireless modules for real-time monitoring and notification. With Arduino, you can develop custom fire alarm systems, smart home automation solutions, and IoT devices tailored to specific needs and requirements. Additionally, Arduino’s versatility allows for easy prototyping and experimentation, making it ideal for educational purposes and DIY projects involving flame detection and safety.
Discover the endless possibilities for Arduino projects with more of our Sensors and Modules guides.

