How to Build your own Packet Monitor Device with Arduino
In this Arduino Hacking Tools guide, we are going to learn about internet packets. Then we will use Spacehuhn’s Packet Monitor project to monitor all the network traffic around you.
What is an Internet Packet?
An internet packet, often simply referred to as a “packet,” is a fundamental unit of data that is transmitted over a computer network. These packets are used to convey information across the Internet and other networks, such as local area networks (LANs) and wide area networks (WANs). Packets are the building blocks of network communication, and they contain both the data being transmitted and control information necessary for routing and delivering the data to its destination.
What is a Packet Monitor?
A packet monitor, often referred to as a packet sniffer, is a software or hardware tool used for capturing and analyzing network traffic in the form of data packets as they traverse a network. Packet monitoring is a common practice in networking and cybersecurity for various purposes, including troubleshooting, network optimization, and security analysis.
Here’s how packet monitors work:
Capture Packets: Packet monitors intercept data packets as they flow through a network segment. These packets may contain various types of data, including web traffic, emails, application data, and more.
Analyze Packets: Once captured, the packets are analyzed to gain insights into network activity. This can include examining the source and destination addresses, protocol information, payload data, and more.
Packet monitoring serves several key purposes:
Network Troubleshooting: IT professionals use packet monitoring to diagnose network issues, identify bottlenecks, and determine the causes of network slowdowns or disruptions.
Security Analysis: Packet monitoring can help detect and analyze potential security threats, such as unauthorized access, malware, or suspicious network behavior.
Network Optimization: By studying network traffic, administrators can optimize network performance and bandwidth usage, improving the efficiency of data transfer.
Compliance and Auditing: In some cases, packet monitoring is used to ensure that networks and data are in compliance with legal and regulatory requirements. It can provide a record of network activity for auditing purposes.
Packet monitoring can be performed using various software tools and hardware devices, and it’s an essential component of network management and security in many organizations. However, it’s important to note that capturing and analyzing network packets may involve privacy and legal considerations, and it should be done in accordance with applicable laws and regulations. Unauthorized packet monitoring can violate privacy and legal rights.
About Spacehuhn
“Spacehuhn” is a pseudonym used by a hacker and maker who has been known for various projects related to Wi-Fi security and electronics. Spacehuhn has gained recognition in the tech and hacker community for contributing to the development of open-source hardware and software tools. One of Spacehuhn’s notable contributions is in the field of Wi-Fi security and the creation of tools for testing and securing wireless networks.
Spacehuhn has also worked on projects related to electronics, programming, and cybersecurity. The online presence of Spacehuhn, including forums, blogs, and social media, has been a valuable resource for individuals interested in these areas.
It’s important to emphasize that while Spacehuhn has contributed to the open-source community with tools and resources related to Wi-Fi security, responsible and ethical usage of such tools is essential. Using them for unauthorized, malicious, or harmful activities is illegal and unethical. Always ensure that you have the necessary permissions and adhere to legal and ethical standards when using these tools for security testing or educational purposes.
Building the Packet Monitor
The Code:
You can download Spacehuhn’s code for this project here: Packet Monitor
You may want to customize the code, look for this section of code and alter the pin numbers for your own needs:
//===== SETTINGS =====//
//create display(Adr, SDA-pin, SCL-pin)
SSD1306 display(0x3c, 5, 4); //GPIO 5 = D1, GPIO 4 = D2
//SH1106 display(0x3c, 5, 4);

#define btn D7 //GPIO 0 = FLASH BUTTON

#define maxCh 13 //max Channel -> US = 11, EU = 13, Japan = 14
#define ledPin D6 //led pin ( 2 = built-in LED)
#define packetRate 5 //min. packets before it gets recognized as an attack

#define flipDisplay true
The Circuit:
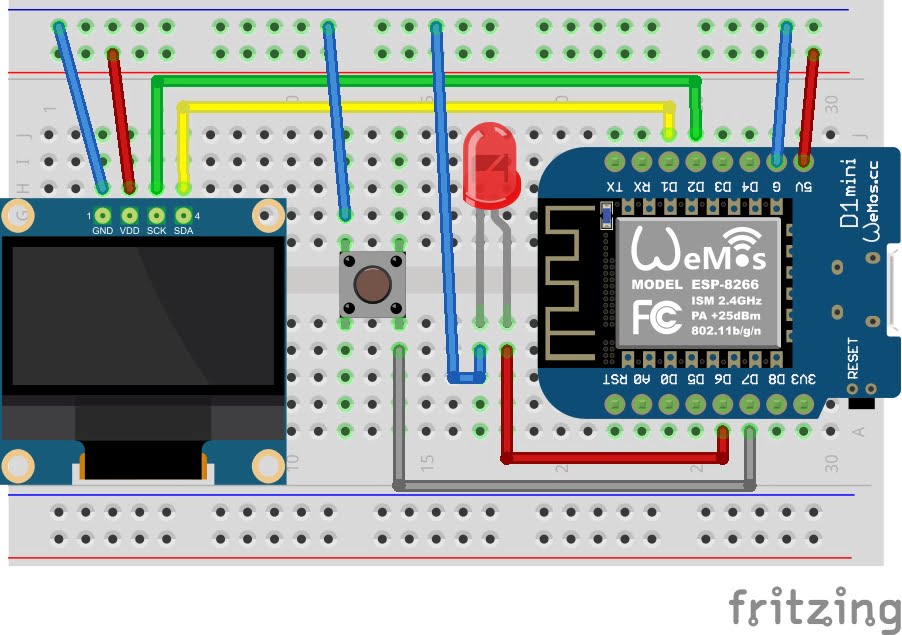
The connections for the OLED are standard:
- SCK to D2
- SDA to D1
Connect the button to which ever pin you state in the code, I have used Pin D7. Connect the other leg to GND.
Connect the LED to which ever pin you state in the code, I have used Pin D6. Connect the other leg to GND.
If you have stated in the code, the same pins as I have done you can simply follow the circuit diagram below.

Upload the Code:
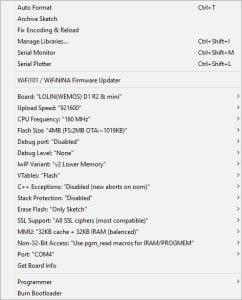
With the circuit built you’re ready to upload the code to the D1-Mini. In the image below are the Arduino IDE board settings I used to successfully upload the code to the D1-Mini.

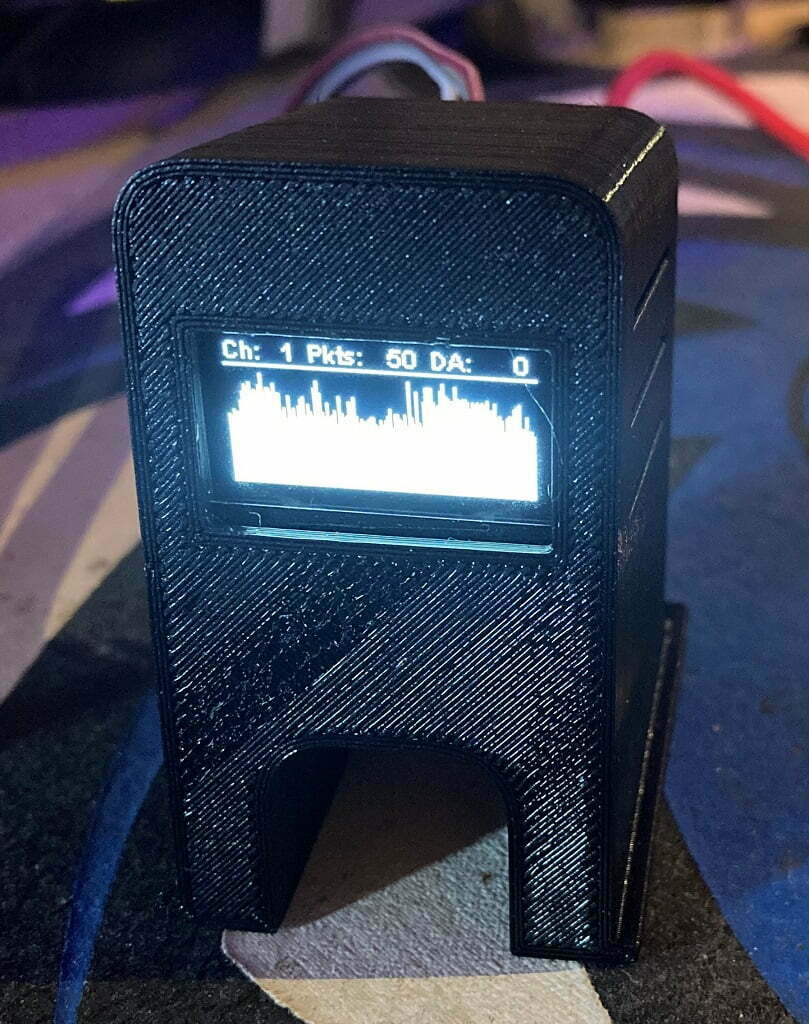
My Final Project
I printed this handy little D1-mini and OLED case, it can be found here on Thingyverse

Conclusion
In a world where Wi-Fi networks are an integral part of our daily lives, Spacehuhn’s innovative Arduino project offers a valuable insight into the often-invisible landscape of wireless communication. This remarkable creation allows us to peer behind the curtain of Wi-Fi channels, showing us the ebb and flow of data in the air without intruding into its content. With a simple push of a button, we can switch between channels and gain a deeper understanding of network traffic.
One of the project’s standout features is its ability to act as a sentinel against deauthentication attacks, using an LED to alert us to potential security threats. Spacehuhn’s dedication to open-source technology and his commitment to knowledge sharing shine brightly in this endeavor.
As we explore this project and embrace the possibilities it offers, it’s crucial to remember that responsible usage is paramount. The ability to monitor Wi-Fi traffic is a powerful tool, and with great power comes great responsibility. It’s a testament to the ever-evolving landscape of technology, where knowledge and security go hand in hand.
Spacehuhn’s creation is more than just a piece of hardware; it’s an educational gateway into the unseen world of wireless communication. Whether you’re a curious tinkerer, a network enthusiast, or a security-conscious individual, this project has something to offer. As we navigate the intricacies of the digital age, we’re reminded that understanding the technology that surrounds us is key to making the most of it.
Happy Hacking Folk’s!
Arduino Recommendations:
The Elegoo Super Starter Kit
If you don’t already own any Arduino hardware, we highly recommend this kit as it has everything you need to start programming with Arduino. You can find out more about this kit, including a list of its components here: Elegoo Super Starter Kit
You can find this kit on Amazon here: Elegoo Super Starter Kit
The 0.96-inch Mini-OLED Display
We highly recommend this mini-OLED bundle of five 0.96-inch OLED displays. We have bought these before and they all worked perfectly. You can read more about the mini-OLED here: Mini-OLED
You can find this bundle on Amazon here: OLED Displays
Elegoo Nano (Arduino Compatible)
We have bought these Nano boards many times and can highly recommend them. There are three Nano boards in this pack making them a total bargain for everyone.
You can find this pack on Amazon here: Arduino Nano
ESP8266 D1-Mini
D1-Mini is an Arduino compatible Wi-Fi board based on an ESP-8266-12F. This WLAN board has 9 digital I/O pins.
You can find this board on Amazon here: D1-Mini


