


Welcome to the World of Sensors and Modules with Arduino!
The Water Level Sensor is an essential component for accurately monitoring liquid levels. Whether ensuring optimal water levels in industrial tanks, safeguarding home appliances, or supporting environmental monitoring, this sensor proves indispensable for efficient and reliable liquid level management. In this sensors and modules guide, we’ll explore its working principle, key features, applications, and how it can enhance your Arduino projects.
If you’re new to Arduino, why not take a look at our Getting Started with Arduino guides. These guides are designed for beginners to learn the fundamental basics of Arduino programming.
How the Water Level Sensor Works
The Sensor has 10 copper traces. These traces are not connected but once submerged into water they become connected. The traces form a variable resistor, the resistance varies depending on how submerged the sensor module becomes. The further the sensor is submerged into water the better the conductivity becomes giving a lower resistance. The less the sensor module is submerged, the less the conductivity, and higher the resistance.
Features and Specifications:
- Operating Voltage: 3.3V ~ 5V
- Operating Current: < 20mA
- Advanced Sense-Tracing Technology: Utilizes a sophisticated array of 10 conductive traces to detect liquid levels with precision and responsiveness.
- Output: Analog and Digital Signals.
- Real-Time Liquid Level Monitoring: Delivers instant and real-time data on liquid levels, ensuring prompt response to changing conditions and enabling dynamic control mechanisms.
- Responsive Conductivity Detection: The conductive traces respond to changes in liquid conductivity, offering a reliable method for accurate detection as water levels vary.
- Calibrated Sensitivity Mapping: Calibrated to provide precise readings, the sensor maps the conductivity changes to specific water levels, delivering accurate measurements for informed decision-making.
- Compatibility: This sensor is also compatible with other devices like the Raspberry Pi, ESP32, and ESP8266 etc…
Necessary Equipment:
- Arduino board (e.g., Arduino Uno)
- Water Level Sensor Module
- Jumper wires
- Breadboard (optional)
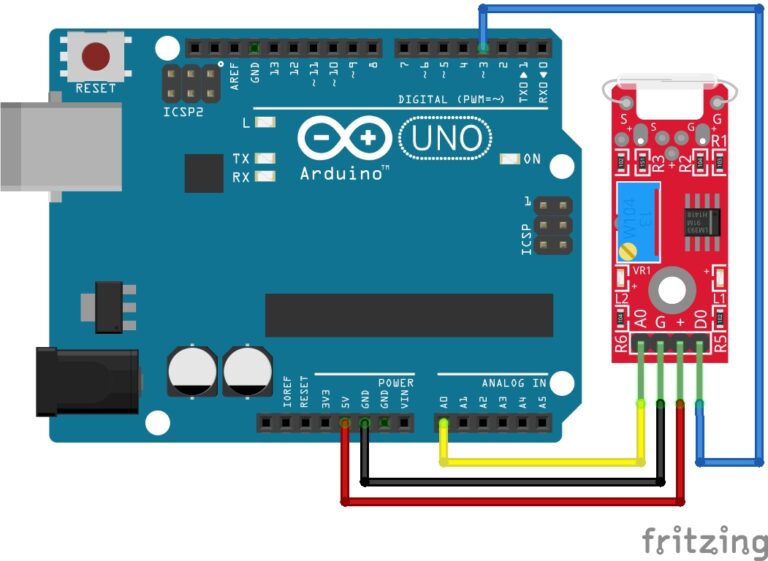
Pin Configuration
Wiring the Water Level Sensor to an Arduino is straightforward. The Water Level Sensor typically consists of 3 pins:
- S on the Water Level Sensor to Analog pin A0 on the Arduino.
- + on the Water Level Sensor to 5V on the Arduino.
- – on the Water Level Sensor to GND on the Arduino.
Pin labels may vary.

Arduino Code Examples
Run the calibration code first to find the maximum value for the sensor being 100% submerged. Make a note of the maximum value when the traces are fully submerged.Make sure to only submerge the traces.Calibration Code:
const int sensorPin = A0;  // Analog pin for sensor
int waterLevel;

void setup() {
  Serial.begin(9600);
}

void loop() {
  waterLevel = analogRead(sensorPin);

  Serial.print("Water Level: ");
  Serial.println(waterLevel);

  delay(1000);  // Adjust the delay as needed
}
Main Code:
After running the calibration code, and noting the maximum value, replace the value in thewaterMax variable below to your new value.const int sensorPin = A0; // Analog pin for sensor
int waterLevel;
int waterMax = 700; // Edit this value to achieve 100% readings when sensor is fully submerged (0-1023)
void setup() {
Serial.begin(9600);
}
void loop() {
waterLevel = analogRead(sensorPin);
// Adjust the map functions waterMax value above to match the behavior of your sensor
int mappedLevel = map(waterLevel, 0, waterMax, 0, 100);
Serial.print("Water Level: ");
Serial.print(mappedLevel);
Serial.println("%");
delay(1000); // Adjust the delay as needed
}
Breaking Down the Code
Pin and Variable Declarations
const int sensorPin = A0;- Defines a constant integer variable
sensorPinand assigns it the value A0, representing the analog pin to which your water level sensor is connected.
- Defines a constant integer variable
int waterLevel;- Declares an integer variable
waterLevelto store the analog reading from the water level sensor.
- Declares an integer variable
int waterMax = 700;- Sets an integer variable
waterMaxto a specific value (700 in this case), which is used to calibrate the maximum analog reading corresponding to 100% water level. You may need to adjust this value based on your sensor’s behavior.
- Sets an integer variable
Setup Function
Serial.begin(9600);initializes serial communication at a baud rate of 9600, allowing you to send and receive data between your Arduino and a connected computer.
Loop Function
waterLevel = analogRead(sensorPin);reads the analog value from the water level sensor and stores it in the variablewaterLevel.int mappedLevel = map(waterLevel, 0, waterMax, 0, 100);- Uses the
mapfunction to convert the raw analog reading (waterLevel) to a percentage value (mappedLevel). This mapping is based on the definedwaterMaxvalue, which represents the maximum analog reading for 100% water level.
- Uses the
Serial.print("Water Level: ");,Serial.print(mappedLevel);,Serial.println("%");- Prints the water level information to the Serial Monitor, displaying the percentage of water level.
delay(1000);- Introduces a delay of 1000 milliseconds (1 second) between each iteration of the loop. You can adjust this delay based on your requirements.
The primary focus of this code is to read analog values from the water level sensor, map them to a percentage value, and output the result to the Serial Monitor for monitoring and calibration purposes. The waterMax variable plays a crucial role in calibrating the mapping to achieve accurate readings based on your specific sensor characteristics. Adjusting this value might help you fine-tune the mapping for more accurate results.
Applications and Usage Scenarios
Industrial Tanks and Reservoirs
Critical for monitoring and controlling liquid levels in industrial processes, preventing overflow or shortages.
Home Appliances
Ensures precise water levels in household appliances like washing machines, dishwashers, and water heaters, contributing to their optimal performance.
Agriculture
Supports efficient water management in irrigation systems, responding to soil moisture levels or reservoir capacities.
Environmental Monitoring
Deployed in weather stations and environmental monitoring systems to gauge water levels in natural bodies or collected rainfall.
Automated Pump Control
Interfaces with pumps to automate the control of water levels, ensuring a consistent and regulated flow.
Alarm Systems
Configurable for setting up alarms or notifications when liquid levels deviate from predefined ranges, providing timely alerts.
Data Logging and Analysis
Supports data logging, allowing for the tracking of liquid levels over time. Data analysis can reveal trends and patterns for informed decision-making.
Conclusion
In this sensors and modules guide, we explained the functionality of the Water Level Sensor, exploring its working principles, and demonstrating how to interface it with an Arduino for practical applications. The water level sensor stands as a pivotal tool for maintaining optimal liquid levels in a diverse range of applications. Its precision and adaptability contribute significantly to the seamless and efficient management of liquid resources, ensuring reliability across a spectrum of scenarios.
Discover the endless possibilities for Arduino projects with more of our Sensors and Modules guides.
