

Welcome to the World of Sensors and Modules with Arduino!
The Tilt Switch Sensor is a simple yet powerful sensor, offering the ability to detect orientation changes with ease. They are typically housed in a protective casing, often cylindrical or rectangular in shape, with electrical contacts inside. Within the housing, there’s a conductive metal ball that can move freely along the switch’s axis. When the switch is tilted, the ball rolls, changing its position within the housing. In this sensors and modules guide, we’ll explore its working principle, key features, applications, and how it can enhance your Arduino projects.
If you’re new to Arduino, why not take a look at our Getting Started with Arduino guides. These guides are designed for beginners to learn the fundamental basics of Arduino programming.
How the Tilt Switch Works
Tilt switches rely on gravity’s effect on the conductive ball. When the switch is tilted beyond a certain angle, gravity causes the ball to roll and move away from its resting position, altering the switch’s state. The switch’s functionality depends on its orientation in space. It can detect changes in position or inclination and respond by switching between the “on” and “off” states.
Features and Specifications:
- Operating Voltage: 5V
- Operating Temperature Range: -40C to 85C.
- Output Signal: Digital
- Operating Angle: This can vary from a few degrees to more than 45 degrees, depending on the specific switch.
- Size: 24.5 x 15.5mm
- Compatibility: This sensor is also compatible with other devices like the Raspberry Pi, ESP32, and ESP8266 etc…
Necessary Equipment:
- Arduino board (e.g., Arduino Uno)
- Tilt Switch Sensor Module
- Jumper wires
- Breadboard (optional)
Pin Configuration
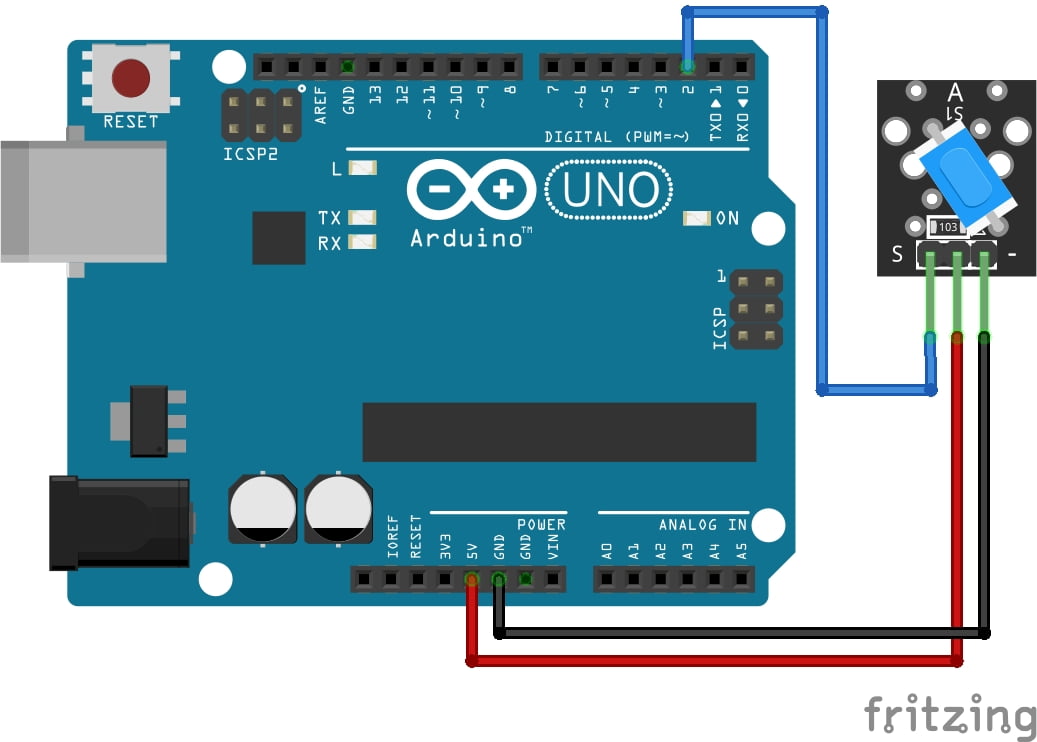
Wiring the Tilt Switch sensor module to an Arduino is fairly simple. The connections are as follows:
- S (Left Pin) on the Tilt Switch Sensor to Digital pin 2 on the Arduino.
- 5V (Middle Pin) on the Tilt Switch Sensor to 5V on the Arduino.
- – (Right Pin) on the Tilt Switch Sensor to GND on the Arduino.
Pin labels may vary.

KY-020 Tilt Switch Module Fritzing Part is created by arduinomodules.info and published under Creative Commons Attribution-ShareAlike 4.0 International license
Arduino Code Example
#define tiltSwitchPin 2 // Change this to the pin you're using for the tilt switch

void setup() {
  pinMode(tiltSwitchPin, INPUT);
  Serial.begin(9600);
}

void loop() {
  int switchState = digitalRead(tiltSwitchPin);
  if (switchState == HIGH) {
    Serial.println("Tilt Switch is tilted!");
    // Add actions or responses when the switch is tilted
  }else{
    Serial.println("Tilt Switch is level!");
  }
  delay(1000); // Delay for stability and to prevent rapid consecutive readings
}
Breaking Down the Code
Pin Declaration
tiltSwitchPin: Defines the digital pin number used to connect the tilt switch to the Arduino. In this example, it’s set to pin 2.
Setup Function
pinMode(tiltSwitchPin, INPUT);: Configures the specified pin (tiltSwitchPin) as an input, indicating it will receive data from the tilt switch.Serial.begin(9600);: Initializes serial communication at a baud rate of 9600 for serial monitor debugging.
Loop Function
int switchState = digitalRead(tiltSwitchPin);: Reads the digital state of thetiltSwitchPinand stores it in the variableswitchState. It will be eitherHIGHorLOW.if (switchState == HIGH) { ... }: Checks if the switch state isHIGH, indicating that the tilt switch is tilted or in the activated state.Serial.println("Tilt Switch is tilted!");: Prints a message to the serial monitor when the tilt switch is tilted. You can add additional actions or responses within this if-block.delay(1000);: Adds a delay of 100 milliseconds for stability and to prevent rapid consecutive readings.
Applications and Usage Scenarios
Alarm Systems
When a device is tilted or moved from its original position (such as a door or window), the switch can trigger an alarm by detecting the change in orientation.
Robotics
In robotics, tilt switches are used for self-balancing robots or to detect tilt angles for controlling robot movements. They assist in maintaining stability by detecting changes in the robot’s orientation.
Automotive Industry
These switches also have applications in automobile safety systems. They can trigger safety mechanisms, such as airbag deployment or fuel cutoff, in the event of a vehicle rollover or sudden tilt.
Consumer Electronics
They are used in consumer electronics, like smartphones and tablets, for auto-rotation functions. When the device is tilted or rotated, the switch detects the change in orientation, enabling the screen to adjust its display orientation accordingly.
Security Devices
Tilt switches are employed in security cameras or sensors. They help in adjusting the camera angle or activating security measures based on changes in orientation.
Industrial Equipment
In industrial settings, these switches are utilized in machinery to monitor and control tilt or inclination. They serve to prevent accidents or trigger shutdowns if equipment tilts beyond safe parameters.
Gaming and Toys
These switches can be incorporated into gaming controllers or toys for interactive experiences. They enable game control through tilting or triggering actions in toys based on orientation changes.
Conclusion
In this sensors and modules guide, we explained the functionality of the Tilt Switch Sensor, exploring its working principles, and demonstrating how to interface it with an Arduino for practical applications. They offer a straightforward method for orientation detection. Understanding their operational principles and integration with Arduino expands possibilities for various projects requiring tilt or orientation sensing.
Discover the endless possibilities for Arduino projects with more of our Sensors and Modules guides.


