

Welcome to the World of Sensors and Modules with Arduino!
The Tactile Switch Module also known as the Key Switch, Tact Switch or Push Button Switch, serves as a fundamental input device in many projects, enabling users to interact with their creations through tactile feedback. In this sensors and modules guide, we’ll explore its working principle, key features, applications, and how it can enhance your Arduino projects.
If you’re new to Arduino, why not take a look at our Getting Started with Arduino guides. These guides are designed for beginners to learn the fundamental basics of Arduino programming.
How the Tactile Switch Works
The Tactile Switch’s function is based on the principle of electrical contact. When the button is pressed, it completes an electrical circuit, allowing current to flow through and trigger actions in connected circuits or microcontrollers.
Features and Specifications:
- Operating Voltage: 3.3V ~ 5V
- Tactile Feedback: Tactile Switch Modules offer tactile feedback, providing users with physical confirmation upon pressing the button.
- Momentary Action: Designed for momentary action, these modules register input only when the button is pressed, making them suitable for various control and activation tasks.
- Simple Interface: With straightforward wiring and a simple interface, Tactile Switch Modules are beginner-friendly and adaptable to a wide range of projects.
- Durability and Reliability: Built with durable materials, Tactile Switch Modules ensure reliable performance over extended periods of use, making them suitable for long-term projects.
- Compatibility: Compatible with other controllers like Raspberry Pi, ESP32, and ESP8266 etc…
Necessary Equipment:
- Arduino (e.g., Arduino Uno)
- Tactile Switch Module
- Jumper wires
- Breadboard (optional)
Pin Configuration
Connecting the Tactile Switch Module to an Arduino is fairly simple. The connections are as follows:
- S (or left pin) on the Tactile Switch Module to Digital pin 2 on the Arduino.
- + (or middle pin) on the Tactile Switch Module to 5V on the Arduino.
- – (or right pin) on the Tactile Switch Module to GND on the Arduino.
Pin labels may vary.
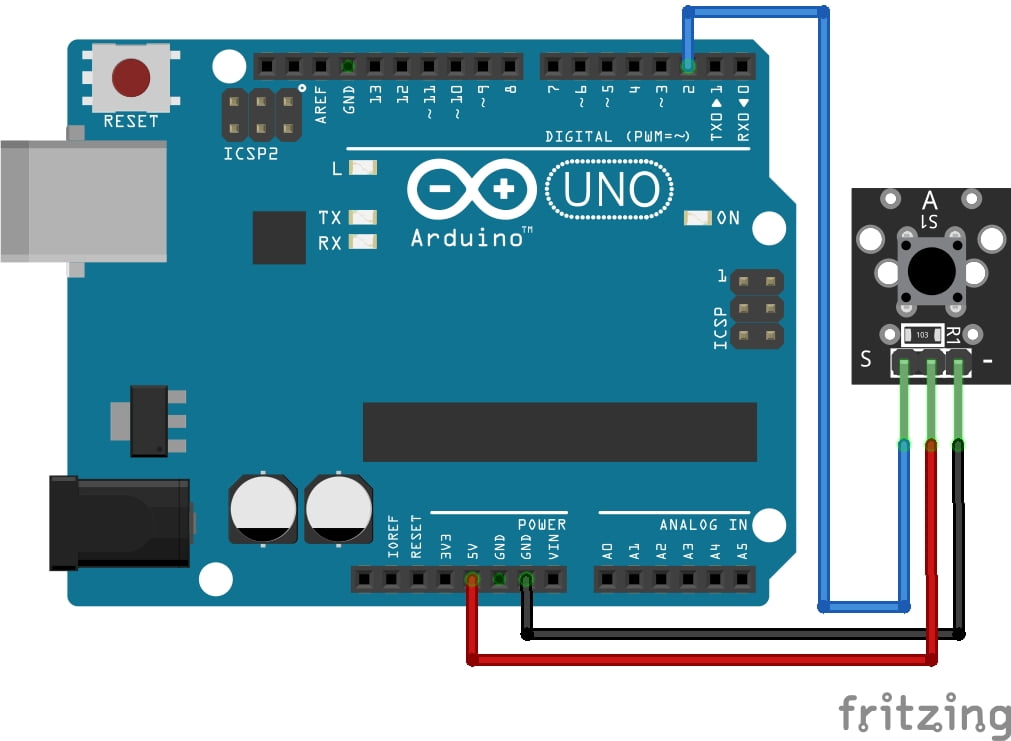
KY-004 Key Switch Module Fritzing Part is created by arduinomodules.info and published under Creative Commons Attribution-ShareAlike 4.0 International license
Arduino Code Example
// Define the pin to which the Push Button Module is connected
const int buttonPin = 2;  // Connect the button pin to this digital pin

void setup() {
  // Initialize the Serial communication for debugging
  Serial.begin(9600);

  // Set the button pin as input
  pinMode(buttonPin, INPUT_PULLUP);
}

void loop() {
  // Read the state of the button
  int buttonState = digitalRead(buttonPin);

  // Check if the button is pressed
  if (buttonState == LOW) {
    Serial.println("Button Pressed!");
    // Add any desired actions or functionalities here
  }

  // Add a short delay for stability
  delay(100);
}
Breaking Down the Code
Pin Declarations
- Define the pin to which the Tactile Switch Module is connected. In this case, it’s connected to Digital pin 2. This pin will be used to read the state of the button.
Setup Function
- Serial communication is initiated at a baud rate of 9600 baud using
Serial.begin(9600). This is for debugging purposes and allows data to be sent to the Serial Monitor. - The button pin is configured as an input using
pinMode(buttonPin, INPUT_PULLUP). TheINPUT_PULLUPparameter enables the internal pull-up resistor on the pin, ensuring a stable reading when the button is not pressed.
Loop Function
- The current state of the button is read using
digitalRead(buttonPin), and the result is stored in the variablebuttonState. - It checks if the button is pressed by comparing
buttonStatewithLOW, indicating that the button is pressed (assuming the button is connected with a pull-up resistor). - If the button is pressed (
buttonStateisLOW), it prints “Button Pressed!” to the Serial Monitor usingSerial.println(). This serves as a confirmation that the button has been pressed. - You can add any desired actions or functionalities inside the
ifstatement block to execute when the button is pressed. - A short delay of 100 milliseconds is added for stability using
delay(100).
Applications and Usage Scenarios
User Input Interfaces
Tactile Switch Modules can be Incorporated into user input interfaces for projects, such as menu navigation systems, game controllers, or interactive displays.
Control Mechanisms
Tactile Switch Modules can be used to control various functions in your projects, such as toggling LEDs, motors, or other electronic components on and off.
Interrupt Handling
Use Tactile Switch Modules to handle interrupts in Arduino sketches, allowing users to trigger specific actions or responses during program execution.
Safety Systems
Tactile Switch Modules can be integrated into safety systems or emergency stop mechanisms, providing users with a physical means to halt operations in critical situations.
Conclusion
In this sensors and modules guide, we explained the functionality of the Tactile Switch Module, exploring its working principles, and demonstrating how to interface it with an Arduino for practical applications. The Tactile Switch Module, with its tactile feedback and momentary action, is the perfect input device for countless projects. Its simplicity, durability, and ease of integration make it an essential component for user interfaces, control mechanisms, interrupt handling, and safety systems.
Discover the endless possibilities for Arduino projects with more of our Sensors and Modules guides.
