


Welcome to the World of Sensors and Modules with Arduino!
The moisture sensor, also known as a soil moisture sensor, is a valuable tool for monitoring the moisture content in soil. It plays a crucial role in optimizing watering schedules for plants and ensuring their health and productivity. In this sensors and modules guide, we’ll explore the soil moisture sensor and how you can use it with Arduino.
If you’re new to Arduino, why not take a look at our Getting Started with Arduino guides. These guides are designed for beginners to learn the fundamental basics of Arduino programming.
Soil Moisture Sensor
The moisture sensor measures the electrical conductivity or resistance between its probes, which are inserted into the soil. The moisture content in the soil affects the conductivity between the probes. Wet soil is more conductive, resulting in a lower resistance, while dry soil has higher resistance.
Features and Specifications:
Analog and Digital Outputs: Moisture sensors often provide both analog and digital outputs. The analog output gives a continuous range of moisture levels, while the digital output indicates a specific threshold.
Corrosion-Resistant Probes: The sensor typically comes with corrosion-resistant probes to withstand exposure to soil and environmental conditions.
Variable Sensitivity: Many moisture sensors offer variable sensitivity adjustments to cater to different soil types and moisture levels.
Low Power Consumption: Designed for low power consumption, making them suitable for long-term deployments in the field.
Necessary Equipment
- Arduino (e.g., Arduino Uno, Nano etc…)
- Soil moisture sensor
- Jumper wires
- Breadboard (optional)
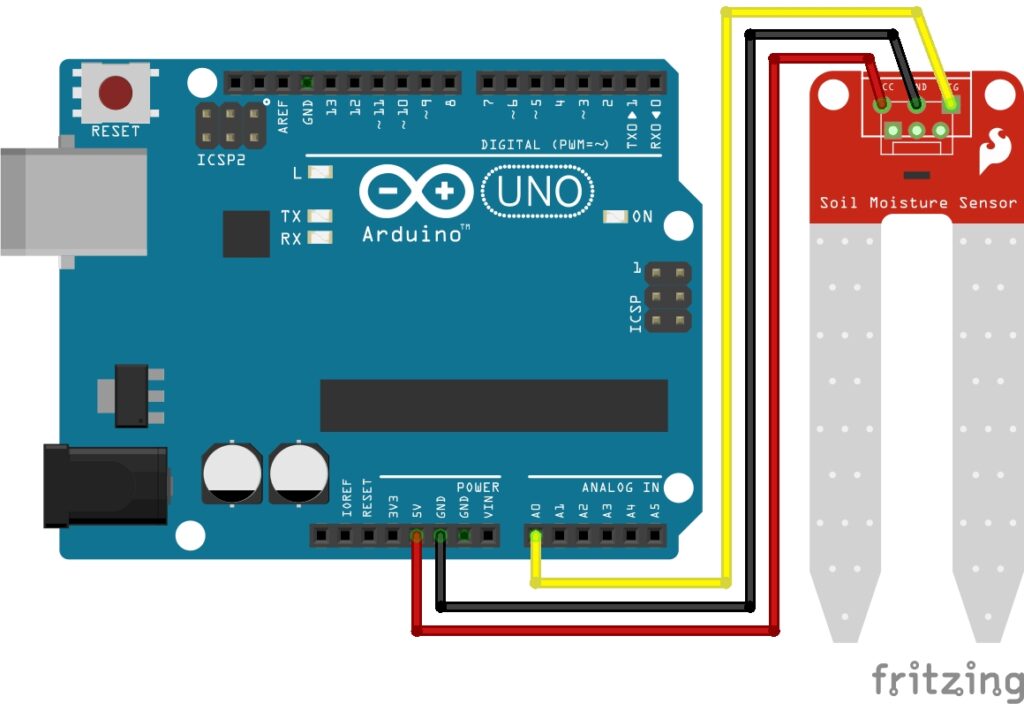
Pin Configuration
Wiring the Moisture Sensor to an Arduino is fairly simple. The Moisture Sensor connections are as follows:
- VCC on the Moisture Sensor to 5V on the Arduino.
- GND on the Moisture Sensor to GND on the Arduino.
- SIG (signal) on the Moisture Sensor to pin A0 on the Arduino.
Pin labels may vary.
Arduino Code Example
const int sensorPin = A0;  // Analog pin for sensor
int moistureValue;

void setup() {
  Serial.begin(9600);
}

void loop() {
  moistureValue = analogRead(sensorPin);

  Serial.print("Moisture Level: ");
  Serial.println(moistureValue);

  delay(1000);  // Adjust the delay as needed
}
Breaking Down the Code
Variable Declarations:
sensorPin: Represents the analog pin to which the moisture sensor is connected.moistureValue: Stores the analog reading from the moisture sensor.
Setup Function:
- The
setupfunction initializes serial communication to allow interaction with the Serial Monitor.
Loop Function:
- The
loopfunction runs continuously after thesetupfunction. - The moisture sensor’s analog voltage is read using the
analogReadfunction, and the result is stored inmoistureValue. - The moisture level is printed to the Serial Monitor using
Serial.printandSerial.println. - A delay of a specified duration is introduced between each iteration of the loop. This delay regulates the update rate of the moisture readings.
Summary:
This code structure continuously reads the analog signal from the moisture sensor, prints the moisture level to the Serial Monitor, and then waits for a specified duration before repeating the process. The delay is included to control the speed at which the moisture readings are updated.
Adjusting Sensitivity
The sensitivity of the moisture sensor can often be adjusted using a potentiometer. Experiment with the potentiometer to find the optimal sensitivity for your specific soil conditions.
Applications and Usage Scenarios for the Soil Moisture Sensor
Agriculture and Gardening:
Optimize irrigation by providing real-time feedback on soil moisture levels, preventing overwatering or underwatering.
Smart Irrigation Systems:
Integrate moisture sensors into automated irrigation systems for precise and efficient water management.
Environmental Monitoring:
Monitor soil moisture in natural environments for ecological research or to assess the health of ecosystems.
Greenhouses and Nurseries:
Ensure optimal growing conditions for plants in controlled environments by maintaining proper soil moisture levels.
Automated Watering System:
Connect the moisture sensor to a microcontroller (e.g., Arduino) and a water pump to create an automated watering system. The pump is activated when the soil moisture falls below a specified threshold.
Data Logging and Analysis:
Implement data logging to track soil moisture levels over time. Analyze the data to understand plant water consumption patterns.
Alert Systems:
Set up alerts or notifications when the soil moisture deviates from the desired range, allowing for timely intervention.
Conclusion
In this sensors and modules guide, we explained the functionality of the soil moisture sensor and how you can use it with Arduino. The moisture sensor is a vital component in modern agriculture and environmental monitoring, enabling precise control over watering systems and contributing to resource conservation. Whether you’re a hobbyist gardener or an agricultural professional, integrating a moisture sensor into your projects can significantly enhance plant care and sustainability. By understanding this sensors features, working principles, and applications, we can unlock the full potential of this versatile module in our own Arduino projects.
Discover the endless possibilities for Arduino projects with more of our Sensors and Modules guides.
