


A Guide to Setting up Pan/Tilt Servos
Welcome to the exciting world of computer vision! In this comprehensive guide, we’ll embark on a journey to set up and test pan/tilt servos, laying the groundwork for more advanced projects in object, color, and face tracking using OpenCV with Python. Whether you’re a seasoned developer or a curious enthusiast, this step-by-step tutorial will equip you with the skills to bring your vision-based projects to life. Let’s dive in and unleash the potential of dynamic vision!
What’s Covered:
- Essential Hardware.
- Assembling the Pan/Tilt Servos.
- Connecting the Servo Controller.
- Connecting the Servos.
- Powering the Controller Board.
- Activating the GPIO.
- Testing the Pan/Tilt Servos.
Essential Hardware:
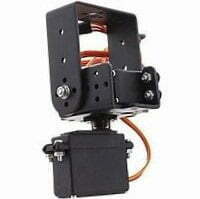
Assembling the Pan/Tilt Servos
I’m using these robust pan/tilt brackets they are great and will last forever. Assembly is also pretty straight forward. Hopefully you have something similar.
Connecting the Servo Controller
Connecting the Pan/Tilt servo kit to the Jetson Nano is fairly straight forward. If you don’t already have the pan tilt servo kit and controller board, please refer to the first section here to find the parts you need to complete this tracking section.
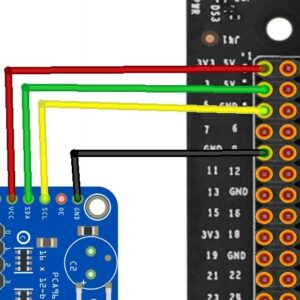
Using female to female jumper cables we can connect the Servo controller to the Jetson Nano as follows:
- 3V3 on the Nano connects to VCC on the controller board.
- Pin 3 on the Nano connects to SDA on the controller board.
- Pin 6 on the Nano connects to SCL on the controller board.
- GND on the Nano connects to GND on the controller board.
Connecting the Servos
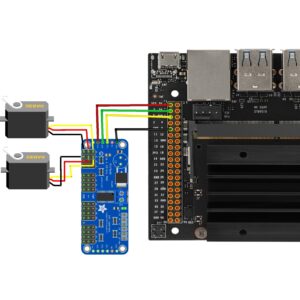
The servos should come with handy connectors that will just plug into the controller board. Make sure you connect the plugs in the correct direction, typically the black wire to GND, and the yellow or orange wire to PWM.
Connect one servo to servo connection 0 on the controller board, and then the other servo to connection 1. In my case I connected the Pan servo to connection 0 and the Tilt servo to connection 1.
Powering the Controller Board
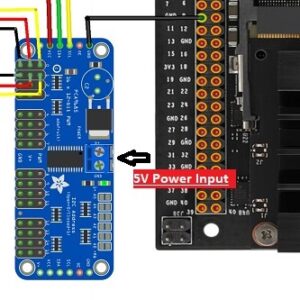
You must power the servo controller board with a 5v power supply, this MUST NOT be powered via the Nano’s 5v GPIO pin, as you will damage your Nano beyond repair. You can however, if you’re using a decent barrel jack power supply as recommended in the first section, you can get the controllers power from the Jetson Nano’s USB ports. I simply stripped one end of an old USB cable, keeping only the VCC and GND wires, inserting those wires into the power input of the controller board then plugging the USB end into the Nano’s USB port.
Activating the GPIO
At the very beginning of these OpenCV guides, in the preparation section we set up the Jetson Nano and configured/activated its GPIO. If you skipped that step, please go back and do it now: Preparation and Installation
Pan Test
Pan scrolls on a horizontal axis, otherwise known as the x axis, moving left to right or vice-versa. First, we need to run a simple test, turning it to the far-left position. This will help you position the servo mount correctly. The servo should have 180 degrees of movement, so positioning the servo at 0 degrees, you will see if you have the servo mount correctly positioned. 0 will be all the way to the left, 180 will be all the way to the right, and 90 will be in the center looking directly forwards. Edit the Pan Servo Starting Position until your happy you have it mounted correctly.Python Code:
#Import Libraries
from adafruit_servokit import ServoKit
import time

kit=ServoKit(channels=16) #Create Servo Object

kit.servo[0].angle=0 #Pan Servo Starting Position

print('Program Terminated') #Confirm Program Has Ended
Now we can run a simple pan left to right, all the way from 0 degrees to 180 degrees. I have added a delay of 0.010 seconds to allow for smoother movement. Experiment, try it with different time delays, even try it without the delay and you can see for yourself the need to have one.#Import Libraries
from adafruit_servokit import ServoKit
import time
kit=ServoKit(channels=16) #Create Servo Object
kit.servo[0].angle=0 #Pan Servo Starting Position
#This For Loop Controls How Many Times to Repeat Process
for i in range(5):
#This For Loop is to Increment Angle
for i in range(0,180,1):
kit.servo[0].angle=i
time.sleep(.010)
#This For Loop is to Decrement Angle
for i in range(180,0,-1):
kit.servo[0].angle=i
time.sleep(.010)
kit.servo[0].angle=90 #Reset Servo Position to 90 Degrees
print('Program Terminated') #Confirm Program Has EndedTilt Test
Tilt scrolls on a vertical axis otherwise known as the y axis, moving up and down or vice-versa.
Python Code:
#Import Libraries
from adafruit_servokit import ServoKit
import time

kit=ServoKit(channels=16) #Create Servo Object

kit.servo[1].angle=90 #Tilt Servo Starting Position

#This For Loop is to Control How Many Times To Repeat Process
for i in range(2):
    #This For Loop is to Increment Angle
    for i in range(90,180,1):
        kit.servo[1].angle=i
        time.sleep(.010)
    #This For Loop is to Decrement Angle
    for i in range(180,90,-1):
        kit.servo[1].angle=i
        time.sleep(.010)


kit.servo[1].angle=160 #Reset Servo Position to 160 Degrees
print('Program Terminated') #Confirm Program Has Ended
Pan and Tilt Test
Now we can run them both together. I don’t need the tilt servo to travel 180 degrees so I have created a startPos object which I can increment and decrement instead of using the range function.
Python Code:
from adafruit_servokit import ServoKit
import time

kit=ServoKit(channels=16)

kit.servo[0].angle=0
kit.servo[1].angle=135
startPOS=135

try:
    for i in range(5):
        for i in range(0,180,1):
            kit.servo[0].angle=i
            kit.servo[1].angle=startPOS
            startPOS+=.25
            if startPOS>=180:
                startPOS=180
            time.sleep(.010)

        for i in range(180,0,-1):
            kit.servo[0].angle=i
            kit.servo[1].angle=startPOS
            startPOS-=.25
            if startPOS<=135:
                startPOS=135
            time.sleep(.010)

except KeyboardInterrupt:
    kit.servo[0].angle=90
    kit.servo[1].angle=135
    print('Program Terminated')
Please take your time and make sure you understand all the code above before moving on to the next section.
Conclusion
Congratulations! You’ve successfully set up and tested your pan/tilt servos, laying a strong foundation for your future ventures into object, color, and face tracking with OpenCV. By mastering these basics, you’re now well-equipped to delve into more advanced computer vision projects. Stay tuned for our next posts, where we’ll explore the exciting realms of dynamic vision!
In the next exciting installment for our OpenCV for Beginners guide we will Detecting and Tracking Faces
That’s All Folks!
You can find all of our OpenCV guides here: OpenCV for Beginners

