

Empowering Your Nano for Computer Vision
Welcome to the cutting-edge intersection of AI and embedded systems! In this guide, we’ll take you step by step installing OpenCV, Python, and Visual Studio so your Nano is ready to embark on a thrilling journey. Prepare to witness the seamless integration of high-performance computing with the power of computer vision. Let’s turn your Jetson Nano into a visual intelligence powerhouse!
What’s Covered:
- Downloading Jetpack OS.
- Installing Jetpack OS.
- First Boot.
- Installing Visual Studio Coding. Environment.
- Installing Required Packages and Tools.
- Installing Python3.
- Setting up the GPIO.
- Creating Virtual RAM.
- Writing Your First Python Script in Visual Studio Code.
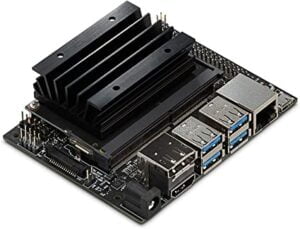
NVidia’s Jetson Nano
The Jetson Nano is a single board computer similar to the Raspberry Pi but has way more power under the hood. For more specific information about the Nano take a look at the Jetson Nano’s Datasheet, It’s pretty impressive.
The reason we chose to use NVidia’s Jetson Nano is that it has advanced uses in machine learning and image processing which will make our projects run much smoother where processing is needed.
Required Hardware
- Jetson Nano Board.
- Power supply.
- Ethernet or Wi-Fi Card.
- A good quality SD Card. We highly recommend the Class 10 SanDisk Extreme PRO.
- Pan/Tilt Brackets and Servo.
- Servo controller board.
- Keyboard and mouse.
- Monitor.
- Webcam.
Preparation and Installation
Preparation
First, we need to download the OS. It’s important to have an SD card that’s fast enough to handle what we are going to be doing and large enough to run the OS and fit all of our projects. The minimum recommended size is a 32 GB UHS-1 card. I will be using the SanDisk Extreme PRO 128GB SD card.
To prepare the SD card you will need the ability to read and write SD cards and have access to the internet.
Download the Jetson Nano Developer Kit SD Card Image, so we can flash it to our SD card. The download file is around 6GB so depending on your internet speed this may take a little while.
Installation
You can flash the image to your SD card using tools like:
To flash my card, I will use the Raspberry Pi Imager tool, if you already use any of the others, feel free to just go ahead and use those.
- Locate where your zip file was downloaded and extract the file from the zip archive.
- Open your imaging software and add the extracted file labelled sd-blob-bo1.img, and the SD card destination.
- Begin the Flashing process by selecting Write.
Now is a good time to go and get a cup of Coffee as this will take a moment. The write and verify process for me took around 35mins hopefully your system is faster but expect a long wait. Once the flashing process is complete, take your SD card and insert it into the jetson board just like in the image below.
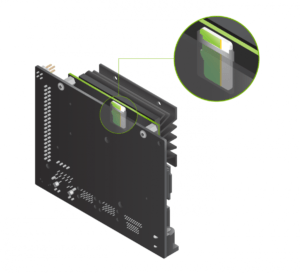
Once you have inserted the SD Card you can connect the keyboard and mouse to the jetson, then connect the Jetson to your monitor and turn the monitor on ready. Now, connect the power supply to the Jetson board. You are now ready to turn on the Jetsons power supply.
First Boot
Once you power on the Jetson board, a green LED next to the micro-USB connector will turn on. On the first boot you will need to run through the initial setup, this includes:
- Accepting the User agreement.
- Select language.
- Select keyboard.
- Connect Wi-Fi.
- Choose time zone.
- Creating Username and password.
- Choose partition size (Maximum size Recommended).
- Select Nvpmodel Mode (If unsure leave as default)
After successfully completing all these steps you will finally see:
Some more initial settings will pop-up like setting up live patch etc… I just kept clicking next and ignored them for now.
Installing Required Packages
Now we have our OS up and running we need to install the necessary programs to begin writing our OpenCV projects.
Updating System
Before installing any new programs and packages to a Linux machine, you should always start by updating and upgrading the repositories and packages on the system. Open the terminal and type the following command:
sudo apt update && sudo apt full-upgrade -y
Now the system is fully updated we can begin installing all software and packages we need.
Installing Curl
curl (short for “Client for URLs”) is a command-line tool and library for making HTTP requests and transferring data with URLs. It is widely used in the Unix and Linux environments and is also available for Windows and macOS.
sudo apt install curl
Installing Visual Studio
Now we can use curl to download Visual Studio. Visual Studio is an advanced integrated Development Environment (IDE) that can be used to write with many coding languages, including Python. The command is one long line and I advise you to copy and paste the command below, so you don’t make any mistakes.
curl -L https://github.com/toolboc/vscode/releases/download/1.32.3/code-oss_1.32.3-arm64.deb -o code-oss_1.32.3-arm64.deb
With the file downloaded we need to unpack it using the following command:
sudo dpkg -i code-oss_1.32.3-arm64.deb
Helpful Settings
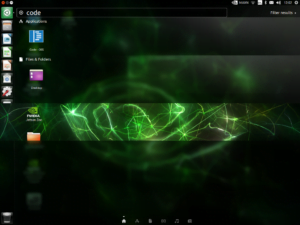
Now for some quality-of-life settings that are not essential but will help speed up productivity slightly. On the left where the Main Icons are select the top icon to search your computer, in the top bar of the window that opens you can enter what you need to search for, enter code-oss, u will see the code-oss icon, simply drag the code-oss icon on to the left menu, this way we can quickly launch it from here.
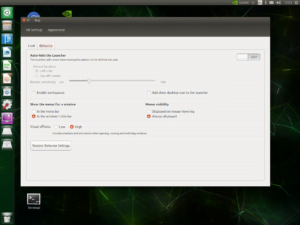
Further down the left quick launch menu, you will see the cog and spanner icon, this is for the system settings menu, click it. Now select the Appearance icon then click the behavior tab. Under the “Show the menus for a window” section, change it to “In the window’s title bar”. Now, under the “Menus visibility” section, change it to “Always displayed”. This will give our windows a more familiar feel when working with them.
Project Directory
Now we need to create a directory where we will be storing all of our project work. Open the terminal and enter the following commands:
cd Desktop
mkdir Python-AI
Setting Python 3.6 as Default Version
The operating system comes with Python2.7 and Python3.6, at the moment it will default to Python2.7 when executing Python commands in the terminal. We can change this with the following commands:sudo update-alternatives --install /usr/bin/python python /usr/bin/python3 1
sudo update-alternatives --config pythonYou should now have the option to set Python3.6 as the default Python version to use. To test this worked type python in the terminal and hopefully Python 3.6 will open in the terminal window. To exit Python type “
exit()” and hit enter or just use “ctrl + d“. If Python2.7 still opened during the last process don’t panic, it’s not a big problem, these were just optional changes, and you can simple use python3 when executing python commands from the terminal.Installing Python Packages
Now we can begin installing necessary packages. Just work your way through the list installing them one at a time in the terminal.
Install Pip
pip is a package installer for Python, used to manage Python packages. The name “pip” stands for “Pip Installs Packages” or “Pip Installs Python.” It simplifies the process of installing, upgrading, and managing Python libraries and dependencies. With pip, you can easily install Python packages from the Python Package Index (PyPI) and other repositories.
sudo apt install python3-pip
sudo -H pip3 install --upgrade setuptools
Install OpenCV
sudo apt install python3-opencv
Install Adafruit Blinka
Adafruit Blinka is a Python library that provides support for CircuitPython, MicroPython, and single-board computers like the Raspberry Pi. The primary goal of Adafruit Blinka is to bring CircuitPython API compatibility to various single-board computers, allowing developers to use CircuitPython libraries and code on these platforms.
sudo -H pip3 install Adafruit-Blinka
Install Adafruits ServoKit
The Adafruit ServoKit is a Python library and a hardware controller that simplifies the control of servo motors. It is designed and developed by Adafruit Industries, a company known for creating open-source hardware and software components for DIY electronics projects. The ServoKit is particularly useful for robotics, animatronics, and other projects where precise control of servo motors is required.
sudo -H pip3 install adafruit-circuitpython-servokit==1.3.8
The latest version of Adafruit Circuit Python would not install to the Nano but rolling back to a previous version, 1.3.8 allowed it to install.
Setting up the GPIO
Now we need to set up the 40pin GPIO for us to use later. The following command will open the GPIO settings menu:
sudo /opt/nvidia/jetsonio/jetson-io.py
Now select the following choices:
- Configure Jetson 40pin Header
- Configure header pins manually
- [*]spi1 (19,21,23,24,26)
For the last selection use the up and down arrow keys to reach spi1 and hit the space bar, this will input the * into the brackets. Now scroll down to back and hit enter. Finally, Save pin changes. Then back once more and Exit. Now reboot your system.
Installing more Necessary Packages for OpenCV
Open your terminal and continue to install the following packages.
Install Cmake
sudo apt install cmake
Install OpenBLAS
libopenblas-dev is the development version of the OpenBLAS (Basic Linear Algebra Subprograms) library. OpenBLAS is an open-source implementation of the BLAS interface, which provides a set of standardized routines for linear algebra operations such as matrix multiplication, vector operations, and other common linear algebra tasks.
sudo apt install libopenblas-dev
Install LAPACK
liblapack-dev is the development version of the LAPACK (Linear Algebra PACKage) library. LAPACK is a library of routines for solving linear algebra problems, including linear equations, linear least squares problems, eigenvalue problems, and singular value decomposition. It provides a set of highly optimized and portable subroutines written in Fortran.
sudo apt install liblapack-dev
Install libjpeg
libjpeg-dev is the development version of the libjpeg library. The libjpeg library is a widely used open-source library for handling JPEG image compression and decompression. It provides functions and utilities for reading and writing JPEG image files and is a crucial component for programs that work with JPEG images.
sudo apt install libjpeg-dev
Install dlib
dlib is a modern C++ toolkit that primarily focuses on machine learning, computer vision, and deep learning. It provides a wide range of functionality, making it a versatile library for various applications.
pip3 install dlib
Install Cython
Cython is a programming language that makes it easy to write C extensions for Python. It’s often used to optimize Python code by allowing developers to write performance-critical portions of their code in a language that is close to C but with a Python-like syntax. Cython code is usually a superset of Python, meaning that valid Python code is also valid Cython code.
pip3 install Cython
Install Face Recognition Library
face_recognition is a Python library that simplifies face recognition tasks. It is built on top of popular computer vision libraries such as dlib, which provides the underlying functionality for face detection and facial feature analysis. The face_recognition library abstracts away much of the complexity involved in working with face recognition algorithms, making it accessible to developers with minimal effort.
pip3 install face_recognition
Virtual RAM
We need to increase the systems Virtual RAM. A simple way to do this is by cloning the repo from JetsonHacks, this way we won’t make any errors. Increasing the VRAM will allow us to run recognition and scanning processes faster. First clone the repo with the top command then install it with the second command.
git clone https://github.com/JetsonHacksNano/installSwapfile
./installSwapfile installSwapfile.sh
Reboot your system to apply the swapfile changes.
Linking OpenCV with Python 3
Lastly, we have one last bit of housekeeping to do, and this will seem very strange indeed. We have OpenCV installed but for some very peculiar reason it has an older version of the library linked to our Python. You can test this for yourself in the terminal by opening Python using the python or python3 command and inputting the following code:
import cv2
cv2.__version__
The version we want is 4.1.1, and maybe by the time you’re following this guide, this is hopefully what you have. Now try the same process again but this time, do it for python2. Anyways moving on, we can fix this issue by entering the following command:
sudo apt remove python3-opencv
I know right, you think I’m mad but just trust me and do it. Once it’s done, try the python3 cv2 version commands again and you will see you now have 4.1.1 ready to use.
Visual Studio Code
Open code-oss. On the left you will see four icons, select the bottom Extensions icon. Type Python in the box at the top. The correct extension we need has the description; IntelliSense (Pylance), Linting, debugging etc. this is the one we need to install. Once installed you will be able to use Python within this visual studio IDE. Now we need to tell Visual Studio which Python interpreter to use, press ctrl + shift + p, this will open the command palette, type Select interpreter into the box, then select the Python3 version you have.
In Code-OSS,
- Click on:
- File
- Open Folder
- Desktop
- Select the Python-AI directory.
We are now ready to write our first program.
Hello World!
Now we can create and run our first Python script, this is really just a test to make sure everything is installed and working before we proceed. On the left of visual Studio select the New File icon to open a new file and label it helloworld.py Now we have a new Python script open ready to be written. Input the following line:
print("Hello World")Now, Right-click on the screen where you entered the line of code and select:
Run Python File in Terminal
“Hello World” will be printed to the code-oss terminal.
Conclusion
Congratulations, you’ve successfully transformed your Jetson Nano into a robust OpenCV platform! Armed with this powerful combination of hardware and software, you’re now equipped to explore the limitless possibilities of computer vision on the edge. Whether you’re diving into robotics, surveillance, or AI applications, your Jetson Nano is your gateway to innovation.
If you need to learn Python or brush up on the basics, please take a look at our Python Crash Course guide, it’s a quick read and you will learn the fundamental basics to Python.
In our next OpenCV for Beginners guide we will be learning about Capturing Frames
That’s All Folks!
You can find all of our OpenCV guides here: OpenCV for Beginners
Why was the Nvidia GeForce card so good at solving problems? Because it had a lot of cores to handle every issue!