Welcome to the World of Sensors and Modules with Arduino!
The DHT11 Temperature Sensor is a versatile digital sensor designed to measure temperature and humidity levels in the surrounding environment. Built with a thermistor and a humidity sensor, this module converts environmental data into digital signals, easily interpretable by microcontrollers like the Arduino. Its compact size, straightforward interface, and reasonable accuracy make the DHT11 an ideal starting point for projects involving climate monitoring, automated systems, or simply learning about sensor integration. In this sensors and modules guide, we’ll explore its working principle, key features, applications, and how it can enhance your Arduino projects.
If you’re new to Arduino, why not take a look at our Getting Started with Arduino guides. These guides are designed for beginners to learn the fundamental basics of Arduino programming.
How the DHT11 Sensor Module Works
The DHT11 Sensor is a basic, low-cost digital temperature and humidity sensor. It contains a sensing element that consists of a humidity sensing component and a thermistor for measuring temperature. The sensor communicates over a single-wire digital interface, making it easy to interface with microcontrollers like Arduino. The humidity sensing component measures relative humidity by detecting the changes in capacitance due to the absorption or desorption of moisture by a polymer layer on a substrate. The thermistor measures temperature by detecting changes in electrical resistance with temperature variations. The sensor provides both temperature and humidity data through its digital output pin sending out a signal containing a start signal followed by data bits representing temperature and humidity readings.
To use the DHT11 sensor with a microcontroller like Arduino, you typically connect the sensor’s data pin to one of the digital pins on the microcontroller and communicate with it using a library that handles the communication protocol.
Features and Specifications:
- Temperature Range: 0°C to 50°C
- Accuracy: ± 0.2C
- Humidity Range: 20% to 90%
- Accuracy: ± -5% accuracy
- Operating Voltage: 5V
- Output: Digital signal
- Accuracy and Limitations:
- The DHT11 sensor is known for its low cost and simplicity, but it may not be as accurate or reliable as more expensive sensors. It also has limitations in terms of response time, and resolution when compared to higher-end sensors.
- Compatibility: This sensor is also compatible with other devices like the Raspberry Pi, ESP32, and ESP8266 etc…
Necessary Equipment:
- Arduino board (e.g., Arduino Uno)
- DHT11 temperature sensor
- Jumper wires
- Breadboard (optional)
Pin Configuration
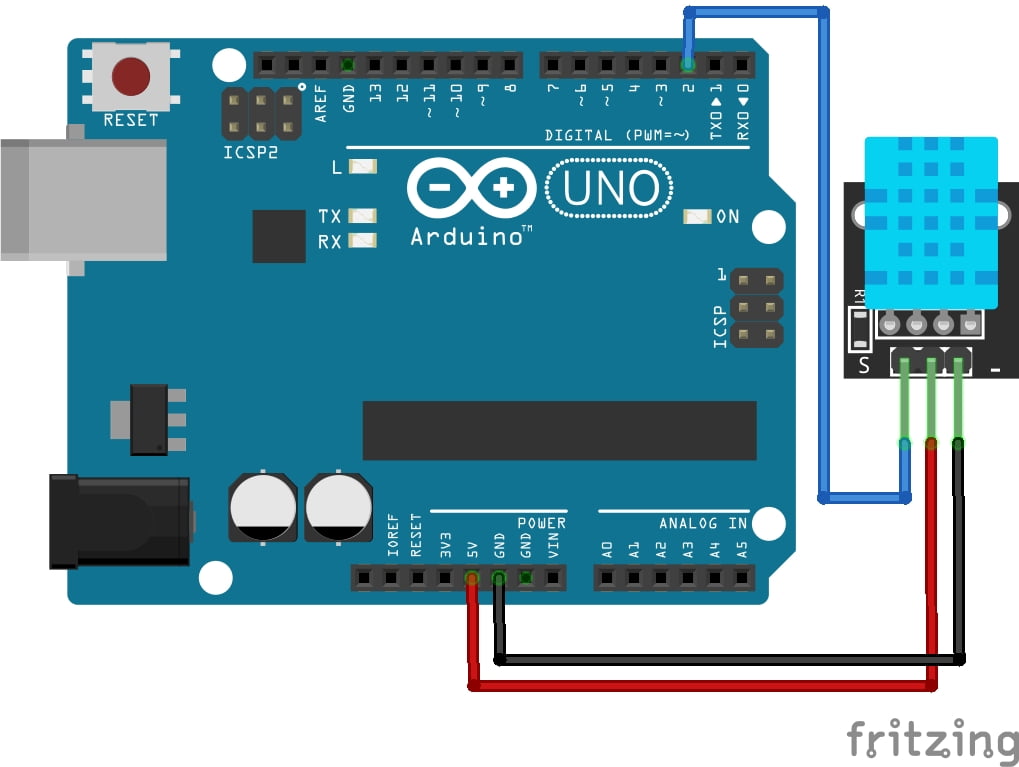
Connecting the DHT11 Temperature Sensor Module to an Arduino is fairly simple. The connections are as follows:
- S on the DHT11 Temperature Sensor Module to Digital Pin 2 on the Arduino.
- VCC on the DHT11 Temperature Sensor Module (middle pin) to 5V on the Arduino.
- – on the DHT11 Temperature Sensor Module to GND on the Arduino.
Pin labels may vary.

KY-015 Temperature and Humidity Sensor Module Fritzing Part is created by arduinomodules.info and published under Creative Commons Attribution-ShareAlike 4.0 International license
Arduino Code Example
#include <DHT.h> // Include the DHT library

#define DHTPIN 2      // Define the digital pin connected to the sensor
#define DHTTYPE DHT11 // Define the type of sensor (DHT11)

DHT dht(DHTPIN, DHTTYPE); // Initialize DHT sensor

void setup() {
  Serial.begin(9600); // Initialize serial communication
  dht.begin();        // Initialize DHT sensor
}

void loop() {
  delay(2000); // Wait for 2 seconds between readings

  float humidity = dht.readHumidity();    // Read humidity value
  float temperature = dht.readTemperature(); // Read temperature value in Celsius

  if (isnan(humidity) || isnan(temperature)) { // Check for any NaN values
    Serial.println("Failed to read from DHT sensor!");
    return;
  }

  Serial.print("Humidity: ");
  Serial.print(humidity);
  Serial.print("%\t Temperature: ");
  Serial.print(temperature);
  Serial.println("°C");

  // You can also convert temperature to Fahrenheit if needed:
  // float fahrenheit = dht.readTemperature(true);
  // Serial.print(fahrenheit);
  // Serial.println("°F");
}
Breaking Down the Code
Include Library
- The
DHT.hlibrary is used to communicate with the DHT sensor.
Pin Declaration
DHTPINdefines the pin connected to the sensor, andDHTTYPEspecifies the sensor type (DHT11 in this case).
Setup Function
- We start the Serial Monitor for serial communication.
- We start the DHT sensor ready for data collection.
Loop Function
- The
loop()function reads temperature and humidity data from the sensor every 2 seconds and prints it to the serial monitor. isnan()is used to check if the sensor readings are valid.
This code reads data from the DHT11 sensor and prints the humidity and temperature values to the serial monitor. You can further enhance this by displaying the readings on an LCD or incorporating them into a more elaborate project.
Applications and Usage Scenarios
Indoor Climate Monitoring
Use the DHT11 sensor to monitor temperature and humidity levels indoors, such as in homes, offices, warehouses, or greenhouses. This information can help maintain comfortable and healthy indoor environments.
Weather Stations
Incorporate the DHT11 sensor into DIY weather stations to monitor local temperature and humidity conditions. This data can be used for weather forecasting, climate analysis, or personal weather monitoring.
HVAC Systems
Integrate the DHT11 sensor into heating, ventilation, and air conditioning (HVAC) systems to monitor indoor environmental conditions. This data can be used to optimize HVAC system performance for energy efficiency and occupant comfort.
Food Storage
Place the DHT11 sensor in refrigerators, freezers, or food storage areas to monitor temperature and humidity levels. This helps ensure that perishable foods are stored at the appropriate conditions to prevent spoilage.
Greenhouse Automation
Use the DHT11 sensor in greenhouse automation systems to monitor and control environmental conditions such as temperature and humidity. This can help optimize plant growth and yield in controlled agricultural environments.
Terrariums and Vivariums
Incorporate the DHT11 sensor into terrariums or vivariums to monitor temperature and humidity levels for reptiles, amphibians, or plants. Maintaining proper environmental conditions is essential for the health and well-being of captive organisms.
Data Logging
Log temperature and humidity data over time using the DHT11 sensor and a microcontroller like Arduino. This data can be analyzed to identify trends, patterns, or anomalies in environmental conditions.
IoT Projects
Integrate the DHT11 sensor into Internet of Things (IoT) projects to remotely monitor temperature and humidity conditions using a web interface or mobile application. This allows users to access real-time environmental data from anywhere with an internet connection.
Conclusion
In this sensors and modules guide, we explained the functionality of the DHT11 Temperature Sensor, exploring its working principles, and demonstrating how to interface it with an Arduino for practical applications. By now, you’re equipped with the knowledge to incorporate this sensor into your projects and experiments, opening doors to endless possibilities in the world of sensor technology.
Discover the endless possibilities for Arduino projects with more of our Sensors and Modules guides.


