

Welcome to the World of Sensors and Modules with Arduino!
The Active Buzzer and Passive Buzzer are two types of sound-producing components commonly used in electronics and Arduino projects. In this sensors and modules guide, we’ll explore both types of Buzzer Modules found in the Elegoo 37 Sensor Kit V2.0, their working principles, key features, applications, and how they can enhance your Arduino projects.
If you’re new to Arduino, why not take a look at our Getting Started with Arduino guides. These guides are designed for beginners to learn the fundamental basics of Arduino programming.
Active Buzzer Vs Passive Buzzer
Both buzzers serve similar purposes but work in different ways. Here are the key differences of Active and Passive buzzers:
Active Buzzers:
- An active buzzer is a self-contained sound-producing component.
- It generates a continuous sound or tone when voltage is applied.
- It has its own built-in oscillator and does not require external circuitry to produce sound.
- Active buzzers are generally easier to use because they can be connected directly to a power source.
- You can control the pitch or frequency of the sound by varying the voltage applied to it.
- They are often used when you need a simple sound or alarm in your projects.
Passive Buzzers:
- A passive buzzer, on the other hand, is essentially a piezoelectric speaker without a built-in oscillator.
- It does not generate sound on its own and relies on external circuitry to produce sound.
- To make a passive buzzer produce sound, you need to provide it with an oscillating signal (typically a square wave) generated by a microcontroller or another external source.
- Passive buzzers provide greater control over the sound’s characteristics, such as frequency and duration, but they require more complex circuitry and programming.
Frequency Range
The audible frequency range for both Passive and Active Buzzers is the same, as it is primarily determined by the external signal provided to the buzzer. Human ears can typically perceive frequencies ranging from approximately 20 Hz to 20,000 Hz. Both types of buzzer modules can cover this entire audible frequency spectrum based on the frequency of the input signal they receive.
For instance, if you provide a 1,000 Hz frequency signal to an Active Buzzer using the Arduino tone() function, it will produce a sound with a frequency of 1,000 Hz. Similarly, a Passive Buzzer would exhibit the same behavior when driven by an external frequency signal within the audible range.
It’s important to note that the specific characteristics, response time, and sound quality may vary between different models and brands of buzzers and buzzer modules. Therefore, experimentation and testing with specific components may be necessary for precise control over the audible output.
Features and Specifications:
- Operating Voltage: 3.3V ~ 5V
- Size: 25mm x 15mm x 12mm
- Compatibility: The buzzer modules are also compatible with other devices like the Raspberry Pi, ESP32, and ESP8266 etc…
Necessary Equipment:
- Arduino (e.g., Arduino Uno)
- Buzzer Modules
- Active Buzzer Module
- Passive Buzzer Module
- Jumper Wires
- Breadboard (optional)
Pin Configuration
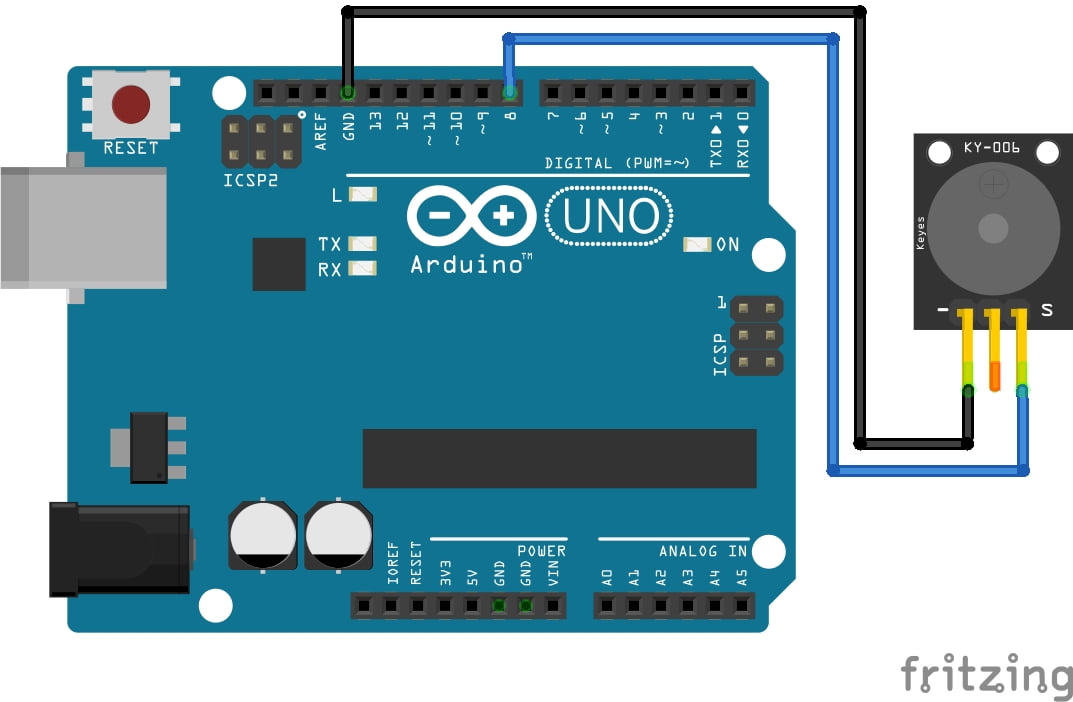
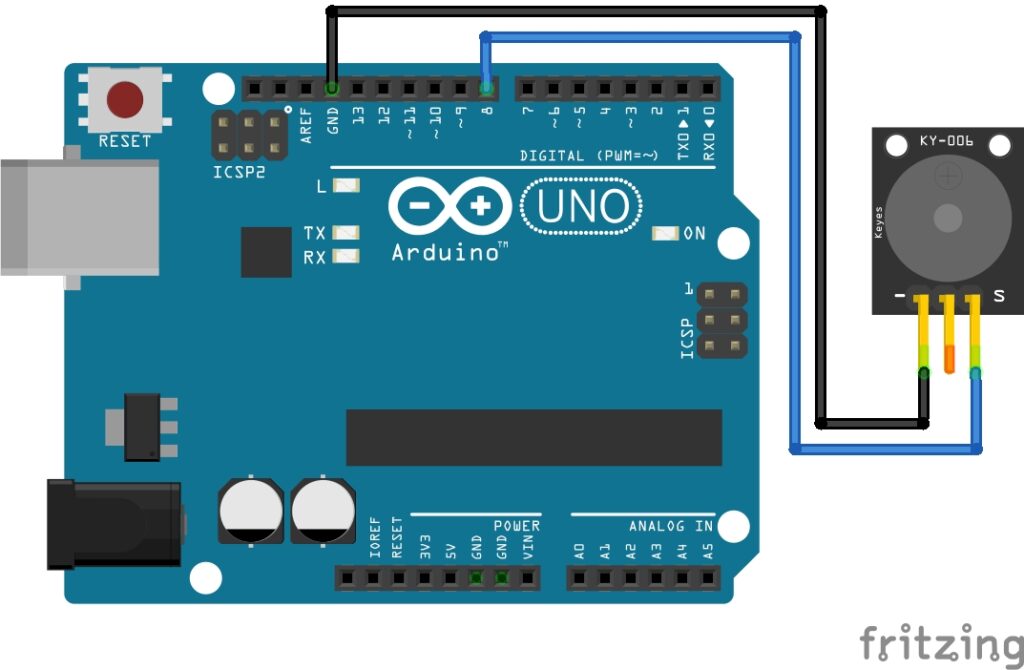
Connecting either of the buzzer modules to an Arduino is very simple, and connected in the same way, so you can just swap the buzzers out between running the code examples. The connections are as follows:
- – on the buzzer to GND on the Arduino.
- S or + on the buzzer to Digital Pin 8 on the Arduino.
Pin labels may vary.
Passive Buzzer Code Example
Connecting a Passive Buzzer to an Arduino involves applying an alternating current signal of the desired frequency. The code example will demonstrate how to generate tones using the tone() function and control the frequency for the Passive Buzzer.
int buzzerPin = 8;  // Connect the Passive Buzzer to digital pin 8

void setup() {
  pinMode(buzzerPin, OUTPUT);
}

void loop() {
  tone(buzzerPin, 1000);  // Generate a 1000 Hz tone
  delay(1000);  // Wait for 1 second
  noTone(buzzerPin);  // Turn off the tone
  delay(1000);  // Wait for 1 second
}
Breaking Down the Code
Pin Declarations
- Defines an integer variable
buzzerPinto represent the digital signal pin connected to the passive buzzer.
Setup Function
- We set the mode of the variable
buzzerPinto be anOUTPUT.
Loop Function
- The
tone()function is used to generate a tone on the specified pin (buzzerPin). The first parameter is the pin number, and the second parameter is the frequency of the tone in Hertz (Hz). - The
delay()function is used to pause the program for a specified amount of time, creating an audible tone for 1 second. - The
noTone()function is then used to turn off the tone on the specified pin, creating a silent period for 1 second.
Adjusting Tone and Volume
Frequency Control: Adjust the frequency parameter in the
tone()function to change the tone of the Passive Buzzer.Volume Control: Since Passive Buzzers rely on external current, volume control is limited. Using an external circuit, such as a transistor, can help modulate the volume.
Active Buzzer Code Example
Now we are going to play a simple melody using the Active Buzzer. First, we must simply swap out the Passive Buzzer for the Active Buzzer in our circuit and we’re good to go.
int buzzerPin = 8;  // Connect the Active Buzzer to digital pin 8

void setup() {
  pinMode(buzzerPin, OUTPUT);
}

void loop() {
  playMelody();
}

void playMelody() {
  int melody[] = {262, 294, 330, 349, 392, 440, 494, 523};  // Melody notes (C4 to C5)
  int noteDuration = 500;  // Duration of each note in milliseconds

  for (int i = 0; i < 8; i++) {
    tone(buzzerPin, melody[i], noteDuration);
    delay(noteDuration + 50);  // Add a small delay between notes
  }

  noTone(buzzerPin);  // Turn off the tone
  delay(1000);  // Pause before playing the melody again
}
Breaking Down the Code
Variable Declaration
int buzzerPin = 8;: Declares an integer variable namedbuzzerPinand assigns it the value8. This variable represents the digital pin on the Arduino board to which the buzzer is connected.
Setup Function
- Configures the specified
buzzerPinas an output pin using thepinMode()function. This setup is done once at the beginning of the program execution.
Loop Function
- Calls the
playMelody()function repeatedly in an infinite loop. This function is responsible for playing the melody.
playMelody Function
- Defines the
playMelody()function, responsible for playing the predefined melody. - Declares an integer array named
melodycontaining the frequencies of each note in the melody. - Sets the variable
noteDurationto 500 milliseconds, representing the duration of each note. - Iterates through each element of the
melodyarray using aforloop. - Calls the
tone()function to generate a tone at the frequency specified bymelody[i]on thebuzzerPinfor the duration specified bynoteDuration. - Adds a small delay of 50 milliseconds between notes using the
delay()function. - Stops generating the tone on the
buzzerPinusing thenoTone()function. - Adds a delay of 1000 milliseconds before playing the melody again, creating a pause between repetitions.
Applications and Usage Scenarios
While Passive Buzzers and Active Buzzers are used for all kinds of Arduino projects, here are some examples of where else they can be used:
Alarm Systems
Buzzers can be used in various alarm systems, such as burglar alarms, fire alarms, or intruder detection systems, to produce loud warning tones in case of emergencies.
Notification Systems
They can be employed in notification systems for indicating events like incoming messages, emails, or alerts in electronic devices, such as smartphones, tablets, or smartwatches.
Home Automation
In home automation projects, buzzers can be integrated into smart home setups to provide audible feedback for actions like doorbell presses, motion detection, or appliance status alerts.
Industrial Applications
Buzzers find use in industrial settings for signaling various conditions, such as equipment malfunction, low inventory levels, or completion of tasks in assembly lines.
Medical Devices
In medical devices, buzzers can be used to generate audible alerts for patients, healthcare providers, or caregivers, signaling events like medication reminders, vital sign alarms, or equipment failures.
Educational Kits
Buzzers are often included in educational electronics kits to teach students about basic circuitry, sound generation, and electronics principles.
Gaming Devices
They can be incorporated into gaming peripherals, such as joystick controllers or game consoles, to provide sound effects like button presses, game events, or notifications.
Vehicle Electronics
Buzzers can be used in automotive applications for indicating conditions like seatbelt warnings, low fuel levels, or engine malfunctions, providing auditory alerts to drivers.
Musical Instruments
While not as common as active buzzers or dedicated audio components, passive buzzers can be utilized in simple electronic musical instruments, experimental music projects, or hobbyist synthesizers for generating tones and melodies.
Accessibility Aids
In assistive technology devices, buzzers can serve as auditory feedback for individuals with visual impairments, indicating events like button presses, proximity alerts, or environmental conditions.
These are just a few examples of how buzzer modules can be used across various domains for generating audible alerts and tones in electronic systems and devices. Their simplicity and versatility make them a popular choice in many Arduino projects requiring sound generation capabilities.
Conclusion
In this guide, we explained the functionality of both types of Buzzer Modules, the Active Buzzer and Passive Buzzer, exploring their working principles, and demonstrating how to interface them with an Arduino for practical applications. In summary, active buzzers are self-contained and generate sound when powered, while passive buzzers require external circuitry to produce sound.
The choice between the two depends on your project’s requirements and your level of control over the sound you want to produce. Active buzzers are simpler to use because they contain built-in oscillators, meaning they generate the sound themselves when power is applied. Passive buzzers provide more control but require the use of an external oscillator using the tone() function to produce sound at specific frequencies.
Discover the endless possibilities for Arduino projects with more of our Sensors and Modules guides.
