

Exploring Basic Components with Arduino!
Welcome to Meganano’s series of comprehensive guides on using basic components with Arduino! In this particular guide, we’ll be focusing specifically on capacitors, exploring their functions, types, applications, and best practices for integrating them into your Arduino projects.
If you’re new to Arduino, why not take a look at our Getting Started with Arduino guides. These guides are designed for beginners to learn the fundamental basics of Arduino programming.
Introduction to Capacitors
What are Capacitors?
Capacitors are fundamental electronic components used in a wide range of circuits. They are passive devices that store and release electrical energy in the form of an electric field between two conductive plates. These plates are separated by an insulating material known as a dielectric. When a voltage is applied across the plates, charge accumulates, resulting in the formation of an electric field.
Basic Function
The primary function of capacitors is to store and release electrical energy. Unlike batteries, which store energy in a chemical form, capacitors store energy in an electric field. This makes them ideal for tasks such as filtering out noise from power supplies, stabilizing voltages, creating timing delays, and coupling signals between different parts of a circuit.
Importance in Electronics
Capacitors play a crucial role in various electronic devices and systems. They are found in everything from simple electronic gadgets to complex computer systems. Without capacitors, many electronic circuits would not function correctly, as they provide essential functions such as smoothing out power supply voltages, blocking direct current (DC) while allowing alternating current (AC) to pass, and controlling the timing of signals in circuits.
In summary, capacitors are vital components in electronic circuits, serving multiple purposes such as energy storage, signal coupling, timing, and filtering. Understanding how capacitors work and how to use them effectively is essential for anyone interested in electronics or working with Arduino projects.
A Brief History of Capacitors
Discovery of Capacitance
The concept of capacitance emerged in the 18th century when scientists began to experiment with electrical conductors and insulators. In the 1740s, Ewald Georg von Kleist and Pieter van Musschenbroek independently discovered the Leyden jar, a device capable of storing electric charge. This marked the first practical demonstration of capacitance.
Development of Leyden Jar
The Leyden jar, named after the city where Musschenbroek worked, was further investigated and developed by numerous scientists, including Benjamin Franklin. It consisted of a glass jar filled with water and lined with metal foil inside and out. This design greatly increased the amount of charge it could store compared to earlier devices.
Introduction of Dielectric Materials
In the early 19th century, researchers began experimenting with different materials to improve capacitor performance. They discovered that inserting a dielectric material between the conductive plates of a capacitor could increase its capacitance significantly. Dielectric materials such as wax, glass, and paper were commonly used.
Advancements in Technology
Throughout the 20th century, capacitor technology saw significant advancements. Manufacturers developed various types of capacitors tailored for specific applications, including electrolytic capacitors, ceramic capacitors, and film capacitors. These advancements led to smaller, more efficient, and more reliable capacitors.
Modern Capacitor Technology
In recent decades, advancements in materials science and manufacturing techniques have further improved capacitor performance. Capacitors are now widely used in virtually all electronic devices, from smartphones and computers to industrial machinery and aerospace equipment. They play crucial roles in filtering signals, smoothing power supplies, and storing energy in circuits.
Future Trends
As electronic devices continue to evolve and demand for smaller, more efficient components grows, research into novel capacitor materials and designs continues. Emerging technologies such as graphene-based capacitors and supercapacitors hold the promise of even higher energy densities and faster charging rates, paving the way for new applications in renewable energy, electric vehicles, and beyond.
Types of Capacitors
Electrolytic Capacitors
- Description: Electrolytic capacitors are polarized capacitors that typically offer high capacitance values. They consist of two conductive plates separated by an electrolyte, which serves as the dielectric.
- Properties: Electrolytic capacitors are known for their high capacitance-to-volume ratio, making them suitable for applications requiring large capacitance values in a relatively small package. They are commonly used in power supply circuits and audio applications.
- Advantages: High capacitance values, compact size, and relatively low cost compared to other types of capacitors.
- Disadvantages: Polarized nature requires careful attention to polarity during circuit assembly. They are also susceptible to degradation over time and may exhibit leakage current if subjected to reverse voltage.
Ceramic Capacitors
- Description: Ceramic capacitors are non-polarized capacitors that use a ceramic material as the dielectric. They are available in a wide range of capacitance values and package sizes.
- Properties: Ceramic capacitors offer excellent stability, high reliability, and low cost. They are commonly used for decoupling, filtering, and bypassing applications in electronic circuits.
- Advantages: Wide range of capacitance values, low cost, high reliability, and stability over temperature and frequency.
- Disadvantages: Capacitance may vary with voltage, and they can exhibit piezoelectric effects under mechanical stress, which may introduce noise in sensitive circuits.
Tantalum Capacitors
- Description: Tantalum capacitors are polarized capacitors known for their high capacitance density and stability. They use tantalum metal as the anode and an oxide layer as the dielectric.
- Properties: Tantalum capacitors offer high capacitance values in a compact package, making them suitable for miniaturized electronic devices and applications where space is limited.
- Advantages: High capacitance density, stable capacitance over a wide temperature range, and low leakage current compared to electrolytic capacitors.
- Disadvantages: Tantalum capacitors are more expensive than other types, and they can be sensitive to voltage spikes, which may lead to catastrophic failure if not properly managed.
Other Types
- Film Capacitors: These capacitors use a thin plastic film as the dielectric and are known for their high stability and low leakage current.
- Supercapacitors: Also known as ultracapacitors, supercapacitors offer very high capacitance values and are used for energy storage in applications requiring rapid charge and discharge cycles.
In summary, understanding the different types of capacitors and their properties is essential for selecting the most suitable component for a specific application. Each type has its advantages and disadvantages, and choosing the right capacitor depends on factors such as capacitance requirements, voltage rating, size constraints, and cost considerations.
In the next section, we’ll delve into the important parameters to consider when choosing capacitors for your Arduino projects.
Capacitors Parameters
Capacitance
- Definition: Capacitance is the measure of a capacitor’s ability to store electrical charge. It is measured in Farads (F), but smaller units such as microfarads (μF) and picofarads (pF) are more commonly used in electronic circuits.
- Importance: The capacitance value determines how much charge a capacitor can store for a given voltage. Higher capacitance values allow capacitors to store more charge, making them suitable for applications requiring larger energy storage or filtering capabilities.
Voltage Rating
- Definition: The voltage rating of a capacitor specifies the maximum voltage that can be safely applied across its terminals without causing breakdown or damage.
- Importance: Exceeding the rated voltage can lead to catastrophic failure of the capacitor, including short circuits, leakage, or even explosion. It’s crucial to choose capacitors with voltage ratings higher than the maximum voltage expected in the circuit.
Tolerance
- Definition: Capacitor tolerance indicates the permissible deviation of the actual capacitance value from the rated value. It is usually expressed as a percentage.
- Importance: Capacitors can have tolerances ranging from a few percent to 20% or more. Understanding the tolerance helps ensure that the capacitor’s actual capacitance falls within an acceptable range for the application. For critical applications requiring precise capacitance values, capacitors with tighter tolerances should be selected.
Temperature Coefficient
- Definition: The temperature coefficient of a capacitor specifies how its capacitance varies with temperature changes. It is usually expressed in parts per million per degree Celsius (ppm/°C).
- Importance: Capacitance values can change significantly with temperature variations, affecting circuit performance. Capacitors with low temperature coefficients are preferred for applications requiring stable capacitance over a wide temperature range.
Equivalent Series Resistance (ESR)
- Definition: ESR is the internal resistance present in a capacitor, representing the energy lost as heat during charge and discharge cycles.
- Importance: Higher ESR values can impact the performance of capacitors in high-frequency circuits, causing power loss and affecting circuit efficiency. Low-ESR capacitors are preferred for applications requiring minimal power dissipation and high-frequency operation.
In summary, understanding the key parameters of capacitors is essential for selecting the right component for your Arduino projects. Capacitance, voltage rating, tolerance, temperature coefficient, and ESR are critical factors to consider when choosing capacitors to ensure optimal performance and reliability of electronic circuits.
In the next section, we’ll explore how capacitors are commonly used in Arduino projects for tasks such as filtering, timing, and signal coupling.
Capacitors in Arduino Projects
Capacitors are essential components in electronic circuits, often playing a supporting role rather than being the focal point of a project. They assist other components by performing various functions that contribute to the overall operation and reliability of electronic devices. For instance, capacitors act as energy storage elements, stabilizing power supplies by filtering out noise and voltage fluctuations. They also help smooth out abrupt changes in voltage, ensuring a steady and consistent electrical flow to sensitive components like integrated circuits and microprocessors. Moreover, capacitors are crucial in timing circuits, providing precise delays or pulse shaping necessary for proper signal processing.
In audio applications, capacitors contribute to tone control, signal coupling, and noise reduction, enhancing the fidelity and clarity of sound reproduction. In essence, capacitors serve as versatile support elements that optimize the performance and functionality of electronic systems, enabling other components to operate more efficiently and reliably within a circuit.
Capacitors are versatile components commonly used in Arduino projects for various tasks, including filtering, timing, and signal coupling. Let’s explore some common applications:
Filtering
- Purpose: Capacitors are used to filter out noise and stabilize power supply voltages in Arduino circuits.
- Implementation: Placing capacitors across the power supply rails helps smooth out fluctuations in voltage caused by noise or transient events, ensuring stable operation of electronic components.
- Example: Adding a capacitor across the power supply rails of a motor driver or sensor module can reduce electrical noise and improve the reliability of sensor readings or motor control.
Timing
- Purpose: Capacitors are employed in timing circuits or for creating delays in Arduino projects.
- Implementation: By controlling the charging and discharging of capacitors through resistors or other components, precise timing intervals can be achieved.
- Example: Using a capacitor and a resistor in combination with an Arduino’s digital input/output pins, one can create time delays for controlling LEDs, buzzers, or other output devices.
Signal Coupling
- Purpose: Capacitors are used for AC coupling in signal processing circuits, allowing the transmission of AC signals while blocking DC components.
- Implementation: Capacitors are placed in series with the signal path, allowing only the AC component of the signal to pass through while blocking any DC offset.
- Example: Coupling capacitors are commonly used in audio amplifier circuits to block DC bias voltage while allowing the audio signal to pass through to the speakers.
Decoupling
- Purpose: Capacitors are used for decoupling purposes to provide localized energy storage and filtering in electronic circuits.
- Implementation: Placing capacitors close to integrated circuits or other sensitive components helps minimize voltage fluctuations caused by rapid changes in current demand.
- Example: Adding decoupling capacitors near microcontrollers or ICs in Arduino projects can improve stability and reduce the risk of malfunctions caused by voltage spikes or noise.
In summary, capacitors play a vital role in Arduino projects, performing tasks such as filtering noise, creating timing delays, coupling signals, and providing localized energy storage. Understanding how to use capacitors effectively enhances the performance and reliability of Arduino-based electronic systems.
In the next section, we’ll discuss how to choose the right capacitors for your Arduino projects and provide practical tips for selecting and integrating capacitors into your circuits.
Choosing the Right Capacitor for Your Arduino Project
Choosing the appropriate capacitor for your Arduino project is crucial for ensuring optimal performance and reliability. Several factors need to be considered when selecting capacitors:
Capacitance
- Determine the required capacitance based on the specific application and circuit requirements. Capacitance values typically range from picofarads (pF) to farads (F), depending on the application.
- Choose a capacitor with a capacitance value that meets the desired energy storage or filtering requirements of the circuit.
Voltage Rating
- Select a capacitor with a voltage rating higher than the maximum voltage expected in the circuit. This ensures that the capacitor can withstand voltage spikes or fluctuations without failure.
- Consider factors such as input voltage variations, transient events, and safety margins when choosing the voltage rating of the capacitor.
Package Size and Physical Constraints
- Consider the physical size and form factor of the capacitor, especially if space is limited in your project.
- Choose capacitors with compact package sizes that fit within the available space on your Arduino board or within the enclosure of your project.
Cost
- Evaluate the cost of capacitors based on your project budget and requirements. Different types of capacitors vary in cost, with some being more expensive than others.
- Balance cost considerations with the desired performance and reliability of the capacitor for your specific application.
Application-Specific Requirements
- Consider any additional requirements specific to your project, such as temperature stability, frequency response, and ESR (Equivalent Series Resistance).
- Choose capacitors with properties that match the environmental conditions and performance requirements of your Arduino project.
In summary, choosing the right capacitor for your Arduino project involves considering factors such as capacitance, voltage rating, package size, cost, and application-specific requirements. By carefully selecting capacitors that meet the needs of your project, you can ensure optimal performance and reliability of your Arduino-based electronic circuits.
In the next section, we’ll explore practical tips for integrating capacitors into your Arduino projects and common pitfalls to avoid when working with capacitors.
Practical Tips for Integrating Capacitors into Your Arduino Projects
Integrating capacitors into Arduino projects requires attention to detail to ensure proper functionality and reliability.
Here are some practical tips and common pitfalls to avoid:
Choose Capacitors Carefully
- Consider the specific requirements of your project when selecting capacitors, including capacitance, voltage rating, package size, and cost.
- Ensure that the chosen capacitors meet the performance and environmental requirements of your Arduino project to avoid compatibility issues or premature failure.
Follow Polarity Guidelines
- For polarized capacitors (e.g., electrolytic, tantalum), always observe the polarity markings and connect them correctly in the circuit.
- Reversing the polarity of polarized capacitors can lead to damage or failure, so double-check connections before powering up your Arduino project.
Use Proper Connection Techniques
- When connecting capacitors in series or parallel, ensure consistent polarity orientation and follow proper wiring techniques to maintain electrical integrity.
- Avoid excessive bending or stress on capacitor leads to prevent damage or poor connections.
Discharge Capacitors Before Handling
- Capacitors can retain electrical charge even after power is disconnected. Always discharge capacitors safely using a discharge tool or resistor before handling them or making changes to the circuit.
- Failure to discharge capacitors properly can result in electrical shocks or damage to components.
Test and Verify Capacitor Functionality
- Before integrating capacitors into your Arduino project, test them individually to verify their functionality and performance.
- Use a multimeter to measure capacitance, voltage, and ESR (Equivalent Series Resistance) to ensure that capacitors meet specified requirements.
Common Pitfalls to Avoid
- Choosing Incorrect Capacitance: Using capacitors with incorrect capacitance values can lead to circuit instability or inadequate performance.
- Ignoring Polarity Guidelines: Incorrectly connecting polarized capacitors can cause damage to the capacitor or other components in the circuit.
- Poor Connection Quality: Loose or improper connections can result in intermittent operation or circuit malfunction.
- Failure to Discharge Capacitors: Forgetting to discharge capacitors before handling them can pose a safety risk.
In summary, integrating capacitors into Arduino projects requires attention to detail and adherence to best practices to ensure optimal performance and reliability. By following these practical tips and avoiding the common pitfalls, you can effectively harness the benefits of capacitors in your electronic circuits.
In the next section, we’ll explore capacitor connections for their effective operation in Arduino projects.
Capacitor Connections
Proper connection of capacitors is essential for their effective operation in Arduino projects. Here’s what you need to know about capacitor connections:
Polarized vs. Non-Polarized Capacitors
- Polarized Capacitors: Electrolytic and tantalum capacitors are polarized, meaning they have a positive and negative terminal. It’s crucial to connect polarized capacitors correctly, observing the polarity markings indicated on the capacitor body.
- Non-Polarized Capacitors: Ceramic and film capacitors are non-polarized, meaning they can be connected in either direction without regard to polarity. This simplifies their integration into circuits.
Series and Parallel Connections
- Series Connection: When capacitors are connected in series, their capacitances add inversely. Series connection increases the equivalent voltage rating of the capacitors while keeping the total capacitance lower than that of individual capacitors.
- Parallel Connection: When capacitors are connected in parallel, their capacitances add directly. Parallel connection increases the total capacitance while keeping the equivalent voltage rating the same as that of individual capacitors.
Proper Polarity
- Always observe the polarity markings on polarized capacitors to ensure correct connection. Reversing the polarity of polarized capacitors can lead to damage or failure.
- When connecting multiple capacitors in series or parallel, ensure that all capacitors have the same polarity orientation to maintain proper polarity across the circuit.
Discharge Before Handling
- Capacitors can store electrical charge even after the power source is disconnected. Before handling capacitors or making any changes to the circuit, ensure that they are properly discharged to prevent electrical shocks or damage to components.
- Use a discharge tool or a high-value resistor to safely discharge capacitors before handling them.
In summary, proper capacitor connections are essential for the safe and effective operation of Arduino projects. Whether connecting polarized or non-polarized capacitors, always observe polarity markings, consider series and parallel connections for desired capacitance and voltage ratings, and ensure capacitors are discharged before handling to prevent accidents.
In the next section, we’ll discuss the time constant of a capacitor concept.
Time Constant of a Capacitor
The time constant of a capacitor, often denoted by the symbol τ (tau), is a measure of how quickly a capacitor charges or discharges in an electrical circuit. It’s determined by the product of the capacitance (C) of the capacitor and the resistance (R) in the circuit through which current is flowing. Mathematically, the time constant (τ) is given by the equation:
τ = R * C
Here’s a breakdown of what this means and how it’s relevant:
Charging and Discharging:
When a capacitor is connected to a voltage source through a resistor, it charges up. Similarly, when the voltage source is removed, the capacitor discharges. The time constant tells you how quickly these processes occur.
Exponential Behavior:
The voltage across a charging or discharging capacitor doesn’t change linearly over time. Instead, it follows an exponential curve. The time constant determines the rate at which the voltage across the capacitor approaches the source voltage (during charging) or zero (during discharging).
Behavior over Time:
After one time constant (τ), the voltage across the capacitor has reached approximately 63.2% of its final value during charging, or it has decreased to about 36.8% of its initial value during discharging.
Applications:
Understanding the time constant is crucial in various electronic applications. For example, in RC (resistor-capacitor) circuits used for filtering or timing purposes, the time constant determines the response time of the circuit. In time-delay circuits or circuits involving transient phenomena, the time constant helps engineers predict the behavior of the system.
Adjusting Time Constants:
Engineers can adjust the time constant by changing either the resistance or capacitance in the circuit. Increasing the resistance or capacitance increases the time constant, resulting in a slower charging or discharging process, and vice versa.
In summary, the time constant of a capacitor-resistor circuit provides valuable insight into the dynamics of charging and discharging processes and is essential for designing and analyzing various electronic circuits.
In the next section, we’ll discuss common capacitor-related issues encountered in Arduino projects and how to troubleshoot them effectively.
Troubleshooting Capacitor-Related Issues
Despite careful planning and implementation, capacitor-related issues may arise in Arduino projects. Understanding common problems and how to troubleshoot them is essential for maintaining circuit functionality. Here are some typical issues and troubleshooting techniques:
Incorrect Capacitance Value
- Symptoms: Circuit instability, unexpected behavior, or failure to meet performance specifications.
- Troubleshooting: Double-check capacitor datasheets and markings to ensure that the capacitance values match the requirements of the circuit.
- Solution: Replace capacitors with correct capacitance values and retest the circuit to verify performance.
Polarity Reversal
- Symptoms: Damage to the capacitor or other components, circuit malfunction, or short circuits.
- Troubleshooting: Inspect capacitor connections to verify proper polarity orientation.
- Solution: Correctly connect polarized capacitors according to the polarity markings indicated on the capacitor body. Replace damaged components if necessary.
Poor Connection Quality
- Symptoms: Intermittent operation, circuit instability, or malfunctioning.
- Troubleshooting: Inspect capacitor connections for loose or improper wiring.
- Solution: Re-solder or rewire connections to ensure secure and reliable electrical contact. Avoid excessive bending or stress on capacitor leads.
Voltage Spikes or Noise
- Symptoms: Unwanted voltage spikes, electrical noise, or signal distortion.
- Troubleshooting: Use an oscilloscope or multimeter to measure voltage waveforms and identify abnormalities.
- Solution: Add additional filtering capacitors or implement noise suppression techniques to mitigate voltage spikes and noise.
Failure to Discharge Capacitors
- Symptoms: Risk of electrical shock when handling capacitors, accidental damage to components.
- Troubleshooting: Follow proper safety procedures for discharging capacitors before handling or making changes to the circuit.
- Solution: Use a discharge tool or resistor to safely discharge capacitors to avoid electrical hazards.
Troubleshooting capacitor-related issues in Arduino projects requires systematic diagnosis and problem-solving skills. By identifying common problems such as incorrect capacitance values, polarity reversal, poor connection quality, voltage spikes, and failure to discharge capacitors, you can effectively address issues and ensure the reliable operation of your circuits.
In the next section, we’ll discuss important safety precautions to observe when working with capacitors in Arduino projects to prevent accidents and ensure personal safety.
Safety Precautions when Working with Capacitors
Safety should always be a top priority when working with capacitors in Arduino projects. Capacitors can store electrical charge and pose risks of electrical shock or component damage if mishandled. Here are some important safety precautions to observe:
Handle Capacitors with Care
- Always handle with care, avoiding excessive force or pressure that may damage the component.
- Hold the capacitor by its body rather than pulling or bending the leads, especially for through-hole capacitors.
Discharge Capacitors before Handling
- A capacitor can retain its electrical charge even after power is disconnected. Before handling a capacitor or making changes to the circuit, ensure that its properly discharged.
- Use a discharge tool or resistor to safely discharge the capacitor to avoid electrical shocks or damage to components.
Observe Polarity Guidelines
- For polarized capacitors (e.g., electrolytic, tantalum), always observe the polarity markings and connect them correctly in the circuit.
- Reversing the polarity of polarized capacitors can lead to damage or failure, so double-check connections before powering up your Arduino project.
Avoid Overheating during Soldering
- When soldering capacitors onto circuit boards, avoid applying excessive heat to prevent damage to the capacitor or its internal components.
- Use a soldering iron with appropriate temperature control and work efficiently to minimize the exposure of capacitors to heat.
Use Proper Insulation and Enclosures
- When working with high-voltage circuits or capacitors, use proper insulation and enclosures to prevent accidental contact with live components.
- Insulate exposed leads of capacitors with heat shrink tubing or electrical tape to avoid short circuits or electrical hazards.
Educate Yourself on Capacitor Safety
- Familiarize yourself with the properties and safety guidelines specific to the types of capacitors you are using in your Arduino projects.
- Refer to capacitor datasheets and manufacturer recommendations for information on safe handling, storage, and operation.
Observing safety precautions when working with capacitors in Arduino projects is essential for preventing accidents, protecting yourself and others, and ensuring the reliable operation of electronic circuits. By following proper handling procedures, discharging capacitors before handling, observing polarity guidelines, avoiding overheating during soldering, using proper insulation and enclosures, and educating yourself on capacitor safety, you can work with capacitors safely and effectively.
In the next section, we’ll build a basic project using a capacitor with Arduino.
Capacitor Charge and Discharge Button Project
Objective
To create a circuit that charges a capacitor and then discharges it through an LED. We’ll be using an Arduino to supply the current, but you could use a 9V battery with a breadboard power supply module.
Necessary Equipment:
- Arduino board (e.g., Arduino Uno)
- Breadboard
- Jumper wires
- 10µF Capacitor
- LED
- x2 Push Buttons
Pin Configuration
- 5V on the Arduino to the (+) pin (longer leg) of the Capacitor.
- GND on the Arduino to the left push button.
- Connect the diagonal opposite pin of the push button to the (-) pin (shorter leg) of the Capacitor.
- (-) pin on the capacitor to the right push button.
- Anode (shorter leg) of the LED to the diagonal opposite pin that is already used of the right push button.
- Cathode (longer leg) of the LED to the (+) leg of the capacitor.
Carefully follow the diagram below
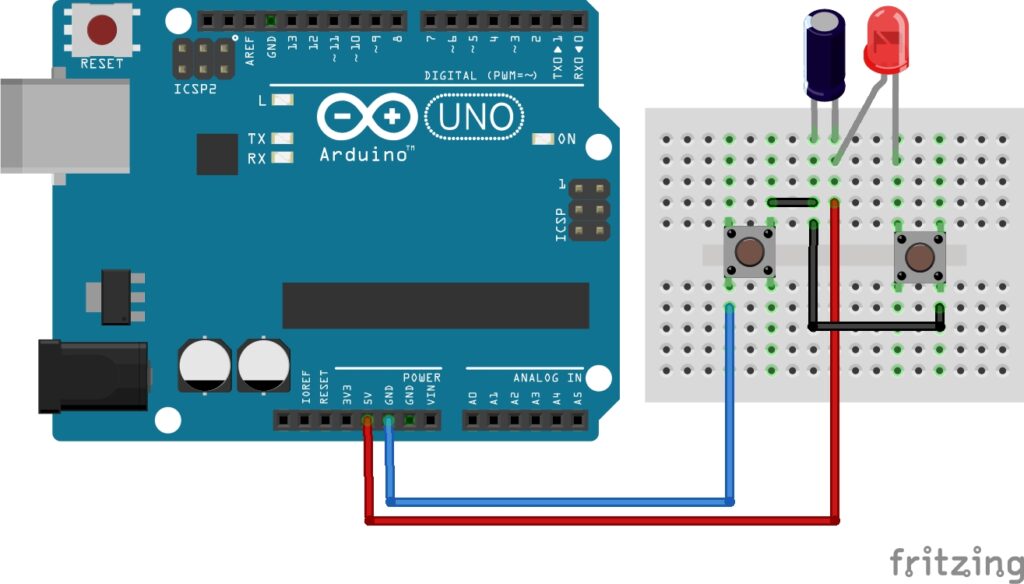

Instructions:
- Set up the circuit as per the circuit diagram.
- Connect the Arduino to your computer via USB.
- Press the left button to charge the capacitor.
- Press the right button to discharge the capacitor and watch the LED.
How it Works:
- Initially, the capacitor charges up once the left button is pressed.
- When the right button is pressed the capacitor will discharge, causing it to light up the LED briefly.
This project offers a hands-on experience demonstrating capacitor charging and discharging cycles.
Resources and Further Reading
To continue your exploration of Arduino and Capacitors, here are some recommended resources:
- Arduino Official Website: Visit the Arduino website for official documentation, tutorials, and project ideas.
- Arduino Forum: Join the Arduino Forum to connect with fellow enthusiasts, ask questions, and share your projects.
- Books: Explore books such as:
- “Arduino Cookbook” by Michael Margolis: A comprehensive guide featuring practical recipes for Arduino projects and programming techniques.
- “Arduino Workshop” by John Boxall
- “Getting Started with Arduino” by Massimo Banzi for comprehensive guides to Arduino projects.
- Maker Communities: Join local maker spaces, clubs, or online communities like Reddit’s Arduino Community to engage with like-minded individuals and collaborate on projects.
Conclusion
Congratulations! You’ve completed this “Basic Components with Arduino” guide on Capacitors. Throughout this journey, we’ve explored the fundamental principles of Capacitors, their applications, and best practices for incorporating them into your projects.
Remember, experimentation is key to mastery. Don’t hesitate to explore, tinker, and push the boundaries of what’s possible with Arduino. Embrace challenges, learn from mistakes, and celebrate every success along the way.
To explore even more of our basic components with Arduino guides, visit Basic Components with Arduino for a wealth of resources and inspiration to fuel your Arduino projects.
Elegoo Kits
In our opinion Elegoo provide the best quality kits for creating Arduino projects. They come complete with an Arduino microcontroller board and many components, sensors, and modules to help you create amazing projects. Meganano highly recommends these kits for anyone who wants to learn or already enjoys programming with Arduino!
Meganano is a participant in the Amazon Services LLC Associates Program, an affiliate advertising program designed to provide a means for us to earn fees by linking to Amazon.co.uk and affiliated sites. This means that when you click on product links and make a purchase on Amazon, we may receive a small commission at no extra cost to you. We only recommend products that we genuinely believe in, and think will be of value to our readers. Your support through these links helps us continue to provide quality content to you. Meganano Thanks you for your support!
Some really fantastic info, Glad I discovered this.