
Exploring Basic Components with Arduino!
Welcome to Meganano’s series of comprehensive guides on using basic components with Arduino! In this particular guide, we’ll be focusing specifically on buzzers, exploring their types, functions, applications, and how to integrate them into your Arduino projects.
If you’re new to Arduino, why not take a look at our Getting Started with Arduino guides. These guides are designed for beginners to learn the fundamental basics of Arduino programming.
Introduction to Buzzers
The Active buzzer and passive buzzer are two types of sound-producing devices commonly used in electronics and projects like the one you mentioned with your Arduino project. They serve similar purposes but work in different ways:
Active Buzzers
- An active buzzer is a self-contained sound-producing component.
- It generates a continuous sound or tone when voltage is applied.
- It has its own built-in oscillator and does not require external circuitry to produce sound.
- Active buzzers are generally easier to use because they can be connected directly to a power source.
- You can control the pitch or frequency of the sound by varying the voltage applied to it.
- They are often used when you need a simple sound or alarm in your projects.
Passive Buzzers
- A passive buzzer, on the other hand, is essentially a piezoelectric speaker without a built-in oscillator.
- It does not generate sound on its own and relies on external circuitry to produce sound.
- To make a passive buzzer produce sound, you need to provide it with an oscillating signal (typically a square wave) generated by a microcontroller or another external source.
- Passive buzzers provide greater control over the sound’s characteristics, such as frequency and duration, but they require more complex circuitry and programming.
Frequency Range
The audible frequency range for both Passive and Active Buzzers is the same, as it is primarily determined by the external signal provided to the buzzer. Human ears can typically perceive frequencies ranging from approximately 20 Hz to 20,000 Hz. Both types of buzzer modules can cover this entire audible frequency spectrum based on the frequency of the input signal they receive.
For instance, if you provide a 1,000 Hz frequency signal to an Active Buzzer using the Arduino tone() function, it will produce a sound with a frequency of 1,000 Hz. Similarly, a Passive Buzzer would exhibit the same behavior when driven by an external frequency signal within the audible range.
It’s important to note that the specific characteristics, response time, and sound quality may vary between different models and brands of buzzers. Therefore, experimentation and testing with specific components may be necessary for precise control over the audible output.
Features and Specifications:
- Operating Voltage: 3.3V ~ 5V
- Size: 12mm x 10mm (sizes may vary between supplier)
- Cost:
- Active Buzzers: Are more expensive than their counterparts because of multiple built-in oscillating circuits.
- Passive Buzzers: Are less expensive than their counterparts because they do not have a built-in oscillator and require external software instead to drive them.
- Compatibility: These are also compatible with other devices like the Raspberry Pi, ESP32, and ESP8266 etc…
Necessary Equipment:
- Arduino (e.g., Arduino Uno)
- Active Buzzer
- Passive Buzzer
- Jumper Wires
- Breadboard (optional)
Pin Configuration
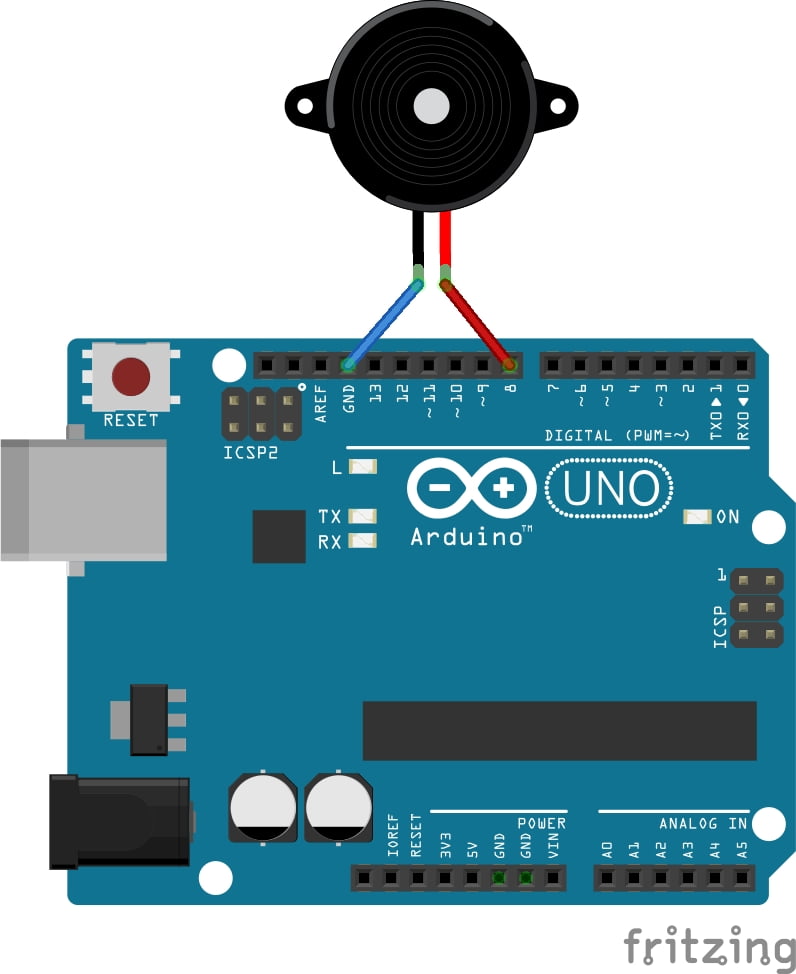
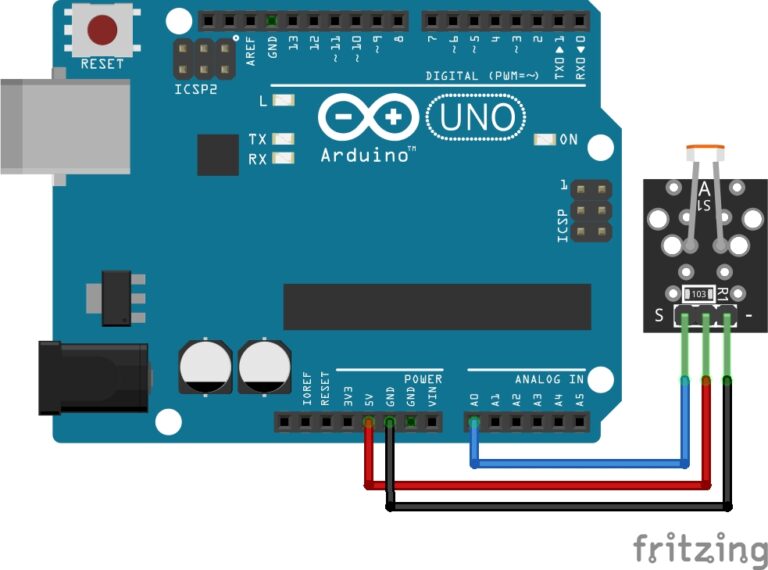
Connecting either of the buzzer modules to an Arduino is very simple, and connected in the same way, so you can just swap the buzzers out between running the code examples. The connections are as follows:
- S or + (longer leg) on the buzzer to Digital Pin 8 on the Arduino.
- – (shorter leg) on the buzzer to GND on the Arduino.
Pin labels may vary.
Passive Buzzer Code Example
Connecting a Passive Buzzer to an Arduino involves applying an alternating current signal of the desired frequency. The code example will demonstrate how to generate tones using the tone() function and control the frequency for the Passive Buzzer.
int buzzerPin = 8;  // Connect the Passive Buzzer to digital pin 8

void setup() {
  pinMode(buzzerPin, OUTPUT);
}

void loop() {
  tone(buzzerPin, 1000);  // Generate a 1000 Hz tone
  delay(1000);  // Wait for 1 second
  noTone(buzzerPin);  // Turn off the tone
  delay(1000);  // Wait for 1 second
}
Breaking Down the Code
Pin Declarations
- Defines an integer variable
buzzerPinto represent the digital signal pin connected to the passive buzzer.
Setup Function
- We set the mode of the variable
buzzerPinto be anOUTPUT.
Loop Function
The tone()function is used to generate a tone on the specified pin (buzzerPin). The first parameter is the pin number, and the second parameter is the frequency of the tone in Hertz (Hz).The delay()function is used to pause the program for a specified amount of time, creating an audible tone for 1 second.The noTone()function is then used to turn off the tone on the specified pin, creating a silent period for 1 second.
Adjusting Tone and Volume
Frequency Control: Adjust the frequency parameter in the
tone()function to change the tone of the Passive Buzzer.Volume Control: Since Passive Buzzers rely on external current, volume control is limited. Using an external circuit, such as a transistor, can help modulate the volume.
Active Buzzer Code Example
Now we are going to play a simple melody using the Active Buzzer. First, we must simply swap out the Passive Buzzer for the Active Buzzer in our circuit and we’re good to go.
int buzzerPin = 8;  // Connect the Active Buzzer to digital pin 8

void setup() {
  pinMode(buzzerPin, OUTPUT);
}

void loop() {
  playMelody();
}

void playMelody() {
  int melody[] = {262, 294, 330, 349, 392, 440, 494, 523};  // Melody notes (C4 to C5)
  int noteDuration = 500;  // Duration of each note in milliseconds

  for (int i = 0; i < 8; i++) {
    tone(buzzerPin, melody[i], noteDuration);
    delay(noteDuration + 50);  // Add a small delay between notes
  }

  noTone(buzzerPin);  // Turn off the tone
  delay(1000);  // Pause before playing the melody again
}
Breaking Down the Code
Variable Declaration
int buzzerPin = 8;: Declares an integer variable namedbuzzerPinand assigns it the value8. This variable represents the digital pin on the Arduino board to which the buzzer is connected.
Setup Function
- Configures the specified
buzzerPinas an output pin using thepinMode()function. This setup is done once at the beginning of the program execution.
Loop Function
- Calls the
playMelody()function repeatedly in an infinite loop. This function is responsible for playing the melody.
playMelody Function
- Defines the
playMelody()function, responsible for playing the predefined melody. - Declares an integer array named
melodycontaining the frequencies of each note in the melody. - Sets the variable
noteDurationto 500 milliseconds, representing the duration of each note. - Iterates through each element of the
melodyarray using aforloop. - Calls the
tone()function to generate a tone at the frequency specified bymelody[i]on thebuzzerPinfor the duration specified bynoteDuration. - Adds a small delay of 50 milliseconds between notes using the
delay()function. - Stops generating the tone on the
buzzerPinusing thenoTone()function. - Adds a delay of 1000 milliseconds before playing the melody again, creating a pause between repetitions.
Conclusion
Congratulations! You’ve completed this “Basic Components with Arduino” guide on buzzers. Throughout this journey, we’ve explored the fundamental principles of buzzers, their types, applications, and best practices for incorporating them into your projects. In summary, active buzzers are self-contained and generate sound when powered, while passive buzzers require external circuitry to produce sound. The choice between the two depends on your project’s requirements and your level of control over the sound you want to produce. Active buzzers are simpler to use but offer less customization, while passive buzzers provide more control but require additional programming.
Remember, experimentation is key to mastery. Don’t hesitate to explore, tinker, and push the boundaries of what’s possible with Arduino. Embrace challenges, learn from mistakes, and celebrate every success along the way.
To explore even more of our basic components with Arduino guides, visit Basic Components with Arduino for a wealth of resources and inspiration to fuel your Arduino projects.
Elegoo Kits
In our opinion Elegoo provide the best quality kits for creating Arduino projects. They come complete with an Arduino microcontroller board and many components, sensors, and modules to help you create amazing projects. Meganano highly recommends these kits for anyone who wants to learn or already enjoys programming with Arduino!
Meganano is a participant in the Amazon Services LLC Associates Program, an affiliate advertising program designed to provide a means for us to earn fees by linking to Amazon.co.uk and affiliated sites. This means that when you click on product links and make a purchase on Amazon, we may receive a small commission at no extra cost to you. We only recommend products that we genuinely believe in, and think will be of value to our readers. Your support through these links helps us continue to provide quality content to you. Meganano Thanks you for your support!

