

What is a GPS Module?
A GPS (Global Positioning System) module is often used with Arduino and other microcontroller platforms, it’s a device that allows you to determine your precise geographical location on Earth using signals received from satellites.
How does the GPS Work?
Satellite Communication: The GPS module communicates with a network of satellites orbiting the Earth. These satellites continuously transmit signals that contain information about their location and the exact time the signal was sent.
Signal Reception: The GPS module receives signals from multiple satellites. To calculate your position accurately, it needs signals from at least three satellites, but it’s better to have signals from four or more.
Triangulation: The GPS module calculates your position by performing a process called triangulation. It measures the time it takes for each signal to travel from the satellite to the module. Since the signals travel at the speed of light, the module can determine the distance to each satellite based on the time delay.
Position Calculation: Using the distances to multiple satellites, the GPS module calculates your latitude, longitude, and sometimes altitude. It can also provide additional information, such as your speed and the direction you’re moving (heading).
Here are some common components of a GPS module:
Antenna: This receives the GPS signals from the satellites. The quality of the antenna can significantly affect the module’s performance.
Receiver Chip: The receiver chip processes the signals from the satellites and performs the necessary calculations to determine your position.
Microcontroller Interface: Many GPS modules come with UART (Universal Asynchronous Receiver-Transmitter) or I2C (Inter-Integrated Circuit) interfaces, making it easy to connect to microcontrollers like Arduino.
Serial Output: GPS modules often provide position data in a standard format (NMEA sentences) through their serial output, which can be read and processed by the Arduino.
Arduino-compatible GPS modules are widely available and can be used in various projects, such as GPS tracking, location-based applications, navigation systems, and more. You can interface with these modules using the Arduino’s serial communication capabilities to read and utilize the GPS data for your specific applications.
How to use the GPS with Arduino
Using a GPS with Arduino is really simple to do. In this guide I will show you how to connect your GPS module to the Arduino and then how to write the print statements needed to read the data in your serial monitor. The quality of the satellite connection will depend on your location and the weather outside. I’m in a valley and still manage to get a good connection.
Let's Build!
Components:
- Arduino
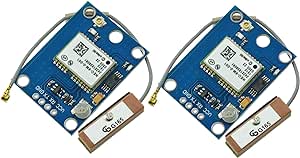
- GPS Neo 6M
- Jumpers
If you don’t have a GPS module yet, you can find it on Amazon here: GPS Module
These are the exact same modules I use, and they both worked well.
The Code:
You will need to install the TinyGPSPlus library from the Libraries Manager in your Arduino IDE. To learn how to do this you can follow our guide here: How to Install Arduino Libraries
#include "TinyGPS++.h"
#include "SoftwareSerial.h"
int RXpin=3;
int TXpin=4;
SoftwareSerial gpsConnection(RXpin,TXpin);
TinyGPSPlus gps;

void setup() {
  Serial.begin(9600);
  gpsConnection.begin(9600);
  Serial.println("GPS Started");
}

void loop() {
  while(gpsConnection.available()){
    gps.encode(gpsConnection.read());
  }
  if(gps.location.isUpdated()){
    Serial.println("");
    Serial.println("************************");
    Serial.println("Date & Time:");
    Serial.print(gps.date.day());
    Serial.print("/");
    Serial.print(gps.date.month());
    Serial.print("/");
    Serial.println(gps.date.year());
    Serial.print(gps.time.hour());
    Serial.print(":");
    Serial.print(gps.time.minute());
    Serial.print(".");
    Serial.print(gps.time.second());
    Serial.println("(24hr)");
    Serial.println("");
    Serial.print("Satellites above: ");
    Serial.println(gps.satellites.value());
    Serial.print("Horizontal dilution of precision: ");
    Serial.println(gps.hdop.value());
    Serial.println("");
    Serial.println("Co-ordinates: ");
    Serial.print("Latitude: ");
    Serial.print(gps.location.lat(),6);
    Serial.print(" / ");
    Serial.print("Longitude: ");
    Serial.println(gps.location.lng(),6);
    Serial.println("");
    Serial.println("Direction and speed:");
    Serial.print(gps.course.deg());
    Serial.println(" degrees");
    Serial.print(gps.speed.knots());
    Serial.println(" knots");
    Serial.print(gps.speed.kmph());
    Serial.println(" km");
    Serial.print(gps.speed.mph());
    Serial.println(" mph");
    Serial.println("");
    Serial.println("Altitude: ");
    Serial.print(gps.altitude.feet());
    Serial.println(" Feet");
    Serial.print(gps.altitude.meters());
    Serial.println(" Meters");
    Serial.println("************************");
    delay(10000);
  }
}
The Circuit:
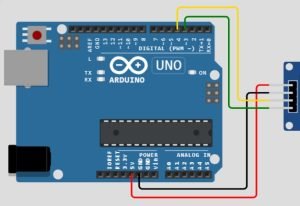
Connect Your Components the same way as in the image below:
- VCC on the GPS module connects to 5v on the Arduino.
- GND on the GPS module connects to GND on the Arduino.
- RX on the GPS module connects to pin 4 on the Arduino.
- TX on the GPS module connects to pin 3 on the Arduino.
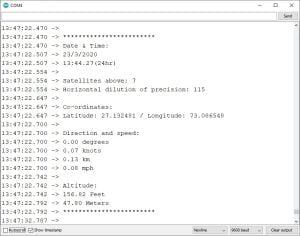
Upload the Code:
Once your code has uploaded to your Arduino, open the serial monitor and wait for the GPS to connect to any available satellites around. Once connected your serial monitor should begin displaying results like in the image below.
Conclusion
This guide on using the GPS module has allowed us to tap into the power of satellite technology to precisely determine our position on Earth. Through the integration of a GPS module with the Arduino, we’ve unlocked a world of possibilities for location-based applications and real-time tracking.
It’s important to recognize the wide range of practical applications for the GPS and Arduino, spanning from navigation systems and geocaching to vehicle tracking and environmental monitoring. The knowledge and skills acquired here can serve as a foundation for creating innovative solutions in various domains.
Remember that the journey doesn’t end here. There’s room for further exploration and customization, whether it involves enhancing accuracy, building data logging systems, or integrating GPS into larger IoT (Internet of Things) projects. The world of Arduino and GPS technology is rich with opportunities, and it’s up to you to continue exploring and innovating.
Happy Tinkering!
Recommendations:
The Elegoo Super Starter Kit
If you don’t already own any Arduino hardware, we highly recommend this kit as it has everything you need to start programming with Arduino. You can find out more about this kit, including a list of its components here: Elegoo Super Starter Kit
You can find this kit on Amazon here: Elegoo Super Starter Kit
The 0.96-inch Mini-OLED Display
We highly recommend this mini-OLED bundle of five 0.96-inch OLED displays. We have bought these before and they all worked perfectly. You can read more about the mini-OLED here: Mini-OLED
You can find this bundle on Amazon here: OLED Displays
Elegoo Nano (Arduino Compatible)
We have bought these Nano boards many times and can highly recommend them. There are three Nano boards in this pack making them a total bargain for everyone.
You can find this pack on Amazon here: Arduino Nano

