

From Isolation to Fusion: A Guide to Image Manipulation
As pixels dance on the canvas of digital imagery, the power to manipulate them opens a realm of artistic expression. Welcome to the world of image manipulation using OpenCV with Python, where each algorithm is a brushstroke, and the canvas is boundless. In this exploration, we embark on a journey through various image effects, unveiling the secrets behind isolating colors, crafting pencil sketch illusions, transforming images into cartoons, adding embossing textures, infusing sepia tones, and seamlessly merging multiple images into cohesive visual narratives. Join us as we unravel the artistry of computer vision, transforming pixels into captivating visual wonders.
What’s Covered:
- Isolating Colors.
- Manipulating Colors.
- Pencil Sketch Effect.
- Cartoon Effect.
- Emboss Effect.
- Sepia Effect.
- Merging Multiple Images.
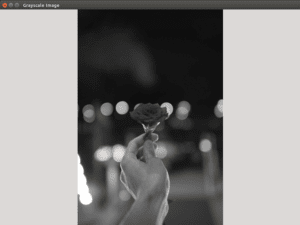
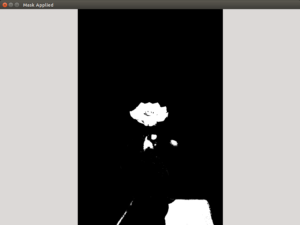
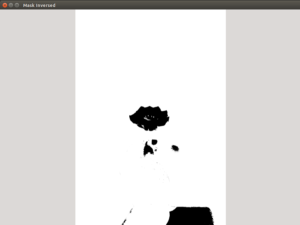
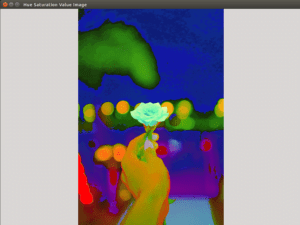
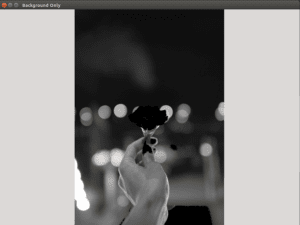
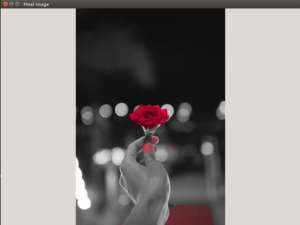
Isolating Colors
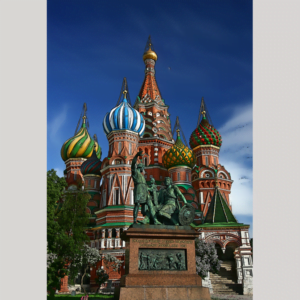
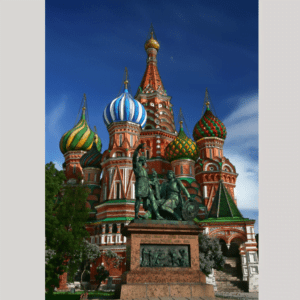
We can isolate a single color within an image to create a beautiful black and white photo with a color accent. I have chosen to accentuate the color red and make all other colors grayscale.
Copy and paste the code to a new file in Visual Studio. Remember to alter the code for where your image is stored.
Python Code:
import cv2
import numpy as np

#Create image object
img = cv2.imread('/home/meganano/Desktop/Python-AI/Day8/rose2.jpg')

#Convert the BGR image to HSV colour space
hsv = cv2.cvtColor(img, cv2.COLOR_BGR2HSV)

#Create grayscale image of the original image
gray = cv2.cvtColor(img, cv2.COLOR_BGR2GRAY)

#Set the color range for the color we want to highlight
lower_red = np.array([160,100,50])
upper_red = np.array([180,255,255])

#Create a mask using the color range
mask = cv2.inRange(hsv, lower_red, upper_red)

#Create an inverse of the mask
mask_inv = cv2.bitwise_not(mask)

#Filter only the red color from the original image
filterRed = cv2.bitwise_and(img, img, mask=mask)

#Filter the regions containing colors other than red from the grayscale image
background = cv2.bitwise_and(gray, gray, mask = mask_inv)

#Convert the one channel grayscale background to a three channel image
background = np.stack((background,)*3, axis=-1)

#Add the foreground and the background
added_img = cv2.add(filterRed, background)

#Create windows for the images
cv2.namedWindow("Original Image", cv2.WINDOW_NORMAL)
cv2.namedWindow("Only Red", cv2.WINDOW_NORMAL)
cv2.namedWindow("Hue Saturation Value Image", cv2.WINDOW_NORMAL)
cv2.namedWindow("Mask Applied", cv2.WINDOW_NORMAL)
cv2.namedWindow("Final Image", cv2.WINDOW_NORMAL)
cv2.namedWindow("Background Only", cv2.WINDOW_NORMAL)
cv2.namedWindow("Mask Inversed", cv2.WINDOW_NORMAL)
cv2.namedWindow("Grayscale Image", cv2.WINDOW_NORMAL)

#display the images
cv2.imshow("Original Image",img)
cv2.imshow("Background Only", background)
cv2.imshow("Mask Inversed", mask_inv)
cv2.imshow("Final Image",added_img)
cv2.imshow("Mask Applied", mask)
cv2.imshow("Grayscale Image", gray)
cv2.imshow("Hue Saturation Value Image", hsv)
cv2.imshow("Only Red", filterRed)

while True:
  if cv2.waitKey(1)==ord('q'):
    break

cv2.destroyAllWindows()


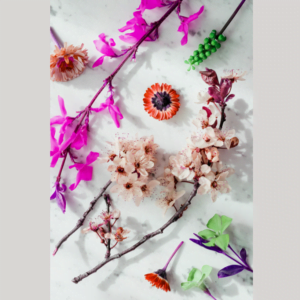
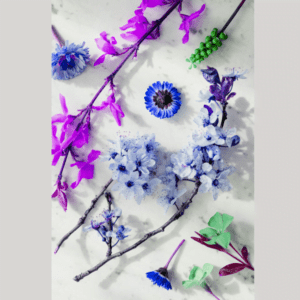
Manipulating Colors
You can easily manipulate the colors in any image simply by splitting the BGR color channels and merging them back in the wrong order.
Copy and paste the code to a new file in Visual Studio. Remember to alter the code for where your image is stored.
Python Code:
import cv2

#Create the Image Object
img = cv2.imread('/home/meganano/Desktop/Python-AI/imageManipulation/blueFlowers/blue3.jpg')

#Split the Blue Green and Red Colors
b,g,r=cv2.split(img)

#Change the Order of BGR
merge=cv2.merge((g,b,r))
merge2=cv2.merge((r,b,g))
merge3=cv2.merge((r,g,b))

#Create Image Windows
cv2.namedWindow("Original Image", cv2.WINDOW_NORMAL)
cv2.namedWindow("Color Merge 1", cv2.WINDOW_NORMAL)
cv2.namedWindow("Color Merge 2", cv2.WINDOW_NORMAL)
cv2.namedWindow("Color Merge 3", cv2.WINDOW_NORMAL)

#Display Images
cv2.imshow('Original Image',img)
cv2.imshow('Color Merge 1',merge)
cv2.imshow('Color Merge 2',merge2)
cv2.imshow('Color Merge 3',merge3)

cv2.waitKey(0)
cv2.destroyAllWindows()

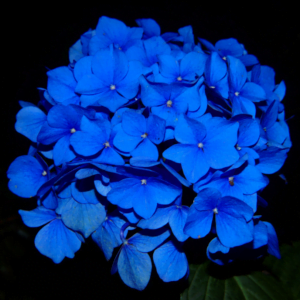
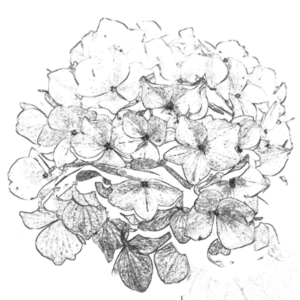
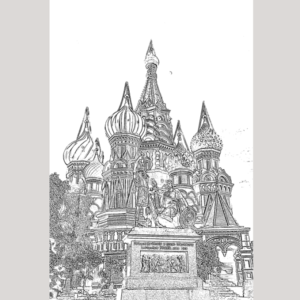
Pencil Sketch Effect
OpenCV has its own pencil sketch function that can be used to convert any image into a very convincing pencil sketch.
Copy and paste the code to a new file in Visual Studio. Remember to alter the code for where your image is stored.
Python Code:
import cv2

#Create Image Object
img=cv2.imread('/home/meganano/Desktop/Python-AI/imageManipulation/blueFlowers/blue3.jpg')

#Create Grayscale and Color Objects Processed with the OpenCV Pencil Sketch Function
dst_gray, dst_color = cv2.pencilSketch(img, sigma_s=60, sigma_r=0.07, shade_factor=0.05)

#Create Image Windows
cv2.namedWindow("Image", cv2.WINDOW_NORMAL)
cv2.namedWindow("Pencil", cv2.WINDOW_NORMAL)
cv2.namedWindow("Color Pencil", cv2.WINDOW_NORMAL)

#Display Images
cv2.imshow("Image", img)
cv2.imshow("Pencil", dst_gray)
cv2.imshow("Color Pencil", dst_color)

cv2.waitKey(0)
cv2.destroyAllWindows()

Cartoon Effect
You can Cartoon-ify images by highlighting each edge and blurring the image. Edit the sigma values to achieve your desired look, sigma_s controls the size of the neighborhood and its values range from 0-200, sigma_r controls how dissimilar the colors are within the neighborhood. Larger sigma_r values result in larger regions of constant color, the sigma_r range is from 0-1.
Copy and paste the code to a new file in Visual Studio. Remember to alter the code for where your image is stored.
Python Code:
import cv2
import numpy as np

#Stage 1 Create Image Object
img = cv2.imread('/home/meganano/Desktop/Python-AI/imageManipulation/colorful2.jpg')

#Stage 2 Convert to Grayscale
gray = cv2.cvtColor(img, cv2.COLOR_BGR2GRAY)

#Stage 3 Use Adaptive Thresholding to Highlight Edges
edgeThin = cv2.adaptiveThreshold(gray, 255, cv2.ADAPTIVE_THRESH_MEAN_C, cv2.THRESH_BINARY, 9, 10)

#Stage 4 Apply Gaussian Blur
blur=cv2.GaussianBlur(gray,(3,3),0)
#Combine Blurred Image with Edges Image
cartoon=cv2.bitwise_and(blur,blur,mask=edgeThin)

#Stage 5 Thin Edge Color Image
dst = cv2.edgePreservingFilter(img, flags=1, sigma_s=60, sigma_r=0.25)
cartoon2 = cv2.bitwise_and(dst, dst, mask=edgeThin)

#Stage 6 Thick Edge Color Image
edgeThick = cv2.bitwise_not(cv2.Canny(img, 100, 200))
cartoon3 = cv2.bitwise_and(dst, dst, mask=edgeThick)

#Create Image Windows
cv2.namedWindow("Original Image", cv2.WINDOW_NORMAL)
cv2.namedWindow("Grayscale Image", cv2.WINDOW_NORMAL)
cv2.namedWindow("Highlight Lines", cv2.WINDOW_NORMAL)
cv2.namedWindow("Grayscale Cartoon", cv2.WINDOW_NORMAL)
cv2.namedWindow("Color Cartoon 1", cv2.WINDOW_NORMAL)
cv2.namedWindow("Color Cartoon 2", cv2.WINDOW_NORMAL)

#Display Images
cv2.imshow("Original Image",img)
cv2.imshow("Grayscale Image",gray)
cv2.imshow("Highlight Lines",edgeThin)
cv2.imshow("Grayscale Cartoon",cartoon)
cv2.imshow("Color Cartoon 1",cartoon2)
cv2.imshow('Color Cartoon 2',cartoon3)

cv2.waitKey(0)
cv2.destroyAllWindows
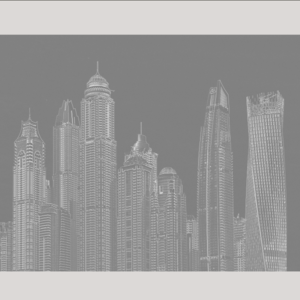
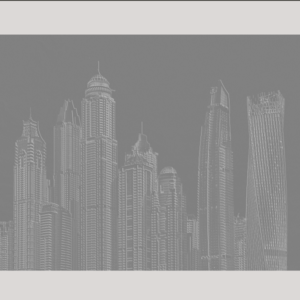
Emboss Effect
When an Emboss filter is applied to an image each pixel is replaced by a high or low tone of gray.
Copy and paste the code to a new file in Visual Studio. Remember to alter the code for where your image is stored.
Python Code:
import cv2 import numpy as np
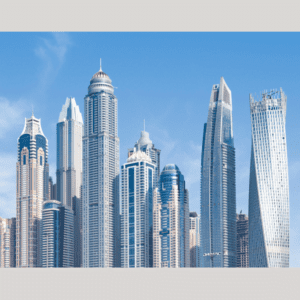
#Create Image Object img = cv2.imread('/home/meganano/Desktop/Python-AI/imageManipulation/urban/urban2.jpg') #Extract Row and Column values From Image height, width = img.shape[:2] #Create a Numpy Array with Row and Column Data y = np.ones((height, width), np.uint8) * 128 #Create a Numpy Array with Row and Columns Data Filled with Zeros output = np.zeros((height, width), np.uint8) #Create Two Numpy Arrays #First for embossing bottom left side kernel1 = np.array([[0, -1, -1], [1, 0, -1], [1, 1, 0]]) #Second for embossing bottom right side kernel2 = np.array([[-1, -1, 0], [-1, 0, 1], [0, 1, 1]]) #Create Grayscale image gray = cv2.cvtColor(img, cv2.COLOR_BGR2GRAY) #Bottom Left-Side Emboss output1 = cv2.add(cv2.filter2D(gray, -1, kernel1), y) #Bottom Right-Side Emboss output2 = cv2.add(cv2.filter2D(gray, -1, kernel2), y) #Combine Both Emboss Outputs to Produce a Stronger Emboss for i in range(height): for j in range(width): output[i, j] = max(output1[i, j], output2[i, j]) #Create Image Windows cv2.namedWindow("Image", cv2.WINDOW_NORMAL) cv2.namedWindow("Output", cv2.WINDOW_NORMAL) cv2.namedWindow("Output 2", cv2.WINDOW_NORMAL) cv2.namedWindow("Output 3", cv2.WINDOW_NORMAL) #Display Images cv2.imshow("Image", img) cv2.imshow("Output", output) cv2.imshow("Output 2", output1) cv2.imshow("Output 3", output2) cv2.waitKey(0) cv2.destroyAllWindows()

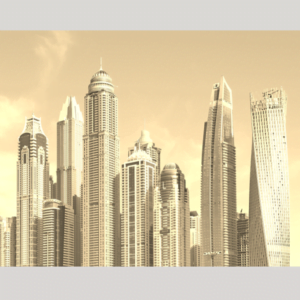
Sepia Effect
Sepia toning is a chemical process used for turning black and white prints to brown, which gives them an antique look. We can achieve the same effect using OpenCV.
Copy and paste the code to a new file in Visual Studio. Remember to alter the code for where your image is stored.
Python Code:
import cv2
import numpy as np

#Create Image object
img = cv2.imread('/home/meganano/Desktop/Python-AI/imageManipulation/urban/urban1.jpg')

sepiaIMG = img.copy()

#Convert to float to Prevent Loss
sepiaIMG = np.array(sepiaIMG, dtype=np.float64)

#Multipying Image with Sepia Matrix
sepiaIMG = cv2.transform(sepiaIMG, np.matrix([[0.272, 0.534, 0.131],
[0.349, 0.686, 0.168],
[0.393, 0.769, 0.189]]))

#Correct Values Greater Than 255
sepiaIMG[np.where(sepiaIMG > 255)] = 255

#Convert Back to int
sepiaIMG = np.array(sepiaIMG, dtype=np.uint8)

#Create Image Windows
cv2.namedWindow("Image", cv2.WINDOW_NORMAL)
cv2.namedWindow("Output", cv2.WINDOW_NORMAL)

#Display Images
cv2.imshow("Image", img)
cv2.imshow("Output", sepiaIMG)

cv2.waitKey(0)
cv2.destroyAllWindows()
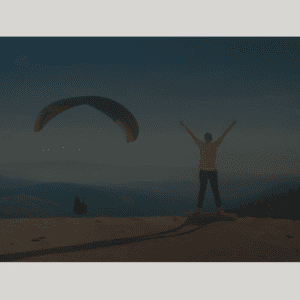
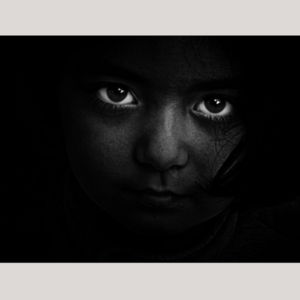
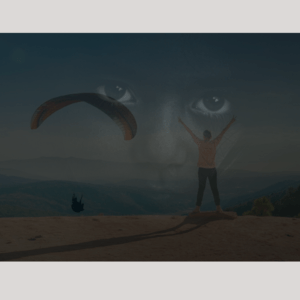
Merging Multiple Images
Here is how to merge multiple images in to one. You must make sure each image you want to merge has the exact same pixel resolution. I edited each image first using Windows “Edit Image with Photos” editor, making each image have a square ratio. Then I used the standard Windows image editor and set each image to have a 600×600 pixel resolution.
Copy and paste the code to a new file in Visual Studio. Remember to alter the code for where your image is stored.
Python Code:
import cv2

img1 = cv2.imread('/home/meganano/Desktop/Python-AI/imageManipulation/people/parachute.jpg')
img2 = cv2.imread('/home/meganano/Desktop/Python-AI/imageManipulation/people/stretch.jpg')
img3 = cv2.imread('/home/meganano/Desktop/Python-AI/imageManipulation/people/girl.jpg')

firstCombine = cv2.addWeighted(img1, 0.2, img2, 0.2, 1)
secondCombine = cv2.addWeighted(img3, 0.2, firstCombine, 0.8, 1)

#Create Image Windows
cv2.namedWindow("Image 1", cv2.WINDOW_NORMAL)
cv2.namedWindow("Image 2", cv2.WINDOW_NORMAL)
cv2.namedWindow("Image 3", cv2.WINDOW_NORMAL)
cv2.namedWindow("Combined", cv2.WINDOW_NORMAL)
cv2.namedWindow("Combined Again", cv2.WINDOW_NORMAL)

#Display Images
cv2.imshow('Image 1',img1)
cv2.imshow('Image 2',img2)
cv2.imshow('Image 3',img3)
cv2.imshow('Combined',firstCombine)
cv2.imshow('Combined Again',secondCombine)

cv2.waitKey(0)
cv2.destroyAllWindows()
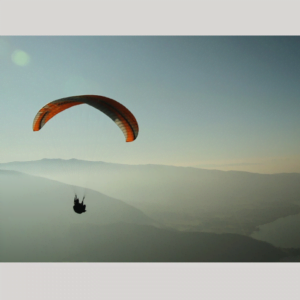
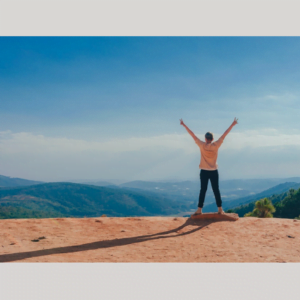
Below is the result after adding a third image to the output.
Conclusion
As we conclude our expedition through the realm of image manipulation with OpenCV, it’s evident that the palette of possibilities is as diverse as the effects themselves. From isolating a single color to creating a cartoon world, the ability to manipulate images is a potent tool for storytellers, artists, and visionaries alike. Armed with OpenCV, you now possess the keys to unlock creativity and turn ordinary images into extraordinary compositions. As you venture forth into your own artistic endeavors, remember that every pixel is a brushstroke, and the canvas of possibilities is vast!
In our next installment of our OpenCV for Beginners guide we will be learning Object Detection
That’s All Folks!
You can find all of our OpenCV guides here: OpenCV for Beginners


