


Unmasking Faces with OpenCV
Embark on a fascinating journey into the world of facial exploration with OpenCV! In this guide, we unveil the secrets of face detection, a foundational skill in computer vision. Beyond mere recognition, we delve into the art of discerning facial features, eyes that express, and smiles that captivate. Whether you’re building security systems, enhancing photography, or exploring human-computer interaction, mastering face detection and feature analysis is your gateway. Join us as we demystify the algorithms behind recognizing faces and uncovering the intricate details that make each expression unique.
What’s Covered:
- What is Face Detection?
- The Haar Cascade Library
- How Does Haar Cascades Work?
- Creating a Basic Face Detection Program.
- Detecting Facial Features.
What is Face Detection?
OpenCV (Open-Source Computer Vision) is an open-source library widely used for computer vision and image processing tasks, including face detection. OpenCV provides a range of functions and algorithms that facilitate face detection, face recognition, and facial feature extraction. Here’s an overview of how you can perform face recognition using OpenCV:
Face Detection:
- Use the Haar cascades algorithm or the more advanced deep learning-based face detectors like the Single Shot MultiBox Detector (SSD) or the You Only Look Once (YOLO) algorithm. OpenCV provides pre-trained face detection models for these algorithms.
- Load the pre-trained face detection model using OpenCV’s `CascadeClassifier` or `dnn` module.
Face Alignment:
- Align the detected face region to a standardized position and size for accurate feature extraction.
- Common techniques for face alignment include affine transformations or more advanced methods like facial landmark detection.
- OpenCV provides pre-trained models such as the shape predictor in the dlib library for facial landmark detection.
Feature Extraction:
- Extract facial features from the aligned face region. Commonly used features include Local Binary Patterns (LBP), Histogram of Oriented Gradients (HOG), or deep learning-based feature embeddings.
- OpenCV offers functions to compute feature descriptors like LBP or HOG.
Face Recognition:
- Train a face recognition model using the extracted features. Common approaches include using techniques like Support Vector Machines (SVM), k-Nearest Neighbors (k-NN), or deep learning-based models like Convolutional Neural Networks (CNN).
- Use the trained model to classify or verify faces by comparing the extracted features with a known database of face features.
- OpenCV can be used for training and classification with these models, or you can integrate external libraries like scikit-learn or deep learning frameworks like TensorFlow or Py Torch.
This guide is about Face detection, not face recognition, I just felt it was important to add it to this list. However, we will be covering Facial Recognition in our next guide.
The Haar Cascade Library
OpenCV comes prepackaged with the haarcascade library but to make sure you are using the latest haarcascade files you can download the repo from GitHub. Go to the OpenCV GitHub repo page here
Click on the green Code button and select download zip. Once the zip file has downloaded, extract the data from the archive. Now open the extracted OpenCV folder, open the data folder. Copy the haarcascades directory and paste it into our Python-AI directory. Now we can easily use the haarcascade.xml files with our projects. If you wish, you can now delete the zip and extracted data, but keep the haarcascades directory we pasted inside the Python-AI directory.
Now, take a look in the haarcascade directory, there are all sorts of classifier models we can use. Starting off simple we will be using the frontalface_default.xml file.
How Does the Haar Cascade Classifier Work?
Classifiers like the haarcascade_frontalface_default.xml file in OpenCV work based on Haar cascades, a machine learning object detection method used to identify objects in images or video.
Here’s a simplified overview of how Haar cascades work for face detection:
Haar Features:
- Haar features are simple, rectangular filters that are used to detect specific patterns in an image, such as edges, corners, or other features.
- These features are calculated at different scales and positions in the image.
Integral Image:
- To efficiently calculate Haar features, an integral image is used. This is a representation of the original image that allows for rapid computation of the sum of pixel values within any rectangular region.
Training the Classifier:
- Haar cascades are trained using positive and negative samples.
- Positive samples contain the object to be detected (e.g., faces), and negative samples contain other parts of the image.
- During training, the classifier learns to distinguish between positive and negative samples based on the calculated Haar features.
Cascade of Classifiers:
- The trained classifier is organized as a cascade, which is a series of progressively more complex classifiers.
- Each stage of the cascade eliminates non-object regions, making the detection process faster.
- The cascade structure allows for efficient computation, as it quickly discards regions that are unlikely to contain the object.
Sliding Window:
- The classifier is applied to different scales and positions of the image using a sliding window.
- The sliding window moves across the image, and at each position and scale, the classifier determines whether the region contains the object of interest.
Thresholding:
- At each stage of the cascade, a threshold is applied to decide whether the region should be considered positive or negative.
- If a region passes all stages, it is classified as a positive detection.
The haarcascade_frontalface_default.xml file, for example, is a pre-trained Haar cascade classifier specifically designed for detecting frontal faces. It has been trained on a large dataset of positive and negative samples, making it capable of quickly and accurately identifying faces in images or video frames.
Creating a Basic Face Detection Program
Open Visual Studio and create a new file then copy and paste the code below. Before running the code, you will need to edit the face_cascade object. You need to change the location of the file to the location where your file is stored. Now run the code, if you get an error double check your face_cascade location is correct.
import cv2
width=640
height=480

camera=cv2.VideoCapture(0)
camera.set(cv2.CAP_PROP_FRAME_WIDTH,width)
camera.set(cv2.CAP_PROP_FRAME_HEIGHT,height)

face_cascade=cv2.CascadeClassifier('/home/meganano/Desktop/Python-AI/haarcascades/haarcascade_frontalface_default.xml')

while True:
  ret, frame=camera.read()
  gray=cv2.cvtColor(frame,cv2.COLOR_BGR2GRAY)

  faces=face_cascade.detectMultiScale(gray,1.3,5)

  for(x,y,w,h) in faces:
    cv2.rectangle(frame,(x,y),(x+w,y+h),(0,255,0),2)

  cv2.imshow('Face Detect Model',frame)
  cv2.moveWindow('Face Detect Model',0,0)

  if cv2.waitKey(1)==ord('q'):
    break
  camera.release()
  cv2.destroyAllWindows()
Breaking Down the Code
The Python code has three lines we haven’t worked with yet:
- The
face_cascadeobject we mentioned above, this is where we tell OpenCV where the Cascade Classifier is stored. The cascade classifier is the type of detection algorithm we want to use, in this case it was the default frontal face algorithm. - Then we have:
faces=face_cascade.detectMultiScale(gray, 1.3, 5)
grayis the colorless converted frame.1.3is our chosen scaleFactor. Scale Factor specifies how much the image size is reduced at each image scale.5is our minNeighbours. Min Neighbours specifies how many neighbors each candidate rectangle should have to retain it.
- We also use a for loop to create the rectangle giving it
(x, y, w, h)arguments for x-axis, y-axis, width, and height. This creates the bounding box to highlight detection.
More Parameters
This has been kept as simple as possible, but we could have entered more parameters to make the program even more accurate. Check the example below.
faces = face_cascade.detectMultiScale(gray[, scaleFactor[, minNeighbors[, flags[, minSize[, maxSize]]]]]
- scaleFactor Is the parameter specifying how much the image size is reduced at each image scale. The higher the range the more likely you are to miss faces, 1.05-1.3 is a good range to use.
- minNeighbors Is the parameter specifying how many neighbors each candidate rectangle should have to retain it. Higher values result in less detections, 3-6 is a good range to use.
- flags Is the parameter with the same meaning for an old cascade as in the function cvHaarDetectObjects. It is not used for a new cascade.
- minSize Is the minimum possible object size. Objects smaller than that are ignored.
- maxSize Is the maximum possible object size. Objects larger than that are ignored. If the max size is the same as the min size the model is evaluated on single scale.
Detecting Facial Features
We can even detect facial features such as eyes and mouth, just by adding 2 more of the haarcascade training models to our previous project. Open a new file in Visual Studio then copy and paste the code below. Study the code below until you understand it.
import cv2
width=640
height=480

camera=cv2.VideoCapture(0)
camera.set(cv2.CAP_PROP_FRAME_WIDTH,width)
camera.set(cv2.CAP_PROP_FRAME_HEIGHT,height)

face_cascade=cv2.CascadeClassifier('/home/meganano/Desktop/Python-AI/haarcascades/haarcascade_frontalface_default.xml')
eye_cascade=cv2.CascadeClassifier('/home/meganano/Desktop/Python-AI/haarcascades/haarcascade_eye.xml')
smile_cascade=cv2.CascadeClassifier('/home/meganano/Desktop/Python-AI/haarcascades/haarcascade_smile.xml')

def detect(gray,frame):
  faces=face_cascade.detectMultiScale(gray,1.3,5)
  for(x,y,w,h) in faces:
    cv2.rectangle(frame,(x,y),(x+w,y+h),(0,255,0),2)
    roi_gray=gray[y:y+h, x:x+w]
    roi_color=frame[y:y+h, x:x+w]

    eyes=eye_cascade.detectMultiScale(roi_gray,1.8,5)
    for(xe,ye,we,he) in eyes:
      cv2.circle(roi_color,(int(xe+we/2),int(ye+he/2)),8,(255,0,0),2)

      smiles=smile_cascade.detectMultiScale(roi_gray,1.3,20)
    for(xs,ys,ws,hs) in smiles:
      cv2.rectangle(roi_color,(xs,ys),(xs+ws,ys+hs),(0,0,255),2)
  return frame

while True:
  ret, frame=camera.read()
  gray=cv2.cvtColor(frame,cv2.COLOR_BGR2GRAY)
  canvas=detect(gray,frame)
  cv2.imshow('Facial Features',canvas)
  cv2.moveWindow('Facial Features',0,0)

  if cv2.waitKey(1)==ord('q'):
    break
camera.release()
cv2.destroyAllWindows()
Breaking Down the Code
- We add two extra cascade file locations inside the
eye_cascadeobject and thesmile_cascadeobject. - Then we create a function defined as
detectwhich holds our detection function code to call upon further down in the code. - We have used two more for loops to create the bounding shape which will be added to the frame,
xefor x-axis eyes andxsfor x-axis smile etc… For the eyes we have used circles instead of rectangles, makes sense. - Then in the while-loop, we create a new object called
canvaswhich calls thedetectfunction. - We then show the
canvasto open a window labelled Facial Features to show the captured frames.
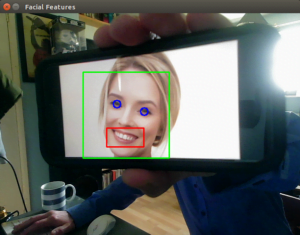
I needed to bring in some outside help for this one as my beard was blocking my mouth from being detected. As you can see the program works perfectly when the target is much better-looking LOL.
Conclusion
Congratulations on navigating the realm of face detection and unveiling the magic of facial feature analysis! You’ve equipped yourself with the tools to identify faces in images and extract key features like eyes and smiles. As you integrate these techniques into your projects, remember that every algorithmic detection is a step toward understanding human expressions. Whether it’s enhancing security or creating delightful applications, the ability to unmask faces is now at your fingertips. Continue to innovate, explore, and let the faces you detect tell their unique stories.
In the next installment of our OpenCV for Beginners guide we will be covering Face Recognition on Images
That’s All Folks!
You can find all of our OpenCV guides here: OpenCV for Beginners


I am regular visitor, how are you everybody?
This piece of writing posted on this website is really pleasant.