

Exploring Color Detection with OpenCV
In the kaleidoscopic universe of computer vision, the ability to decipher and comprehend colors is a gateway to understanding visual information. Join us on an immersive journey into the world of color detection using OpenCV with Python, where pixels transform into a chromatic symphony. In this exploration, we unravel the secrets behind identifying and analyzing colors in images and videos. OpenCV becomes the maestro conducting the orchestra of hues, revealing the beauty hidden within the spectrum.
What’s Covered:
- The Process of Color Detection.
- The Color Detection Program.
The Process of Color Detection
Color detection with OpenCV involves identifying specific colors or ranges of colors in an image or video stream. The process typically involves the following steps:
Image Acquisition:
Capture or load an image using OpenCV functions such as cv2.imread() or read frames from a video stream.
Color Space Conversion:
Convert the image from the default color space (BGR in OpenCV) to a color space that is more suitable for color detection. Common color spaces used for color detection include RGB, HSV (Hue-Saturation-Value), or HLS (Hue-Lightness-Saturation). Conversion can be done using functions like cv2.cvtColor().
Color Thresholding:
Set a lower and upper threshold to define the range of colors you want to detect. This can be done by specifying minimum and maximum values for each channel (e.g., R, G, and B in RGB) or by defining a range of hue values (in the case of HSV or HLS). Thresholding can be achieved using functions like cv2.inRange().
Noise Reduction:
Apply morphological operations such as erosion and dilation to reduce noise or small fluctuations in the image. These operations help in smoothing the color regions and filling any gaps or holes. Functions like cv2.erode() and cv2.dilate() are commonly used for this step.
Contour Detection (Optional):
If you want to extract specific objects or regions of interest based on color, you can apply contour detection using functions like cv2.findContours(). This step helps in identifying boundaries and shapes related to the detected color regions.
Object Tracking or Analysis:
Once color regions or objects have been detected, you can perform further processing such as tracking the movement of objects, measuring their properties (e.g., area, centroid), or performing specific actions based on their presence or absence.
OpenCV provides a wide range of functions and tools for color detection, and the specific approach may vary depending on the desired application and the characteristics of the color you want to detect. Experimenting with different color spaces, threshold values, and additional image processing techniques can help refine the color detection process to suit your needs.
The Code
The Color Detection Program
This program will detect any object that is red, green, or blue.
Python Code:
import numpy as np
import cv2
width=640
height=480
camera = cv2.VideoCapture(0)
camera.set(cv2.CAP_PROP_FRAME_WIDTH,width)
camera.set(cv2.CAP_PROP_FRAME_HEIGHT,height)
while True:
_, frame = camera.read()
hsvFrame = cv2.cvtColor(frame, cv2.COLOR_BGR2HSV)
#Red color range and mask
red_lower = np.array([136, 87, 111], np.uint8)
red_upper = np.array([180, 255, 255], np.uint8)
red_mask = cv2.inRange(hsvFrame, red_lower, red_upper)
#Green color range and mask
green_lower = np.array([36, 25, 100], np.uint8)
green_upper = np.array([70, 255, 255], np.uint8)
green_mask = cv2.inRange(hsvFrame, green_lower, green_upper)
#Blue color range and mask
blue_lower = np.array([100, 100, 100], np.uint8)
blue_upper = np.array([140, 255, 255], np.uint8)
blue_mask = cv2.inRange(hsvFrame, blue_lower, blue_upper)
#Create kernel Array of ones
kernel = np.ones((5, 5), "uint8")
# For red color morphological operations
red_mask = cv2.dilate(red_mask, kernel)
res_red = cv2.bitwise_and(frame, frame, mask = red_mask)
# For green color morphological operations
green_mask = cv2.dilate(green_mask, kernel)
res_green = cv2.bitwise_and(frame, frame, mask = green_mask)
# For blue color morphological operations
blue_mask = cv2.dilate(blue_mask, kernel)
res_blue = cv2.bitwise_and(frame, frame, mask = blue_mask)
#Detect red
contours, hierarchy = cv2.findContours(red_mask, cv2.RETR_TREE, cv2.CHAIN_APPROX_SIMPLE)
for contour in contours:
area = cv2.contourArea(contour)
if(area > 300):
x, y, w, h = cv2.boundingRect(contour)
frame = cv2.rectangle(frame, (x, y),(x + w, y + h),(0, 0, 255), 2)
cv2.putText(frame, "Red", (x, y), cv2.FONT_HERSHEY_SIMPLEX, 1,(0, 0, 255),2)
#Detect green
contours, hierarchy = cv2.findContours(green_mask, cv2.RETR_TREE, cv2.CHAIN_APPROX_SIMPLE)
for contour in contours:
area = cv2.contourArea(contour)
if(area > 300):
x, y, w, h = cv2.boundingRect(contour)
frame = cv2.rectangle(frame, (x, y),(x + w, y + h),(0, 255, 0), 2)
cv2.putText(frame, "Green", (x, y), cv2.FONT_HERSHEY_SIMPLEX,1, (0, 255, 0),2)
#Detect blue
contours, hierarchy = cv2.findContours(blue_mask,cv2.RETR_TREE,cv2.CHAIN_APPROX_SIMPLE)
for contour in contours:
area = cv2.contourArea(contour)
if(area > 300):
x, y, w, h = cv2.boundingRect(contour)
frame = cv2.rectangle(frame, (x, y),(x + w, y + h),(255, 0, 0), 2)
cv2.putText(frame, "Blue", (x, y), cv2.FONT_HERSHEY_SIMPLEX,1, (255, 0, 0),2)
#Display Final Frame
cv2.imshow("Color Detection", frame)
if cv2.waitKey(1)== ord('q'):
break
camera.release()
cv2.destroyAllWindows()
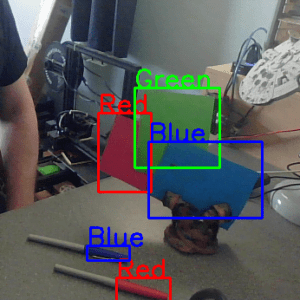
print('Program Terminated')As you can see from the image below, the program successfully detects any objects with a red, green and blue color.
You can learn more about OpenCV’s Morphological Operations here.
Conclusion
As we conclude our vibrant expedition through the world of color detection with OpenCV, it’s evident that the ability to discern and work with colors is a powerful tool in the realm of computer vision. From sorting and identifying objects based on their red, green, or blue hues to enhancing image aesthetics, the applications are as diverse as the colors themselves.
Armed with the knowledge gained from this journey, you now hold the palette to not only detect the presence of colors but also to categorize and understand the visual world through the lens of red, green, and blue. As you venture into your own projects, remember that every shade has a story, and OpenCV is your brush to bring those stories to life.
In the next installment of our OpenCV for Beginners guide we will be giving a brief Introduction to Tracking
That’s All Folks!
You can find all of our OpenCV guides here: OpenCV for Beginners


