

Creating a Morse Code Message Generator with Arduino!
In a world inundated with instant messaging and high-speed communication technologies, there’s something timeless and fascinating about Morse code, the original language of the telegraph era. Morse code is a method used for transmitting textual information as a series of on-off tones, lights, or clicks. Developed in the early 19th century by Samuel Morse and Alfred Vail, Morse code revolutionized long-distance communication and laid the groundwork for modern telecommunications systems.
In this post, we’ll explore morse code and its history, significance, and practical applications in the digital age. Armed with an Arduino Uno microcontroller and a few lines of code, we’ll create an exciting project to convert plain text messages into Morse code signals, transmitting them through a simple buzzer.
If you’re new to Arduino, why not take a look at our Getting Started with Arduino guides. These guides are designed for beginners to learn the fundamental basics of Arduino programming.
Morse Code: A Brief History
The origins of Morse code trace back to the invention of the electric telegraph in the 1830s. Samuel Morse, an American inventor and painter, along with his colleague Alfred Vail, devised a system to represent letters and numbers using combinations of short and long signals, dots and dashes, sent over electrical wires.
In 1838, Morse presented a telegraph system that utilized his code to the United States Congress, and by 1844, the first official Morse code message, “What hath God wrought,” was transmitted over a telegraph line from Washington, D.C. to Baltimore, Maryland. This historic moment marked the birth of a new era in communication.
Composition
Morse code consists of a set of standardized sequences of dots and dashes, each representing a letter, numeral, or special character. The basic unit of time in Morse code is the “dot,” which represents a short signal, and the “dash,” which is three times the duration of a dot. These signals are combined to form the Morse code representation of each character.
Utility and Legacy
Morse code quickly became the primary means of rapid communication over long distances, especially during the expansion of the telegraph network in the 19th and early 20th centuries. It facilitated communication across continents and oceans, enabling the exchange of news, business transactions, and personal messages at unprecedented speeds.
Despite the advent of more advanced communication technologies, Morse code continues to hold significance today. It remains a crucial skill for amateur radio operators and is used in emergency situations when other forms of communication fail. Moreover, Morse code serves as a symbol of human ingenuity and perseverance, a testament to the enduring power of innovation and invention.
In summary, Morse code stands as a testament to human ingenuity and innovation, having played a pivotal role in shaping the modern world. Its legacy endures as a timeless communication system, embodying the spirit of connectivity and progress.
The UK Morse Code Standard
Here’s a list of letters and numbers in Morse code, based on the UK Morse code standard:Letters:
- A:
.- - B:
-... - C:
-.-. - D:
-.. - E:
. - F:
..-. - G:
--. - H:
.... - I:
.. - J:
.--- - K:
-.- - L:
.-.. - M:
-- - N:
-. - O:
--- - P:
.--. - Q:
--.- - R:
.-. - S:
... - T:
- - U:
..- - V:
...- - W:
.-- - X:
-..- - Y:
-.-- - Z:
--..
- 0:
----- - 1:
.---- - 2:
..--- - 3:
...-- - 4:
....- - 5:
..... - 6:
-.... - 7:
--... - 8:
---.. - 9:
----.
Regional Variants of Morse Code
Morse code has several regional variants, each with slight differences in the encoding of characters, symbols, and punctuation marks. Some of the prominent regional variants include:
American Morse Code:
Developed by Samuel Morse and Alfred Vail, American Morse code was widely used in the United States and Canada during the 19th and early 20th centuries. It is characterized by shorter signals and different representations for certain characters compared to International Morse code.
International Morse Code:
Also known as Continental Morse code, this variant became the most widely used worldwide for telegraphy and radio communication. It was standardized by the International Telegraphy Congress in 1865 and later adopted as the official Morse code standard by the International Telecommunication Union (ITU). International Morse code is the basis for modern Morse code communication and is used by amateur radio operators, maritime communication, and aviation.
British Morse Code:
British Morse code, also known as UK Morse code, has some variations from International Morse code, particularly in the encoding of letters, numbers, and punctuation marks. It was commonly used in the United Kingdom and British Commonwealth countries.
Russian Morse Code:
Russia had its own variant of Morse code, with slight differences in the encoding of characters compared to International Morse code. Russian Morse code was used for telegraphy and military communication within the former Soviet Union.
Japanese Morse Code:
Japan developed its own Morse code variant, known as Wabun Morse code, which combines elements of International Morse code with Japanese kana characters. It was used extensively for telegraphy and maritime communication in Japan.
These regional variants of Morse code arose due to historical, cultural, and technological factors, and while they share many similarities, they may have differences in specific character representations and encoding rules. However, with the widespread adoption of International Morse code as the standard for modern communication, many of these regional variants have become less commonly used in favor of the international standard.
How to Build Your own Morse Code Generator
Now onto the fun stuff, let’s build!
Necessary Equipment
- Arduino board (e.g. Arduino Uno)
- Active Buzzer
- Jumper Wires
- Breadboard
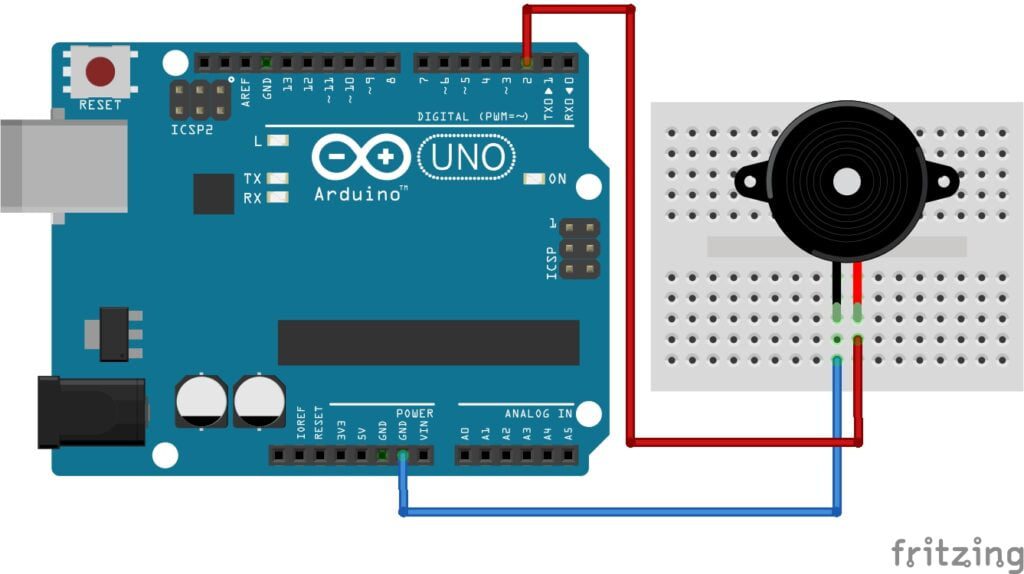
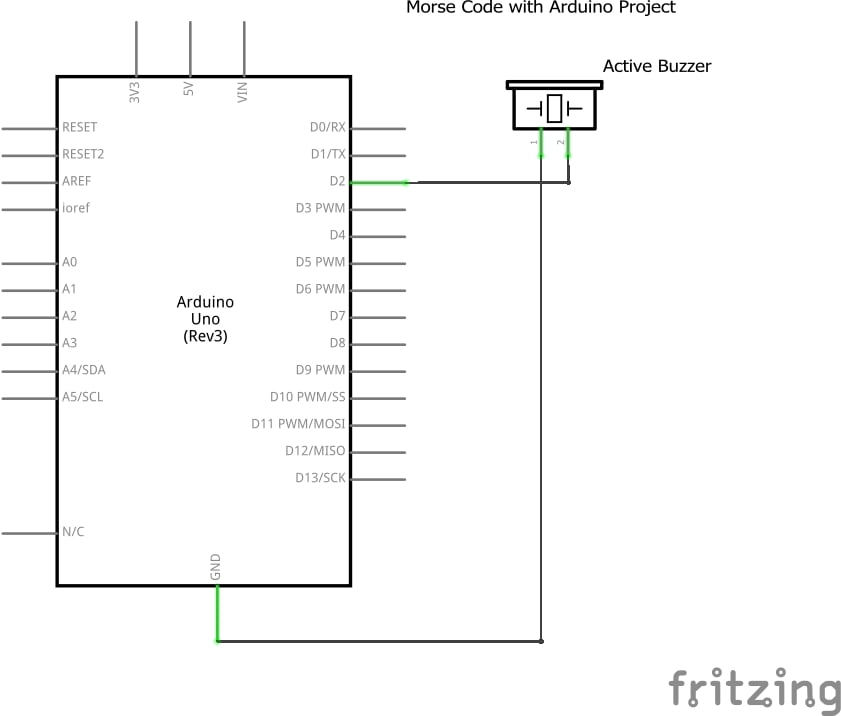
Pin Configuration
Connecting the buzzer to an Arduino is super simple. The connections are as follows:
- (+) on the Buzzer to Digital pin 2 on the Arduino.
- (-) on the Buzzer to GND on the Arduino.
Circuit Diagram
Arduino Code
//Connect Buzzer to digital pin 2
int morseTone = 2;

// Set duration of dots and dashes
int dotTime = 100;
int dashTime = 300;

//Set delays between letters and words
int letterDelay = 100;
int wordDelay = 700;


// Define Morse code representations of letters
String letters[] = {
  ".-",   // A
  "-...", // B
  "-.-.", // C
  "-..",  // D
  ".",    // E
  "..-.", // F
  "--.",  // G
  "....", // H
  "..",   // I
  ".---", // J
  "-.-",  // K
  ".-..", // L
  "--",   // M
  "-.",   // N
  "---",  // O
  ".--.", // P
  "--.-", // Q
  ".-.",  // R
  "...",  // S
  "-",    // T
  "..-",  // U
  "...-", // V
  ".--",  // W
  "-..-", // X
  "-.--", // Y
  "--.."  // Z
};

// Define Morse code representations of numbers
String numbers[] = {
  "-----", // 0
  ".----", // 1
  "..---", // 2
  "...--", // 3
  "....-", // 4
  ".....", // 5
  "-....", // 6
  "--...", // 7
  "---..", // 8
  "----."  // 9
};


void setup() {
  Serial.begin(9600);
  pinMode(morseTone, OUTPUT);
}


void loop() {
  String userInput = ""; // Variable to store user input
  Serial.println("Enter a message in plain text:");

  // Read user input from serial monitor
  while (Serial.available()) {
    char c = Serial.read();
    userInput += c;
  }

  // Play Morse code signals for each character in the user input
  for (int i = 0; i < userInput.length(); i++) { playMorse(userInput[i]); delay(letterDelay); // Add delay between letters } } void dot(){ digitalWrite(morseTone,HIGH); delay(dotTime); digitalWrite(morseTone,LOW); } void dash(){ digitalWrite(morseTone,HIGH); delay(dashTime); digitalWrite(morseTone,LOW); } // Function to play Morse code for a given character void playMorse(char c) { if (c >= 'A' && c <= 'Z') { // Play Morse code for uppercase letters int index = c - 'A'; String morse = letters[index]; playMorseCode(morse); } else if (c >= 'a' && c <= 'z') { // Play Morse code for lowercase letters (convert to uppercase) int index = c - 'a'; String morse = letters[index]; playMorseCode(morse); } else if (c >= '0' && c <= '9') {
    // Play Morse code for numbers
    int index = c - '0';
    String morse = numbers[index];
    playMorseCode(morse);
  } else {
    // Check for special characters
    playSpecial(c);
  }
}

void playMorseCode(String morse) {
  for (int i = 0; i < morse.length(); i++) {
    if (morse.charAt(i) == '.') {
      dot();
    } else if (morse.charAt(i) == '-') {
      dash();
    }
    // Add appropriate delay between dots and dashes
    delay(dotTime);
  }
}

// Function to play Morse code for special characters
void playSpecial(char c) {
  switch(c) {
    case '.':
      playMorseCode(".-.-.-");
      break;
    case ',':
      playMorseCode("--..--");
      break;
    case '?':
      playMorseCode("..--..");
      break;
    case '\'':
      playMorseCode(".----.");
      break;
    case '!':
      playMorseCode("-.-.--");
      break;
    case ':':
      playMorseCode("---...");
      break;
    case ';':
      playMorseCode("-.-.-.");
      break;
    case '-':
      playMorseCode("-....-");
      break;
    case '/':
      playMorseCode("-..-.");
      break;
    case '(':
      playMorseCode("-.--.-");
      break;
    case ')':
      playMorseCode("-.--.-");
      break;
     //////////////////////////////////////////////
    // Add additional cases for more special characters as needed
    default:
      // Handle unsupported special characters
      break;
  }
}
Breaking Down the Code
Variable Declarations:
morseTone: Defines the digital pin to which the buzzer is connected.dotTime,dashTime: Define the duration (in milliseconds) for a dot and a dash, respectively.letterDelay,wordDelay: Define the delays (in milliseconds) between letters and words, respectively.letters[],numbers[]: Define arrays containing the Morse code representations of letters and numbers, respectively.
Setup Function (
setup()):- Initializes serial communication with a baud rate of 9600.
- Sets the
morseTonepin as an output pin.
Loop Function (
loop()):- Initializes an empty string
userInputto store the user’s input message. - Prints “Enter a message in plain text:” to the serial monitor.
- Reads user input from the serial monitor until input is available.
- Iterates through each character in the
userInputstring and calls theplayMorse()function to convert it to Morse code.
- Initializes an empty string
Dot and Dash Functions (
dot()anddash()):- Sets the
morseTonepin HIGH to produce a sound (dot or dash) for the specified duration. - Delays for the duration of the dot or dash.
- Sets the
morseTonepin LOW to stop the sound.
- Sets the
Play Morse Function (
playMorse()):- Takes a character
cas input and determines whether it is a letter, number, or special character. - Calls the appropriate function (
playMorseCode()orplaySpecial()) to convert the character to Morse code.
- Takes a character
Play Morse Code Function (
playMorseCode()):- Takes a Morse code string
morseas input and iterates through each character. - Calls the
dot()ordash()function based on the current character in the Morse code string. - Delays for the duration of a dot between each dot or dash.
- Takes a Morse code string
Play Special Function (
playSpecial()):- Takes a special character
cas input and maps it to its corresponding Morse code representation. - Calls the
playMorseCode()function to play the Morse code for the special character.
- Takes a special character
Enhancements and Future Directions
Using Radio Modules to Transmit Signals:
Maybe implement the NRF24L01 Radio transceiver modules, so the generated morse code message can be transmitted from one Arduino to another.
User Interface Improvements:
Consider developing a more user-friendly interface for inputting messages. You could create a custom keypad or implement a graphical user interface (GUI) using buttons or a touchscreen display.
Speed and Tone Control:
Add functionality to adjust the speed of the Morse code signals and the tone frequency of the buzzer. This would allow users to customize the output according to their preferences.
Character Recognition:
Incorporate character recognition capabilities to interpret Morse code signals received from an external source, such as a light sensor or microphone. This could enable your project to decode Morse code messages transmitted via light flashes or audio signals.
Integration with External Devices:
Explore options for integrating your Morse code project with other electronic devices or systems. For example, you could interface it with a smartphone to send and receive Morse code messages wirelessly.
Expand Morse Code Library:
Expand the Morse code library to include support for even more characters, symbols, and international characters. This would enhance the versatility and applicability of your project for users worldwide.
Learning Resources:
Develop educational materials or tutorials to accompany your project, providing users with resources to learn Morse code and its history. This could include interactive lessons, practice exercises, and real-world applications of Morse code communication.
Enclosures and Packaging:
Design and build a custom enclosure or packaging for your project to enhance its aesthetics, durability, and portability. Consider using 3D printing or laser cutting techniques to create custom enclosures tailored to your project’s specifications.
Integration with IoT Platforms:
Explore opportunities to integrate your Morse code project with Internet of Things (IoT) platforms and services. For example, you could connect it to cloud-based services for remote monitoring, data logging, and analytics.
By incorporating these enhancements and exploring new avenues for development, you can take your Morse code project to the next level, enriching the user experience and expanding its potential applications.
Conclusion
In wrapping up our exploration of Morse code with Arduino, we’ve gained insights into a communication system that has stood the test of time. By utilizing simple components and basic programming, we’ve been able to convert plain text messages into Morse code signals, demonstrating the practical application of this historic language.
While our project may be complete, our appreciation for Morse code continues. Whether for its historical importance, its simplicity, or its resilience in the face of technological advancement, Morse code remains a fascinating subject worth exploring.
This was a really fun project to work on and I will definitely be expanding on this in the future. Next, I want to add radio modules to actually transmit the morse code signal from one Arduino to another.
Happy Tinkering Folks!

Your writing style is engaging and informative. I’ve learned so much from this post and can’t wait to apply these tips to my own projects.