

Welcome to the World of Sensors and Modules with Arduino!
The DS18B20 Temperature Sensor is a digital temperature sensor capable of measuring temperatures with exceptional accuracy. Known for its simplicity and versatility, this sensor operates on the OneWire protocol, simplifying its integration with microcontrollers like Arduino. In this sensors and modules guide, we’ll explore its working principle, key features, applications, and how it can enhance your Arduino projects.
If you’re new to Arduino, why not take a look at our Getting Started with Arduino guides. These guides are designed for beginners to learn the fundamental basics of Arduino programming.
How the DS18B20 Temperature Sensor Works
The DS18B20 temperature sensor employs a digital thermometer that converts temperature readings into digital signals. Its unique serial number allows multiple sensors to operate on the same data bus, enabling precise multi-sensor temperature monitoring.
Features and Specifications
- Temperature Range: -55C ~ +125C
- Accuracy Range: ±0.5C
- Operating Voltage: 3.0V to 5.5V
- Digital Interface: Uses the OneWire protocol for communication.
- Compatibility: This sensor is also compatible with other devices like the Raspberry Pi, ESP32, and ESP8266 etc…
Necessary Equipment:
- Arduino board (e.g., Arduino Uno)
- DS18B20 Sensor Module
- Jumper wires
- Breadboard (optional)
Pin Configuration
Wiring the DS18B20 Sensor Module to an Arduino is fairly simple. The connections are as follows:
- G on the DS18B20 Sensor Module to GND on the Arduino.
- R on the DS18B20 Sensor Module to 5V on the Arduino.
- Y on the DS18B20 Sensor Module to Digital pin 2 on the Arduino.
Pin labels may vary.
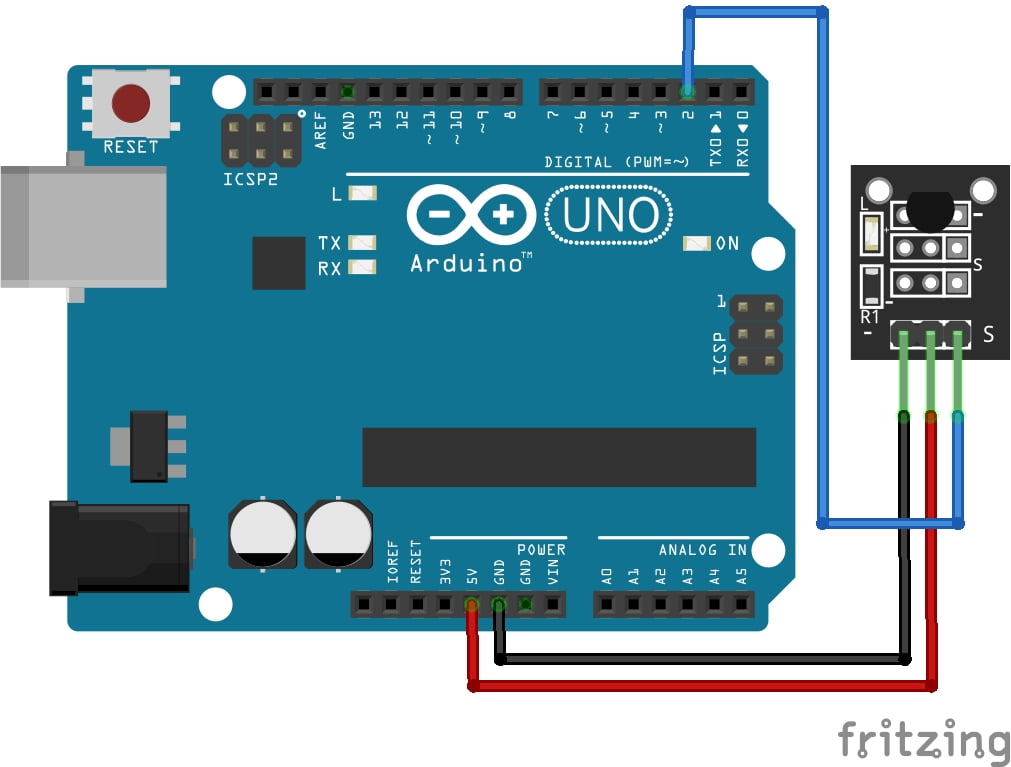
KY-028 Digital Temperature Sensor Module Fritzing Part is created by arduinomodules.info and published under Creative Commons Attribution-ShareAlike 4.0 International license
The OneWire.h Library
The OneWire.h library is essential for working with the DS18B20 Temperature Sensor. This library provides the necessary functions and protocols to communicate with the sensor via the OneWire protocol.
The OneWire protocol is a communication protocol that allows multiple devices (like the DS18B20 sensor) to communicate with an Arduino using a single data wire. It simplifies the process of interfacing with multiple sensors on the same data bus.
Functions within the OneWire.h library enable actions such as initializing communication, reading and writing data, and accessing specific devices on the OneWire bus. Without this library, interfacing and communicating with the DS18B20 sensor using the OneWire protocol would be considerably more complex.
Installing the OneWire.h Library
To install the OneWire library in the Arduino IDE, follow these steps:
Open the Arduino IDE on your computer.
Go to the “Sketch” menu at the top of the Arduino IDE.
Select “Include Library” and then click on “Manage Libraries…”
A Library Manager window will open. In the search bar at the top right corner, type “OneWire”.
Look for the “OneWire” library by Jim Studt, Paul Stoffregen. Once you find it, click on the library entry.
Click the “Install” button to install the library.
Once the installation process completes, close the Library Manager.
After following these steps, the OneWire library will be installed and available for use in your Arduino sketches.
Arduino Code Example
#include <OneWire.h>

#define ONE_WIRE_BUS 2 // Pin for the 18B20 sensor
OneWire oneWire(ONE_WIRE_BUS);
float temperature = 0;

void setup() {
  Serial.begin(9600);
}

void loop() {
  readTemperature();
  Serial.print("Temperature: ");
  Serial.print(temperature);
  Serial.println("°C");
  delay(1000); // Delay for 1 second before the next reading
}

void readTemperature() {
  byte data[9];
  byte addr[8];

  if (!oneWire.search(addr)) {
    oneWire.reset_search();
    delay(250);
    return;
  }

  if (OneWire::crc8(addr, 7) != addr[7]) {
    Serial.println("CRC is not valid!");
    return;
  }

  if (addr[0] != 0x28) {
    Serial.println("Device is not recognized as 18B20");
    return;
  }

  oneWire.reset();
  oneWire.select(addr);
  oneWire.write(0x44, 1); // Start temperature conversion, with parasite power on at the end

  delay(1000); // Wait for conversion to complete

  oneWire.reset();
  oneWire.select(addr);
  oneWire.write(0xBE); // Read Scratchpad

  for (byte i = 0; i < 9; i++) { // we need 9 bytes
    data[i] = oneWire.read();
  }

  int16_t raw = (data[1] << 8) | data[0];
  byte cfg = (data[4] & 0x60);
  if (cfg == 0x00) raw = raw & ~7;  // 9 bit resolution, 93.75 ms
  else if (cfg == 0x20) raw = raw & ~3; // 10 bit res, 187.5 ms
  else if (cfg == 0x40) raw = raw & ~1; // 11 bit res, 375 ms

  temperature = (float)raw / 16.0; // Convert raw data to Celsius
}
Breaking Down the Code
Libraries and Definitions
#include <OneWire.h>: Includes the OneWire library, necessary for communicating with the 18B20 sensor.#define ONE_WIRE_BUS 2: Defines the pin connected to the DS18B20 sensor.OneWire oneWire(ONE_WIRE_BUS);: Initializes the OneWire instance.
Setup Function
Serial.begin(9600);: Initializes serial communication for debugging purposes.
Loop Function
readTemperature();: Calls the function to read the temperature.Serial.print("Temperature: "); Serial.print(temperature); Serial.println("°C");: Prints the temperature reading to the serial monitor.delay(1000);: Adds a delay of 1 second between temperature readings.
Read Temperature Function
- The
readTemperature()function contains the necessary code to communicate with the DS18B20 sensor using the OneWire protocol, read the temperature data, and convert it to Celsius. It reads the sensor’s scratchpad, performs necessary calculations, and stores the temperature value in thetemperaturevariable.
This code continuously reads the temperature from the DS18B20 sensor and prints it to the serial monitor in Celsius. Adjust the code as needed for specific applications or to include additional functionalities.
Applications and Usage Scenarios
Home Automation
Integrate DS18B20 sensors into your home automation system to monitor room temperatures. This can be useful for controlling heating and cooling systems efficiently, ensuring comfort while saving energy.
Industrial Monitoring
Use DS18B20 sensors in industrial settings to monitor temperatures in machinery, equipment, or storage facilities. This can help prevent overheating or ensure optimal operating conditions.
Greenhouse Control
Monitor temperature levels in a greenhouse to ensure optimal growing conditions for plants. The DS18B20 sensor can help automate climate control systems, such as opening vents or activating fans when temperatures rise too high.
Weather Stations
Incorporate DS18B20 sensors into DIY weather stations to monitor outdoor temperature. This data can be used for weather forecasting or simply for personal interest in local weather conditions.
Food Safety
Employ DS18B20 sensors in refrigerators, freezers, or food transport vehicles to monitor temperatures and ensure food safety. Alerts can be set up to notify users if temperatures exceed safe limits.
Aquarium Monitoring
Use DS18B20 sensors to monitor water temperature in aquariums. Maintaining optimal water temperature is crucial for the health of aquatic organisms, and the sensor can be integrated into aquarium control systems for automatic adjustments.
HVAC Systems
Integrate DS18B20 sensors into heating, ventilation, and air conditioning (HVAC) systems for precise temperature monitoring. This can help regulate indoor climate conditions efficiently and ensure occupant comfort.
Medical Applications
In medical equipment or environments, DS18B20 sensors can monitor temperatures in incubators, storage units for temperature-sensitive medications, or during transportation of medical supplies.
Remote Monitoring
Deploy DS18B20 sensors in remote locations where temperature monitoring is necessary, but access is limited. These sensors can be connected to a central system via wireless communication for remote data retrieval and analysis.
Research and Development
Use DS18B20 sensors in research projects or experiments where accurate temperature measurement is required. This could include studies in physics, chemistry, biology, or environmental science.
Conclusion
In this sensors and modules guide, we explained the functionality of the DS18B20 Temperature Sensor, exploring its working principles, and demonstrating how to integrate it with an Arduino for accurate temperature readings. By the end, you should now possess the knowledge to leverage this sensor’s precision, opening doors to temperature-sensitive projects and applications.
Discover the endless possibilities for Arduino projects with more of our Sensors and Modules guides.

