

What are Servos?
Servos, short for “servomechanisms” or “servomotors,” are devices that are widely used in robotics and automation to control the position or orientation of various components, such as robot arms, camera gimbals, and model aircraft control surfaces. They are essential for tasks that require precise control of angular or linear position.
A servo motor consists of three main components:
Motor: The motor provides the physical movement. It typically has a DC motor that rotates a shaft.
Gearbox: A gearbox is often attached to the motor shaft to reduce the speed of the motor and increase the torque output. This reduction in speed allows for finer control of the servo’s position.
Control Circuit: The control circuit is a crucial part of the servo. It receives signals (usually in the form of PWM, or Pulse Width Modulation) from an external source, such as an Arduino, and converts them into precise movements of the motor. The control circuit includes a feedback mechanism (usually a potentiometer) that provides information about the current position to ensure accurate positioning.
Components Needed:
- Arduino board (e.g., Arduino Uno)
- Servo motor
- Jumper wires
- Breadboard (optional)
Here’s how to use a servo with an Arduino:
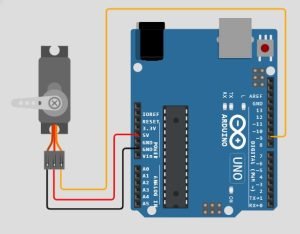
Wiring:
- Connect the servo’s power supply (usually red wire) to the Arduino’s 5V pin.
- Connect the servo’s ground (usually brown or black wire) to the Arduino’s GND pin.
- Connect the servo’s signal wire (usually orange or yellow) to one of the digital PWM pins on the Arduino (e.g., pin 9).
Arduino Code:
You need to write an Arduino sketch to control the servo’s position. Here’s a basic example to move the servo to a specific angle:
#include <Servo.h>

Servo myservo;  // Create a Servo object

void setup() {
  myservo.attach(9);  // Attach the servo to pin 9
}

void loop() {
  myservo.write(90);  // Move the servo to 90 degrees
  delay(1000);        // Wait for 1 second
  myservo.write(0);   // Move the servo to 0 degrees
  delay(1000);        // Wait for 1 second
}
This code uses the Servo library, which simplifies servo control. It attaches the servo to pin 9 and then moves it to 90 degrees and back to 0 degrees with a 1-second delay in between.
Upload the Code:
Upload the code to your Arduino board using the Arduino IDE.
Power Up:
Connect the Arduino to your computer or a power source. The servo should start moving as per the code.
This is a basic example, and you can modify the code to control the servo’s position based on sensor input or other criteria. Servos are versatile and can be used in various projects to achieve precise control of mechanical movements.
Let's Build!
Simple Servo Control
Study the code below. We have included a new library this comes with the Arduino IDE so you shouldn’t need to download it with the libraries manager. Remember we use libraries to make use of their custom commands, first we declare our servo name to the Servo library, then we use our declared name of servo to attach it to our servo pin.
The Code:
#include <Servo.h>
Servo servo;
int servoPin=9;
int pos=0;
int tm=10;

void setup() {
  pinMode(servoPin,OUTPUT);
  servo.attach(servoPin);
}

void loop() {
  for(pos=0; pos<=180; pos+=1){
    servo.write(pos);
    delay(tm);
  }
  for(pos=180; pos>=0; pos-=1){
    servo.write(pos);
    delay(tm);
  }
}
The Circuit:
Upload the Code:
Upload the code to your Arduino board. Once the code finishes uploading, your servo should now be moving 180 degrees back and forth.
Controlling The Servo with The Joystick
This project will show you how to control the servo with a joystick.
The Code:
Study the code below. There is nothing new here but read it and understand it.
#include
Servo Xservo;
int servoPin=9;
int xJoy=A1;
int xJoyVal;
int xJoyValMapped;
int tm=100;
void setup() {
pinMode(xJoy,INPUT);
pinMode(servoPin,OUTPUT);
Xservo.attach(servoPin);
}
void loop() {
xJoyVal=analogRead(xJoy);
xJoyValMapped=map(xJoyVal,0,1023,0,255);
if(xJoyValMapped>180){
xJoyValMapped=180;
}
Xservo.write(xJoyValMapped);
delay(tm);
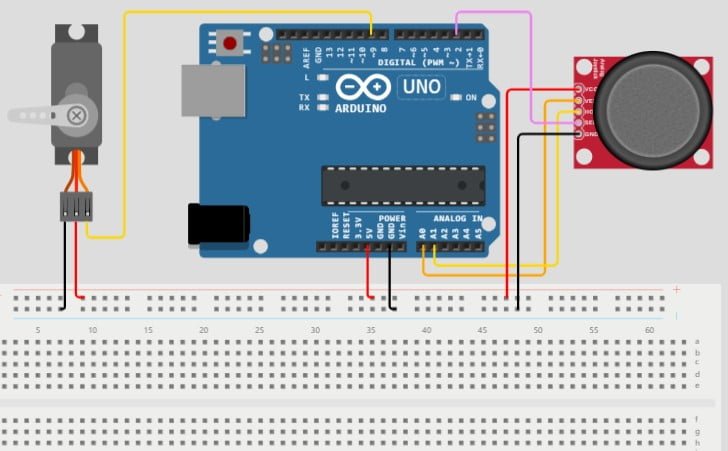
}The Circuit:
Assemble your components the exact same way as in the image below. Remember from the last lesson VCC is connected to the 5v pin on the Arduino, this time we need 5v for both the Joystick and the servo, so we will use the breadboard, then connect both servo and joystick to the red rail on the breadboard. We can assume the pins on the joystick next to the VCC pin are VRx and VRy. We won’t be using VRy and SW for this project, but we will connect them anyway.
Upload the Code:
Once you have your circuit complete, upload the code to your Arduino board. Once the upload finishes you should now have control of the servo using the joysticks x axis (left and right).
Conclusion
Servos are indispensable components in robotics and automation, offering precise control over angular or linear position. They consist of a motor, gearbox, and control circuit, making them ideal for applications where accuracy and repeatability are essential. When coupled with an Arduino or other microcontroller, servos become valuable tools for bringing motion and control to a wide range of projects. Whether you’re building a robot, a camera gimbal, or a model aircraft, understanding how to use servos effectively opens up a world of possibilities for creative engineering and automation. So, dive into the world of servos, experiment with different applications, and turn your innovative ideas into reality.
Happy Tinkering!
Recommendations:
If you don’t already own any Arduino hardware, we highly recommend purchasing the Elegoo Super Starter Kit. This kit has everything you need to start programming with Arduino.
You can find out more about this kit here: Elegoo Super Starter Kit


Your point of view caught my eye and was very interesting. Thanks. I have a question for you.