

What are DC Motors?
Direct Current (DC) motors are commonly used in various applications, including robotics, automation, and electronics projects. When combined with an Arduino microcontroller, you can control the speed and direction of DC motors, making them an essential component for many projects. It’s important you remember this, do not connect the DC Motor to your Arduino 5v pin, Your Arduino board will quickly die, it cannot power it, instead we need a separate power supply to power the motors.
DC Motor Basics
DC motors are electric motors that convert electrical energy into mechanical rotation. They operate on the principle of electromagnetic induction, where the interaction between a magnetic field and current flowing through a wire generates rotational motion. Key components of a typical DC motor include:
Stator:
- The stationary part of the motor that houses the magnets or electromagnets to create a magnetic field.
Rotor:
- The rotating part of the motor, often with a shaft connected to it. When current flows through the rotor, it experiences a magnetic force and starts rotating.
Brushes and Commutator:
- Many DC motors have brushes and a commutator, which help reverse the direction of current flow in the rotor to maintain continuous rotation.
How to Use DC Motors with Arduino:
To control DC motors with an Arduino, you’ll typically need the following components:
DC Motor: Choose an appropriate DC motor based on your project’s requirements, considering factors like torque, speed, and voltage.
H-Bridge Motor Driver: An H-bridge is an electronic circuit that allows you to control the direction and speed of a DC motor. It can be used to reverse the polarity of the motor terminals, which changes the direction of rotation.
Arduino Board: Any Arduino board, such as Arduino Uno or Arduino Nano, can be used for motor control.
Power Supply: Depending on the motor’s voltage requirements, you might need an external power supply, as the Arduino may not provide enough current to drive the motor.
The basic steps to control a DC motor with an Arduino:
Connect the Motor to the H-Bridge: Connect the two terminals of the DC motor to the H-bridge motor driver. The H-bridge typically has four terminals: two for motor power (usually labeled “M+ and M-“) and two for control signals (often labeled “IN1, IN2” for one direction and “IN3, IN4” for the other direction).
Connect the H-Bridge to Arduino: Connect the control pins of the H-bridge to digital pins on the Arduino. These pins will control the motor’s direction and speed.
Write Arduino Code: Write Arduino code to control the motor. You can use the
analogWrite()function to control the speed by varying the PWM (Pulse Width Modulation) value, and you can set the direction by toggling the control pins on the H-bridge.Power Supply: Connect an external power supply to the H-bridge if required, and make sure to connect the ground of the Arduino and the external power supply together for a common reference.
Upload and Run Code: Upload your Arduino code to the board and run the program to control the motor’s direction and speed.
Example Code
Here’s a simplified example code to get you started with controlling a DC motor using an H-bridge and Arduino:
#include <Arduino.h>

// Define motor control pins
const int motorIN1 = 2;
const int motorIN2 = 3;

void setup() {
  // Set motor control pins as outputs
  pinMode(motorIN1, OUTPUT);
  pinMode(motorIN2, OUTPUT);
}

void loop() {
  // Run the motor in one direction at half speed
  digitalWrite(motorIN1, HIGH);
  digitalWrite(motorIN2, LOW);
  analogWrite(motorSpeed, 128);  // 0-255: 0 is off, 255 is full speed

  // Wait for a while
  delay(2000);

  // Reverse the motor direction
  digitalWrite(motorIN1, LOW);
  digitalWrite(motorIN2, HIGH);

  // Wait for a while
  delay(2000);
}
This code runs the motor in one direction for 2 seconds, then reverses the direction for another 2 seconds.
Remember that the specific connections and code may vary depending on the H-bridge and motor you are using, so consult the datasheets and documentation for your components for detailed instructions.
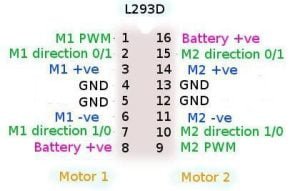
Introducing the L293D IC
We have not learnt about IC’s yet, an IC is an integrated circuit, programmed for a specific purpose. The L293D is a H-bridge motor driver, designed to control motors. Below are the pin outs for the L293D IC.
The L293D has several features that make it suitable for motor control:
Bidirectional Control: It can control the rotation of a DC motor in both forward and reverse directions.
High Current Capability: The L293D can handle relatively high currents, which is essential for driving motors with sufficient power.
Built-in Diodes: It includes built-in flyback (freewheeling) diodes, which protect against voltage spikes generated by the motor when it is turned off.
Ease of Use: It is relatively easy to use with microcontrollers like Arduino, as it requires minimal external components.
Multiple Configurations: Some versions of the L293D, such as L293DNE, provide two H-bridges in a single IC, which allows you to control two DC motors independently or a single stepper motor.
Introducing the Power Supply Module
This module can be powered via the mains power adapter, or a 9v battery, making this the perfect module for our next project.
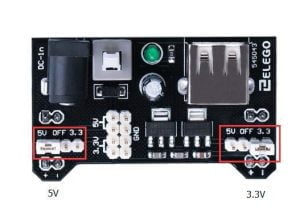
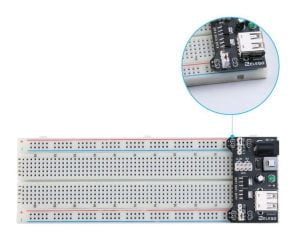
Be careful when inserting it into the breadboard, make sure the + is in the red rail and the – is in the blue rail.
Let's Build!
How to Program a DC Motor
Study the code below. The variable enable is the motor, it’s declared as enable, because we are just enabling it, the control is done with the next 2 variables dir1 and dir2. The variables dir1 and dir2 are for driving the motor forwards and backwards.
The Code:
When you’re ready, copy and paste the code below to a new sketch.
int enable=5;
int dir1=4;
int dir2=3;
void setup() {
Serial.print(9600);
pinMode(enable,OUTPUT);
pinMode(dir1,OUTPUT);
pinMode(dir2,OUTPUT);
}
void loop() {
analogWrite(enable,255);
for (int i=0;i<5;i++) {
digitalWrite(dir1,HIGH);
digitalWrite(dir2,LOW);
delay(1000);
digitalWrite(dir1,LOW);
digitalWrite(dir2,HIGH);
delay(1000);
}
for(int mSpeed=100; mSpeed<255; mSpeed++){
analogWrite(enable,mSpeed);
digitalWrite(dir1,HIGH);
digitalWrite(dir2,LOW);
Serial.print(mSpeed);
delay(200);
}
for(int mSpeed; mSpeed>100; mSpeed--){
analogWrite(enable,mSpeed);
digitalWrite(dir1,HIGH);
digitalWrite(dir2,LOW);
Serial.print(mSpeed);
delay(200);
}
for(int mSpeed=100; mSpeed<255; mSpeed++){
analogWrite(enable,mSpeed);
digitalWrite(dir1,LOW);
digitalWrite(dir2,HIGH);
Serial.print(mSpeed);
delay(200);
}
for(int mSpeed; mSpeed>100; mSpeed--){
analogWrite(enable,mSpeed);
digitalWrite(dir1,LOW);
digitalWrite(dir2,HIGH);
Serial.print(mSpeed);
delay(200);
}
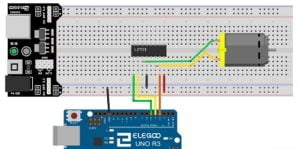
}The Circuit:
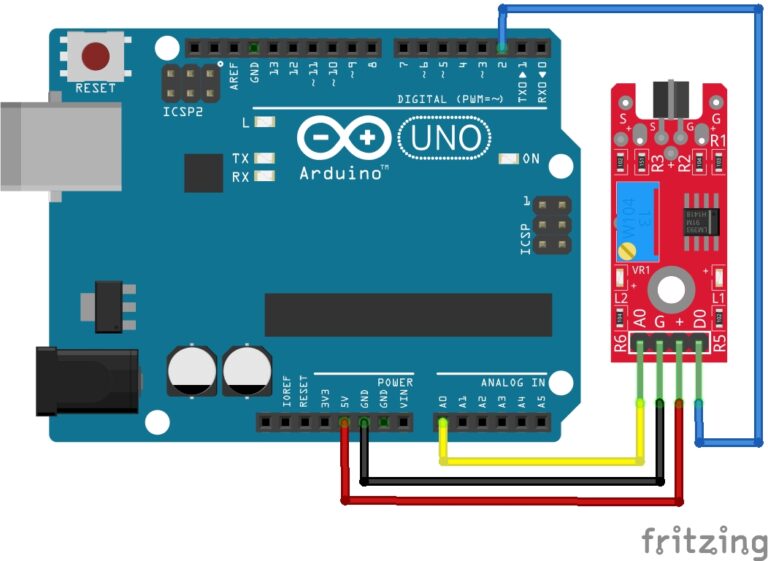
Assemble your components in the exact same way as the below image.
Upload the Code:
Once you have assembled the circuit, go ahead and upload the code to the Arduino board.
If all went well, the DC Motor should now be spinning forwards and then backwards.
A Challenge!
Controlling Motors and Servos with The Joystick
This is going to be your toughest project so far. We are going to program the Arduino to control 2 different components with another component. We have learnt how to control a servo with the joystick, and we have learnt to control a motor with the joystick. Now we are going to control both, from the same joystick. Also, you are going to have to use what you have learnt to construct the project. I will give you the code, but you will have to put it altogether without the guidance of the images. You have today’s lessons image and yesterday’s lessons image it’s up to you to make it work.
The Code:
I have included comments, to make this as easy as possible for you to understand.
Open your Arduino IDE then copy and paste the code below to a new sketch. Use todays and yesterdays project images to construct the Joystick, the Servo, and the Dc Motor. You will need to overcome one problem in the build process, its not difficult to figure out, just remember, DO NOT power your Dc Motor from the Arduinos 5V pin.
#include <Servo.h>
Servo Xservo;

 ////////////
//Dc Motor
int enable=5;
int dir1=4;
int dir2=3;

 ////////////
//Servo
int servoPin=9;

 ////////////
//Joystick Steering
int xJoy=A1;
int xJoyVal;
int xJoyValMapped;

 ////////////
//Joystick Travel
int yJoy=A0;
int yJoyVal;
int yJoyValMapped;

void setup() {
   ////////////
  //Dc Motor
  pinMode(enable,OUTPUT);
  pinMode(dir1,OUTPUT);
  pinMode(dir2,OUTPUT);

   ////////////
  //Servo
  pinMode(servoPin,OUTPUT);
  Xservo.attach(servoPin);

   ////////////
  //Joystick
  pinMode(xJoy,INPUT);
  pinMode(yJoy,INPUT);
}

void loop() {
   ////////////////////////
  //Servo control
  xJoyVal=analogRead(xJoy);
  xJoyValMapped=map(xJoyVal,0,1023,0,255);

   ////////////////////////
  //Motor control
  yJoyVal=analogRead(yJoy);
  yJoyValMapped=map(yJoyVal,0,1023,0,255);
  analogWrite(enable,255);

   ////////////////////////
  //X Axis (left and right)
  if(xJoyValMapped>180){
    xJoyValMapped=180;
  }
  Xservo.write(xJoyValMapped);
  delay(100);

   ////////////////////////
  //Y Axis (forwards and backwards)
  if(yJoyValMapped>=130){
    digitalWrite(dir1,HIGH);
    digitalWrite(dir2,LOW);
  }
  if(yJoyValMapped<=100){
    digitalWrite(dir1,LOW);
    digitalWrite(dir2,HIGH);
  }
  if((yJoyValMapped>100)&&(yJoyValMapped<130)){
    digitalWrite(dir1,LOW);
    digitalWrite(dir2,LOW);
  }
}
I really hope you figured out how to complete this task. Let me know in the comments if you managed to complete it. If you didn’t, look back over the last 2 lessons and try again. If you still fail to make it work, then please let me know and I’ll try to tell you where you went wrong.
Conclusion
Mastering the programming of DC motors, together with servos, and joysticks is a significant step toward unlocking the potential of robotics, automation, and electronics projects. Learning how to control DC motors empowers you to manipulate physical motion, whether it’s driving a robot, automating machinery, or creating kinetic art. Servos add precision and accuracy to your projects, enabling fine-grained control of angles and positions, making them indispensable in robotics and mechanisms. Joysticks provide an intuitive and interactive means of user input, bridging the gap between human and machine.
Recommendations:
If you don’t already own any Arduino hardware, we highly recommend purchasing the Elegoo Super Starter Kit. This kit has everything you need to start programming with Arduino.
You can find out more about this kit here: Elegoo Super Starter Kit
