

Illuminating Your Raspberry Pi Projects with LED's!
In this guide, we will delve into the world of Raspberry Pi’s General-Purpose Input/Output (GPIO) pins and learn how to control two LEDs using them. GPIO pins are a versatile feature of the Raspberry Pi, allowing you to interact with various external components, such as LEDs, sensors, and more. We’ll cover the basic wiring, Python programming, and demonstrate how to make these LEDs blink on and off. So, let’s get started!
Materials Needed:
Before we begin, make sure you have the following materials ready:
- Raspberry Pi (any model with GPIO pins)
- 2 LEDs (different colors can be fun)
- 2 x 220-330Ω resistors
- Breadboard and jumper wires
- Power supply for your Raspberry Pi
The Circuit:
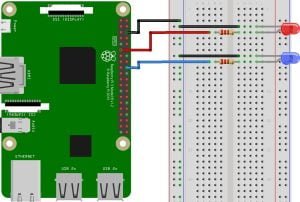
Follow the circuit diagram below, the connections are as follows:
- Insert the longer lead (anode) of each LED into separate rows on the breadboard.
- Connect a 220-330Ω resistor to the longer leg of each LED’s anode.
- The shorter lead (cathode) of each resistor should be connected to the Raspberry Pi’s ground (GND) pin.
- Connect the other end of the resistors to separate GPIO pins on the Raspberry Pi. For example, connect one resistor to GPIO 11 and the other to GPIO 18.
Python Code:
Now, let’s write the Python code to control these LEDs. You can use the RPi.GPIO library to interact with the GPIO pins.
import RPi.GPIO as GPIO
import time

# Set the GPIO mode to BCM
GPIO.setmode(GPIO.BCM)

# Define the GPIO pins for the LEDs
led1_pin = 11
led2_pin = 18

# Setup the GPIO pins
GPIO.setup(led1_pin, GPIO.OUT)
GPIO.setup(led2_pin, GPIO.OUT)

try:
    while True:
        # Turn on LED 1
        GPIO.output(led1_pin, GPIO.HIGH)
        time.sleep(1)

        # Turn off LED 1 and turn on LED 2
        GPIO.output(led1_pin, GPIO.LOW)
        GPIO.output(led2_pin, GPIO.HIGH)
        time.sleep(1)

        # Turn off LED 2
        GPIO.output(led2_pin, GPIO.LOW)
        time.sleep(1)

except KeyboardInterrupt:
    # Clean up when the program is interrupted
    GPIO.cleanup()
Explanation:
- Import the
RPi.GPIOlibrary and set the GPIO mode to BCM. - Define the GPIO pins used for the LEDs.
- Set up the GPIO pins as output.
- Create a loop that alternates between turning on LED 1, LED 2, and turning both off.
Conclusion:
That’s it! we’ve successfully connected and controlled two LEDs using the Raspberry Pi’s GPIO pins. This is just the beginning of what you can do with GPIO on your Raspberry Pi. You can expand upon this project by adding more LEDs, sensors, or even creating more complex programs to control various components. Have fun experimenting and exploring the possibilities.
Happy Tinkering Folks!
You can explore more of our Raspberry Pi guides here: Raspberry Pi for Beginners
Unlock the Possibilities
We have put together a list of some great Raspberry Pi products and deals: Shop Raspberry Pi Goodies Now!
