

A Beginner's Guide to Using the GPIO on Your Raspberry Pi!
The Raspberry Pi is a powerful and versatile single-board computer that opens up a world of possibilities for DIY electronics and programming projects. One of its key features is the General-Purpose Input/Output (GPIO) header, which allows you to connect and control external hardware components. In this guide, we’ll walk you through the basics of using the Raspberry Pi GPIO, making it accessible to beginners.
Potential Risks to Your Raspberry Pi
Before you do anything with the GPIO pins it’s necessary to have at least a basic knowledge of their capabilities, or you run the risk of bricking your Pi, permanently.
Using the GPIO (General-Purpose Input/Output) pins on a Raspberry Pi does come with some potential risks, but it’s important to note that if you’re careful and follow best practices, the chances of “bricking” your Raspberry Pi are relatively low. Here are some of the potential risks and ways to mitigate them:
Over-Voltage:
Applying voltages higher than 3.3V (for Raspberry Pi models prior to Raspberry Pi 4) or 3.3V/5V (for Raspberry Pi 4 and later) to GPIO pins can damage the GPIO or the entire Raspberry Pi. To mitigate this risk, always double-check the voltage levels of components you connect and use level shifters or voltage dividers if necessary.
Reverse Polarity:
Incorrectly connecting power sources or components with reversed polarity can damage the Raspberry Pi. Pay close attention to the orientation and polarity of connections, especially when using external power supplies.
Short Circuits:
Accidental short circuits can occur when wires or components touch or get connected incorrectly. This can damage the GPIO pins or the Raspberry Pi itself. Always double-check your wiring and consider using a breadboard or a case to protect the GPIO pins from accidental contact.
Excessive Current Draw:
Drawing too much current through the GPIO pins can lead to overheating or damage. Check the current requirements of the devices you connect and use external power sources, such as relays or motors, whenever necessary.
Static Electricity:
Handling components and GPIO pins without proper electrostatic discharge (ESD) precautions can introduce static electricity, potentially damaging sensitive electronic components. Ground yourself before working with your Raspberry Pi and other components.
Software Errors:
While not technically “bricking” the hardware, incorrect code or configuration changes to the GPIO pins can lead to unexpected behavior, crashes, or unresponsive GPIO pins. Always double-check your code and make gradual changes to prevent unexpected issues.
Firmware Updates:
In some cases, updating the Raspberry Pi’s firmware can cause problems, but these are usually recoverable. Always backup your data and read release notes before performing firmware updates.
Precautions to Keep Your Raspberry Pi Safe:
To minimize the risks associated with using the GPIO, consider the following precautions:
- Use a proper case or enclosure to protect the Raspberry Pi and GPIO pins from physical damage and dust.
- Follow tutorials and guidelines from reputable sources, and double-check your connections before powering up the Raspberry Pi.
- Start with simple projects and gradually work your way up to more complex ones as you gain experience.
- Always disconnect power when making significant changes to your GPIO setup.
- Backup your data and configuration regularly, so you can recover from any software issues.
By being cautious and taking these precautions, you can reduce the risk of damaging your Raspberry Pi while working with the GPIO.
About the Raspberry Pi GPIO
GPIO stands for General Purpose Input Output. The GPIO is the 40 male header pins you can see on the Raspberry Pi. They are used for extending your Raspberry Pi’s capabilities, using expansion boards, or connecting your own project components. If you have bought a custom Raspberry Pi case with a fan, you most likely had to connect the fan to the GPIO pins.
Voltage Pins
There are two 3.3v and two 5v pins on the board, their voltage comes direct from the Raspberry Pi’s power supply and cannot be configured, there are many ground pins available. The rest of the pins are for general purpose input and output, they are set to 3.3v for output, and are tolerant of 3.3v for input. If your project needs more than 3.3v, you will need to either use the 5v pins or draw power from an external source. If you draw more power than the GPIO pins are capable of, you will permanently damage your Raspberry Pi.
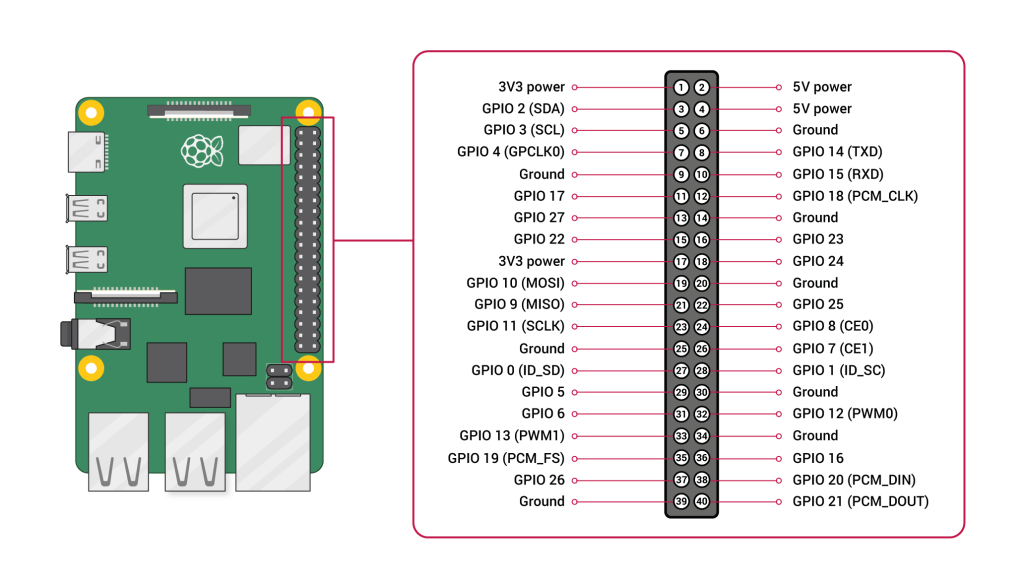
Other GPIO Pin Functions
- PWM (pulse-width modulation)
- Software PWM available on all pins
- Hardware PWM available on GPIO12, GPIO13, GPIO18, GPIO19
- SPI
- SPI0: MOSI (GPIO10); MISO (GPIO9); SCLK (GPIO11); CE0 (GPIO8), CE1 (GPIO7)
- SPI1: MOSI (GPIO20); MISO (GPIO19); SCLK (GPIO21); CE0 (GPIO18); CE1 (GPIO17); CE2 (GPIO16)
- I2C
- Data: (GPIO2); Clock (GPIO3)
- EEPROM Data: (GPIO0); EEPROM Clock (GPIO1)
- Serial
- TX (GPIO14); RX (GPIO15)
Lorem ipsum dolor sit amet, consectetur adipiscing elit. Ut elit tellus, luctus nec ullamcorper mattis, pulvinar dapibus leo.
The GPIO Group
To use the GPIO pins your user must be part of the GPIO group.
If you are not using the default pi user account you can add your account name to the group, open the Raspberry Pi terminal and type the following command:
sudo usermod -a -G gpio <username>Using the GPIO with Python
You can control many different components and sensors with the GPIO using Python by importing the GPIO library to your Python script.
import RPi.GPIO as GPIO
Now, you need to declare the pin you are going to use:
import RPi.GPIO as GPIO

myPin=10
You then need to declare the GPIO pin mode, there are 2 modes, which define the pin numbering convention that is going to be used.
- GPIO.BOARD will use the digital pin numbering system.
- GPIO.BCM will use the GPIO Numbering system.
import RPi.GPIO as GPIO

myPin=10 # Pin (10)

GPIO.setmode(GPIO.BOARD)
or
import RPi.GPIO as GPIO

myPin=15 # GPIO15 is Pin 10

GPIO.setmode(GPIO.BCM)
Next, we need to declare whether it’s an Input or Output.
import RPi.GPIO as GPIO

myPin=15 # GPIO15 is Pin 10

GPIO.setmode(GPIO.BCM)

GPIO.setup(myPin, GPIO.OUT) # For OUTPUT
or
import RPi.GPIO as GPIO

myPin=15 # GPIO15 is Pin 10

GPIO.setmode(GPIO.BCM)

GPIO.setup(myPin, GPIO.IN) # For INPUT
When ending your Python script, you must remember to safely shutdown the GPIO with the following command:
GPIO.cleanup()
This insures your GPIO pins are all shut down and ready for the next user.
Complete GPIO Python Script Example
To keep this guide as simple as possible, I will show you a completed sketch, so you get a basic idea.
import RPi.GPIO as GPIO       # Import GPIO Library
import time                   # Import time Library

LED1=10                       # Declaration of the Pin to use

GPIO.setmode(GPIO.BOARD)      # Set the Boards Numbering system
GPIO.setup(LED1, GPIO.OUT)    # Set the GPIO pin to OUTPUT

for i in range(10):           # Created for-loop to loop 10 times
  GPIO.output(LED1,GPIO.HIGH) # Set HIGH for ON
  time.sleep(1)               # Sleep for a second
  GPIO.output(LED1,GPIO.LOW)  # Set LOW for OFF
  time.sleep(1)               # Sleep for a second

GPIO.cleanup()               # Safely shutdown the GPIO Pins
print('GPIO Shutdown')       # Prints to screen GPIO shutdown safely
Conclusion
With the information and hands-on experience gained from this guide, you’re well on your way to exploring the endless possibilities of Raspberry Pi GPIO. From simple LED projects to more complex sensors and automation, you can bring your ideas to life and develop your skills in electronics and programming.
Start your journey into the world of Raspberry Pi GPIO today and watch as your projects and knowledge grow.
That’s All Folks!
You can explore more of our Raspberry Pi guides here: Raspberry Pi for Beginners
Unlock the Possibilities
We have put together a list of some great Raspberry Pi products and deals: Shop Raspberry Pi Goodies Now!
