
What is Virtual Python?
Visual Python, also known as vPython, is a library that allows you to create 3D visualizations and animations in Python. It’s particularly useful for teaching and learning physics and computer programming because it provides an easy-to-use interface for creating interactive 3D graphics. Visual Python is based on the popular Python programming language and is designed to be user-friendly, making it accessible to both beginners and experienced programmers.
Where to Begin
Learn Python:
If you have never used Python before you can follow our latest crash course here: Python Crash Course Rev.3 (Updated 2023)
Visual Python Installation:
To get started with vPython, you’ll need to install it first. As of my last knowledge update in September 2021, vPython was typically installed using the vpython package, which you can install using pip. However, please note that software and package installations can change, so it’s a good idea to check the official vPython website or documentation for the most up-to-date installation instructions.
Here’s how you can install vPython using pip:
pip install vpython
Creating a Basic VPython Program:
Once you have vPython installed, you can create a basic vPython program to display a 3D object. Here’s a simple example:
from vpython import sphere, scene

# Create a 3D scene
scene.background = color.white
scene.title = "VPython Example"

# Create a 3D object (in this case, a sphere)
my_sphere = sphere(pos=vector(0, 0, 0), radius=1, color=color.blue)

# Run the VPython interactive window
while True:
    rate(30)  # Adjust the frame rate as needed
In this example:
- We import the necessary VPython modules,
sphereandscene. - We create a 3D scene and set its background color and title.
- We create a 3D sphere object and specify its position, radius, and color.
- Finally, we enter an infinite loop with
rate(30)to keep the VPython window open and update the scene at 30 frames per second.
You can interact with the 3D object using your mouse and keyboard. You can rotate the view, zoom in and out, and even animate the objects as needed.
Additional Resources:
To learn more about vPython and explore its capabilities, you can refer to the official VPython documentation and tutorials. Since the software and documentation may have been updated since my last knowledge update, it’s a good idea to visit the official VPython website or relevant community resources for the latest information and examples:
- Official vPython Website: http://www.vpython.org/
- vPython Documentation: http://www.vpython.org/contents/docs/index.html
These resources should provide you with more in-depth information and examples to help you get started with vPython and create interactive 3D visualizations in Python.
Some Basic Scripts
Here is some of the work I have done so far:
Basic Clock
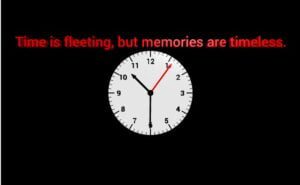
Using Pythons time library, this basic script displays the time.
The Code:
from vpython import *
import numpy as np
import time

clockR=2
clockT=clockR/10
majorTickL=clockR/7
majorTickT=2*np.pi*clockR/300
majorTickW=clockT*1.2
minorTickL=clockR/15
minorTickT=2*np.pi*clockR/600
minorTickW=clockT*1.2
minHandL=clockR-majorTickL
minHandT=minHandL/25
minHandOffset=clockT/2+minHandT
hrHandL=.75*minHandL
hrHandT=minHandT*1.25
hrHandOffset=clockT+hrHandT
secHandL=clockR-majorTickL
secHandT=minHandL/25
secHandOffset=clockT/2+minHandT
hubRadius=clockT/1.5

hrAngle=np.pi/2
minAngle=np.pi/2
secAngle=np.pi/2

secInc=-.01
minInc=secInc/60
hrInc=minInc/12

for theta in  np.linspace(0,2*np.pi,13):
    majorTick=box(axis=vector(clockR*np.cos(theta),clockR*np.sin(theta),0),color=color.black,length=majorTickL,width=majorTickW,height=majorTickT,pos=vector((clockR-majorTickL/2)*np.cos(theta),(clockR-majorTickL/2)*np.sin(theta),0))
for theta in  np.linspace(0,2*np.pi,61):
    minorTick=box(axis=vector(clockR*np.cos(theta),clockR*np.sin(theta),0),color=color.black,length=minorTickL,width=minorTickW,height=minorTickT,pos=vector((clockR-minorTickL/2)*np.cos(theta),(clockR-minorTickL/2)*np.sin(theta),0))

myTime=time.localtime(time.time())
print("Hour: "+str(myTime[3]))
print("Minute: "+str(myTime[4]))
print("Second: "+str(myTime[5]))
print(str(myTime[3])+":"+str(myTime[4])+":"+str(myTime[5]))

clockFace=cylinder(radius=clockR,axis=vector(0,0,1),color=vector(1,1,1),length=clockT,pos=vector(0,0,-clockT/2))
minHand=arrow(axis=vector(0,1,0),length=minHandL,color=color.black,shaftwidth=minHandT,pos=vector(0,0,minHandOffset))
hrHand=arrow(axis=vector(0,-1,0),length=hrHandL,color=color.black,shaftwidth=hrHandT,pos=vector(0,0,hrHandOffset))
secHand=arrow(axis=vector(0,1,0),length=secHandL,color=color.red,shaftwidth=secHandT,pos=vector(0,0,secHandOffset))
hub=cylinder(axis=vector(0,0,1),length=clockT*2,radius=hubRadius,color=color.black)
textH=clockR/4
myLabel=text(text="GMT Time Zone",align="center",color=color.red,height=textH,pos=vector(0,1.1*clockR,-clockT/2),depth=clockT)
Angle=np.pi/2
AngleInc=-2*np.pi/12
Angle=Angle+AngleInc
numH=clockR/8
for i in range(1,13,1):
    clockNum=text(align="center",text=str(i),pos=vector(clockR*.75*np.cos(Angle),clockR*.75*np.sin(Angle)-numH/2,0), height=numH,depth=clockT,color=color.black)
    Angle=Angle+AngleInc

while True:
    rate(5000)
    hr=time.localtime(time.time())[3]
    min=time.localtime(time.time())[4]
    sec=time.localtime(time.time())[5]
    minAngle=-((min+sec/60)/60)*2*np.pi+np.pi/2
    hrAngle=-((hr+min/60)/12)*2*np.pi+np.pi/2
    secAngle=-(sec/60)*2*np.pi+np.pi/2
    minHand.axis=vector(minHandL*np.cos(minAngle),minHandL*np.sin(minAngle),0)
    hrHand.axis=vector(hrHandL*np.cos(hrAngle),hrHandL*np.sin(hrAngle),0)
    secHand.axis=vector(secHandL*np.cos(secAngle),secHandL*np.sin(secAngle),0)
Bouncing Ball Animation

The Code:
from vpython import *
from time import *


####PLAY AROUND WITH THESE SETTINGS ONLY####
wallThickness=1
roomWidth=20
roomDepth=30
roomHeight=50
bSpeed=100 #Ball Speed
mRadius=2 #Marble Radius
############################################

floor=box(pos=vector(0,-roomHeight/2,0),size=vector(roomWidth, wallThickness, roomDepth),color=color.green)
ceiling=box(pos=vector(0,roomHeight/2,0),size=vector(roomWidth, wallThickness, roomDepth),color=color.green)
leftWall=box(pos=vector(-roomWidth/2,0,0),size=vector(wallThickness, roomHeight, roomDepth),color=color.green)
rightWall=box(pos=vector(roomWidth/2,0,0),size=vector(wallThickness, roomHeight, roomDepth),color=color.green)
back=box(pos=vector(0,0,-roomDepth/2),size=vector(roomWidth, roomHeight, wallThickness),color=color.green)
marble=sphere(radius=mRadius,color=color.red)

deltaX=.1
deltaY=.1
deltaZ=.1

xPos=0
yPos=0 #x,y,z Starting Positions
zPos=0

while True:
    rate(bSpeed)
    xPos=xPos+deltaX
    yPos=yPos+deltaY
    zPos=zPos+deltaZ
    Xrme=xPos+mRadius #Xrme right marble edge
    Xlme=xPos-mRadius #Xlme left marble edge
    Ytme=yPos+mRadius #Ytme Top marble edge
    Ybme=yPos-mRadius #Ybme Bottom marble edge
    Zbme=zPos-mRadius #Zbme Back marble edge
    Zfme=zPos+mRadius #Zfme Front marble edge
    Rwe=roomWidth/2-wallThickness/2 #Rwe Right wall edge
    Lwe=-roomWidth/2+wallThickness/2 #Lwe Left wall edge
    Cwe=roomHeight/2-wallThickness/2 #Cwe Ceiling wall edge
    Flwe=-roomHeight/2+wallThickness/2 #Flwe Floor wall edge
    Bwe=-roomDepth/2+wallThickness/2 #Bwe Back wall edge
    Fwe=roomDepth/2-wallThickness/2 #Fwe Front wall edge

    if (Xrme>=Rwe or Xlme<=Lwe):
        deltaX=deltaX*(-1)
    if (Ytme>=Cwe or Ybme<=Flwe):
        deltaY=deltaY*(-1)
    if (Zfme>=Fwe or Zbme<=Bwe):
        deltaZ=deltaZ*(-1)

    marble.pos=vector(xPos,yPos,zPos)
Adding User Interactive Functionality
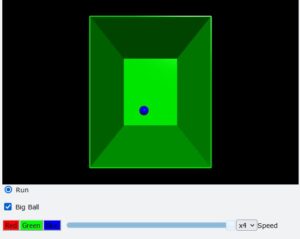
The Code:
from vpython import *
from time import *

wallThickness=.1
roomWidth=12
roomDepth=20
roomHeight=15
mRadius=.5 #Marble Radius
bSpeed=1
floor=box(pos=vector(0,-roomHeight/2,0),size=vector(roomWidth, wallThickness, roomDepth),color=color.green)
ceiling=box(pos=vector(0,roomHeight/2,0),size=vector(roomWidth, wallThickness, roomDepth),color=color.green)
leftWall=box(pos=vector(-roomWidth/2,0,0),size=vector(wallThickness, roomHeight, roomDepth),color=color.green)
rightWall=box(pos=vector(roomWidth/2,0,0),size=vector(wallThickness, roomHeight, roomDepth),color=color.green)
back=box(pos=vector(0,0,-roomDepth/2),size=vector(roomWidth, roomHeight, wallThickness),color=color.green)
marble=sphere(radius=mRadius,color=vector(1,1,1))
deltaX=.1
deltaY=.1
deltaZ=.1
xPos=0
yPos=0 #x,y,z Starting Positions
zPos=0

#First Widget
run=0

def runRadio(x):
    print(x.checked)
    global run
    if x.checked==True:
        run=1
    if x.checked==False:
        run=0
radio(bind=runRadio, text="Run")

scene.append_to_caption("\n\n")
#Second Widget
def bigBall(x):
    global mRadius
    if x.checked==True:
        mRadius=mRadius*2
        marble.radius=mRadius
    if x.checked==False:
        mRadius=mRadius/2
        marble.radius=mRadius
checkbox(bind=bigBall,text="Big Ball")

scene.append_to_caption("\n\n")

#Third Widget
def ballRed(x):
    marble.color=color.red
def ballGreen(x):
    marble.color=color.green
def ballBlue(x):
    marble.color=color.blue
button(bind=ballRed,text="Red",color=vector(0,0,0),background=vector(1,0,0))
button(bind=ballGreen,text="Green",color=vector(0,0,0),background=vector(0,1,0))
button(bind=ballBlue,text="Blue",color=vector(0,0,0),background=vector(0,0,1))

#Fourth Widget
def ballOpac(x):
    op=x.value
    marble.opacity=op
slider(bind=ballOpac,vertical=False,min=0,max=1,value=1,text="Opacity")

#Fifth Widget
def speed(x):
    global bSpeed
    if x.selected=="x1":
        bSpeed=1
    if x.selected=="x2":
        bSpeed=2
    if x.selected=="x3":
        bSpeed=3
    if x.selected=="x4":
        bSpeed=4
    if x.selected=="x5":
        bSpeed=5
menu(bind=speed, choices=["x1","x2","x3","x4","x5"])
wtext(text="Speed")
while True:
    rate(25)
    xPos=xPos+deltaX*run*bSpeed
    yPos=yPos+deltaY*run*bSpeed
    zPos=zPos+deltaZ*run*bSpeed
    Xrme=xPos+mRadius #Xrme right marble edge
    Xlme=xPos-mRadius #Xlme left marble edge
    Ytme=yPos+mRadius #Ytme Top marble edge
    Ybme=yPos-mRadius #Ybme Bottom marble edge
    Zbme=zPos-mRadius #Zbme Back marble edge
    Zfme=zPos+mRadius #Zfme Front marble edge
    Rwe=roomWidth/2-wallThickness/2 #Rwe Right wall edge
    Lwe=-roomWidth/2+wallThickness/2 #Lwe Left wall edge
    Cwe=roomHeight/2-wallThickness/2 #Cwe Ceiling wall edge
    Flwe=-roomHeight/2+wallThickness/2 #Flwe Floor wall edge
    Bwe=-roomDepth/2+wallThickness/2 #Bwe Back wall edge
    Fwe=roomDepth/2-wallThickness/2 #Fwe Front wall edge

    if (Xrme>=Rwe or Xlme<=Lwe):
        deltaX=deltaX*(-1)
    if (Ytme>=Cwe or Ybme<=Flwe):
        deltaY=deltaY*(-1)
    if (Zfme>=Fwe or Zbme<=Bwe):
        deltaZ=deltaZ*(-1)

    marble.pos=vector(xPos,yPos,zPos)
Multi-Time Zone Clock with a Little Extra
Conclusion
Visual Python opens up a world of possibilities for creating captivating 3D visualizations and animations with ease. Whether you’re a beginner looking to explore the fundamentals of programming or an experienced developer seeking to communicate complex ideas visually, vPython empowers you to turn your imagination into reality. Its user-friendly interface, rich documentation, and supportive community make it a valuable tool for both education and professional projects. So, dive into the realm of vPython and embark on a journey where code and creativity converge in a visually stunning way.