


Welcome to the World of Sensors and Modules with Arduino!
The Membrane Switch Keypad Module is known for its slim and flexible construction, making it suitable for various applications where space is a consideration. In this sensors and modules guide, we’ll explore its working principle, key features, applications, and how it can enhance your Arduino projects.
If you’re new to Arduino, why not take a look at our Getting Started with Arduino guides. These guides are designed for beginners to learn the fundamental basics of Arduino programming.
Working Principle
A membrane switch keypad typically consists of multiple layers that work together to facilitate the detection of key presses. The layers are stacked on top of each other, and each layer serves a specific purpose in the functioning of the keypad.
Top Graphic Overlay
The topmost layer is the graphic overlay. This layer is often made of a thin, flexible, and durable material, such as polyester or polycarbonate. It includes printed graphics, symbols, or labels corresponding to the functions of the keys. Users interact directly with this layer when pressing the keys.
Top Spacer Layer
Beneath the graphic overlay, there is a spacer layer that provides a small gap or space between the graphic overlay and the next layer. This gap allows the keys to be pressed without constant contact with the layers below.
Conductive Layer
Below the spacer layer is the conductive layer. This layer typically contains a grid of conductive traces made of a conductive material, such as silver or carbon. When a key is pressed, it makes contact with these traces, creating an electrical connection.
Separator Layer
The separator layer is another spacer-like layer that maintains a separation between the conductive layer and the next layer. It prevents unintended contact between the conductive traces when a key is not pressed.
Lower Spacer Layer
This layer serves a similar purpose to the upper spacer layer, providing a gap between the separator layer and the next layer.
Bottom Circuit Layer
The bottom circuit layer is another conductive layer with traces arranged in a grid. This layer completes the electrical circuit when a key is pressed, allowing the keypad to register the keypress.
Bottom Insulator Layer
The bottom insulator layer acts as an insulating barrier, preventing unintended contact between the bottom circuit layer and the surface to which the keypad is mounted.
These layers work in tandem to detect key presses. When a key is pressed, the conductive pads on the graphic overlay make contact with the conductive traces on the upper and lower circuit layers, completing the circuit and registering a keypress. The use of layers provides flexibility, durability, and resistance to environmental factors, making membrane switch keypads suitable for various applications.
Features and Specifications:
- Operating Voltage: 3.3V ~ 5V
- Interface: 8-pin Access to 4×4 Matrix
- Maximum Rating: 24 VDC, 30 mA
- Operating Temperature: 0C ~ 50C
- Keypad Dimensions: 6.9cm x 7.6cm
- Compatibility: This module is also compatible with other devices like the Raspberry Pi, ESP32, and ESP8266 etc…
Necessary Equipment:
- Arduino (e.g., Arduino Uno)
- Membrane Switch Keypad Module
- Jumper wires
- Breadboard (optional)
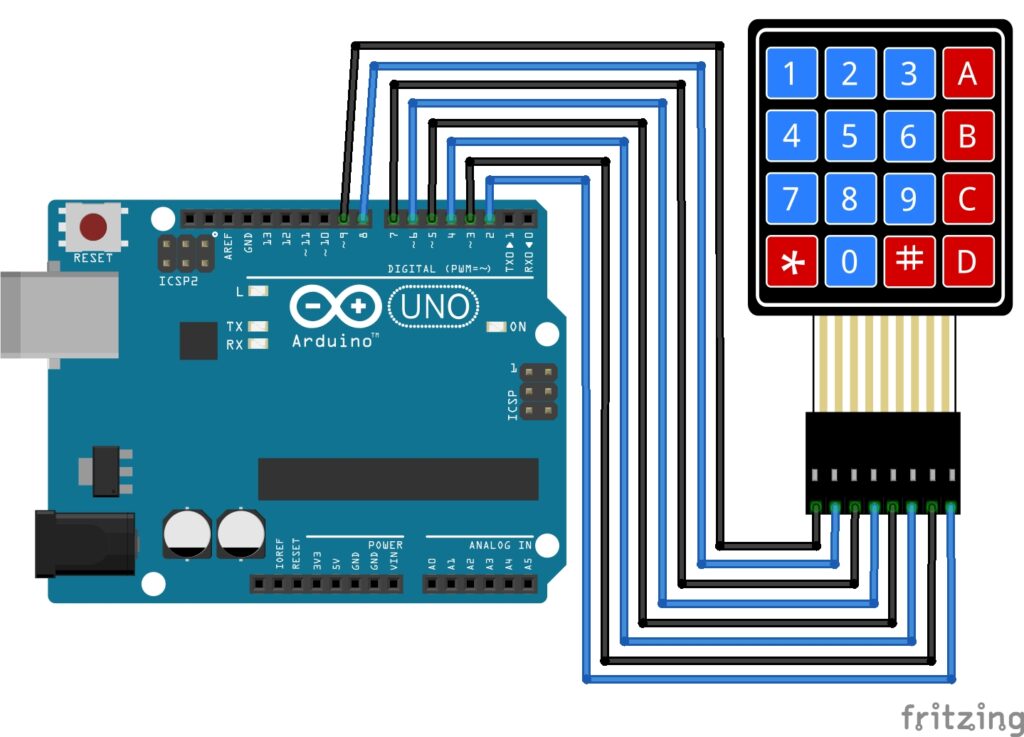
Pin Configuration
Integrating the Membrane Switch Keypad Module with an Arduino is fairly simple as the layout remains in the same order as the Arduino pins, just connect them in the same order from left to right:
- First Pin on the Keypad Module to Digital pin 9 on the Arduino.
- Second Pin on the Keypad Module to Digital pin 8 on the Arduino.
- Third Pin on the Keypad Module to Digital pin 7 on the Arduino.
- Fourth Pin on the Keypad Module to Digital pin 6 on the Arduino.
- Fifth Pin on the Keypad Module to Digital pin 5 on the Arduino.
- Sixth Pin on the Keypad Module to Digital pin 4 on the Arduino.
- Seventh Pin on the Keypad Module to Digital pin 3 on the Arduino.
- Eighth Pin on the Keypad Module to Digital pin 2 on the Arduino.
The Keypad Library
To install the Keypad library for Arduino, you can follow these steps:
Using Arduino Library Manager
- Open the Arduino IDE on your computer.
- Go to “Sketch” in the menu bar, then select “Include Library” and then “Manage Libraries…”
- The Library Manager will open. In the Library Manager, you’ll find a search bar in the upper-right corner.
- Type “Keypad” into the search bar.
- In the search results, find the “Keypad”.
- Click on the entry for the “Keypad” library.
- On the right side, you’ll see an “Install” button. Click on it.
- The Arduino IDE will download and install the Keypad library.
- Once the installation is complete, close the Library Manager.
Manually Installing the Library
If, for any reason, you prefer to install the library manually, you can follow these steps:
- Visit the Keypad GitHub repository.
- On the GitHub page, click the green “Code” button, and then select “Download ZIP.”
- Extract the downloaded ZIP file.
- Inside the extracted folder, you’ll find a folder named “Keypad-master.” Rename it to “Keypad.”
- Move the “Keypad” folder to the “libraries” folder inside your Arduino sketchbook. The location of your Arduino sketchbook is usually in your documents folder.
- Restart the Arduino IDE.
Arduino Code Example
#include <Keypad.h>

const byte ROWS = 4; //four rows
const byte COLS = 4; //four columns
char keys[ROWS][COLS] = {
  {'1','2','3','A'},
  {'4','5','6','B'},
  {'7','8','9','C'},
  {'*','0','#','D'}
};
byte rowPins[ROWS] = {9, 8, 7, 6}; //connect to the row pinouts of the keypad
byte colPins[COLS] = {5, 4, 3, 2}; //connect to the column pinouts of the keypad
Keypad keypad = Keypad(makeKeymap(keys), rowPins, colPins, ROWS, COLS);

void setup(){
  Serial.begin(9600);
}

void loop(){
  char key = keypad.getKey();
  if (key){
    Serial.println(key);
  }
}
Breaking Down the Code
Include Library
- At the beginning of your Arduino sketch, include the Keypad library using the
#include <Keypad.h>directive. - This allows you to use the functions and features provided by the Keypad library in your code.
Initialization
- To use the Keypad library, you need to create a
Keypadobject. Typically, this is done with theKeypadclass constructor. - The constructor takes parameters that define the configuration of your keypad, such as the keymap, row pins, column pins, and the number of rows and columns.
Keymap
- The keymap is a 2D array that defines the characters or functions associated with each key on the keypad.
- For example, a keymap might look like
char keys[ROWS][COLS] = {{'1','2','3'}, {'4','5','6'}, {'7','8','9'}}.
Row and Column Pins
- Specify the pins connected to the rows and columns of your keypad in arrays. These pins are where the keypad is physically connected to the Arduino.
- For example,
byte rowPins[ROWS] = {9, 8, 7}; byte colPins[COLS] = {6, 5, 4};.
Creating Keypad Object
- Instantiate a
Keypadobject by calling the constructor with the defined keymap, row pins, column pins, and other configuration parameters.
Setup Function
- We start the serial monitor so we can print the key presses of the keypad to the monitor.
Loop Function
- In the
loop()function, use thegetKey()method of theKeypadobject to read any key presses. - The
getKey()method returns the character associated with the pressed key or a null character if no key is pressed.
Processing Key Presses
- Use conditional statements or a switch-case structure to perform actions based on the key pressed.
- For example, you might have a case for each digit, a case for the ‘*’ key, and a case for the ‘#’ key.
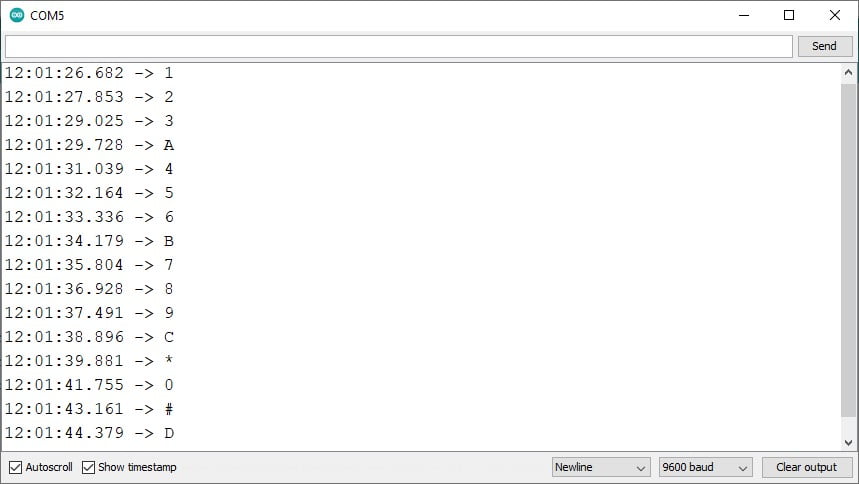
Serial Monitor Output
Applications and Usage Scenarios
Consumer Electronics
Commonly used in remote controls, calculators, and other handheld devices.
Industrial Control Panels
Ideal for machinery control panels where a compact and durable keypad is required.
Medical Devices
Used in medical equipment with a need for a hygienic and easy-to-clean interface.
Conclusion
In this sensors and modules guide, we explained the functionality of the Membrane Switch Keypad Module, exploring its working principles, and demonstrating how to interface it with an Arduino for practical applications. Through the integration of the Keypad library, the keypad module seamlessly interfaces with Arduino, allowing you to effortlessly capture and process user inputs. Whether you’re crafting control panels for industrial machinery, enhancing automotive interfaces, or exploring interactive consumer electronics, the membrane switch keypad module stands as a reliable and adaptable component.
Discover the endless possibilities for Arduino projects with more of our Sensors and Modules guides.

Hi there! Do you know if they make any plugins to assist with SEO? I’m trying to get my blog to rank for some targeted keywords but I’m not seeing very good results. If you know of any please share. Kudos!