

Unleashing the Power of HackRF One in Replay Attacks
Embarking on the world of ethical hacking brings forth a myriad of tools, each with its own unique capabilities. Today, our focus turns to the HackRF One, a powerful software-defined radio (SDR) that opens doors to a realm of possibilities. In this guide, we delve into the intricacies of a replay attack using the HackRF One, showcasing how this versatile device can be harnessed for ethical hacking prowess.
What is the HackRF One?
The HackRF One is a popular software-defined radio (SDR) platform that allows users to receive, transmit, and manipulate a wide range of radio signals. While the HackRF One itself is not specifically designed for replay attacks, it can be used as a tool in conducting such attacks when combined with other techniques and knowledge.
HackRF One Replay Attack Overview
In the context of a replay attack, the HackRF One can be utilized to capture and replay radio frequency (RF) signals. Here’s a general overview of how it could be done:
- Capture: Using the HackRF One, you can tune in to the target RF frequency and capture the desired signal. This could involve intercepting wireless communications, such as keyless entry systems, garage door openers, or other devices that use RF signals for authentication or control.
- Recording: The HackRF One can record the captured RF signal into a file for later replay. This file contains the raw data representing the captured signal.
- Replay: After recording the signal, you can utilize the HackRF One to transmit the captured signal back onto the same frequency or device. This process effectively replays the original RF signal, potentially tricking the target system into performing actions as if the original signal was received.
Ethical Considerations of the HackRF One
It’s important to note that the use of the HackRF One or any other SDR device for replay attacks is subject to legal and ethical considerations. Conducting replay attacks without proper authorization or for malicious purposes is illegal and unethical. The capabilities of the HackRF One should be used responsibly and in compliance with applicable laws and regulations.
If you are interested in experimenting with the HackRF One or SDR technology, it is strongly recommended to do so within legal boundaries and for educational purposes or authorized research only.
It’s also worth mentioning that defending against replay attacks can involve implementing cryptographic protocols, using rolling codes or challenge-response mechanisms, or employing other security measures that make the replayed signals ineffective or easily detectable.
“Let’s Get Started!”
-Michael Ossmann
The HackRF One was created by Michael Ossmann. Michael is a well-known figure in the field of software-defined radio (SDR) and has contributed significantly to the open-source hardware and software communities. The HackRF One, developed by Ossmann’s company Great Scott Gadgets, is a popular SDR platform that provides users with a versatile and affordable tool for exploring and experimenting with radio frequency (RF) communication.
RF Spectrum Analyzer

Before we can successfully capture the key fob data, we need to know what frequency it transmits on, for this we need to use a spectrum analyzer to find the correct frequency. Mess with the frequencies until you find what frequency your fob is transmitting on, don’t forget to make a note of the frequency when you find it as this is very important for the programs we are about to build.
Key fobs typically transmit on the following frequencies:
- 868MHz
- 433MHz
- 390MHz
- 315MHz
- 310MHz
- 303MHz
GNU Radio Companion
For this guide I will be using DragonOS on the Raspberry Pi, it has GRC preinstalled. If you are using another Linux distro or Windows, you can install it with the following steps:
GRC Linux Install
- Update Package Lists: Open a terminal and update your package lists to make sure you have the latest information about available packages.
sudo apt-get update
For other package managers like yum or dnf on different Linux distributions, use the appropriate commands.
- Install GRC: Enter the following command to install GNU Radio Companion and its dependencies:
sudo apt-get install gnuradio
- Verify Installation: Once the installation is complete, you can verify it by running:
gnuradio-companion
GRC Windows Installation
Alternatively, you can install GNU Radio Companion to your Windows system by following these steps:
- Install GRC: Start by installing GRC on your computer. You can download it from the GRC website https://www.gnuradio.org/ and follow the installation instructions specific to your operating system.
- Launch GRC: Once installed, open GRC. The application should be available in your program list or applications folder.
Building the Receiver
We need to build two programs. The first program is our receiver which will intercept and capture a car key fob radio transmission. The second program is to transmit the captured signal data to the target car.
- Open the DragonOS terminal and enter the following command:
gnuradio-companion
With GRC open, you will see two blocks within the blank canvas.
- Double-click the options block and give your project a title and ID, as we are building the receiver give it a recognizable name like capture_fob. Now click apply, then ok.
- Double click the Variable block. Set the ID label to samp_rate, and set the value to 2e6 or 2000000. 2e6 is the scientific notation of 2000000, you can use whichever you prefer.
- Once the value has been entered, click apply then ok.
Now we can start building our radio program.
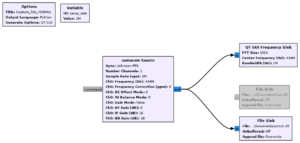
Osmocom Source
- From the right-handside menu, locate the osmocom source, then drag and drop it to the canvas area.
- Double-click the osmocom Source block and enter the following values:
- sync:
- Number Channels: 1
- Sample Rate (sps): samp_rate
- ch0:
- DC Offset Mode: 0
- IQ Balance Mode: 0
- Gain Mode: Manual
- RF Gain (db): 0
- IF Gain (db): 16
- BB Gain (db): 16
QT GUI Frequency Sink
Now, locate and drag and drop the QT GUI Frequency Sink to the canvas area.
Double-click the QT GUI Frequency Sink and enter the following values:
- FFT Size: 1024
- Center Frequency (Hz): 434e6 (Or Your Frequency)
- Bandwidth (Hz): samp_rate
File Sink
Now locate the drag and drop the File Sink.
- Double-click the File Sink block and enter the following values:
- File: Location where to store the fobs captured lock signal. Label it lock.dll.
- Append file: Overwrite.
Second File Sink
Now drag and drop another File Sink.
- Double-click the File Sink block and enter the following values:
- File: Location where to store the fobs captured unlock signal. Label it unlock.dll.
- Append file: Overwrite.
- Right-click this File sink block and select Disable, as we can’t have both active at any time.
Connecting the Blocks
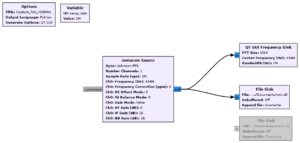
That’s it, our program to capture the fob transmissions is complete. Don’t forget to save the program by clicking on File > Save As.
Building the Transmitter
Now we need to build our transmitter program which will transmit the captured fob signals.
- Click on File > New > QT GUI.
Same as before, start by double-clicking the Options block and give it a title and ID, something recognizable like transmit_fob.
- Double-click the Variable block and enter the following values:
- ID: samp_rate
- Value: 2e6
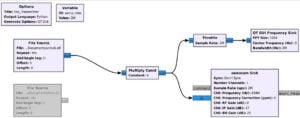
File Source
Now from the right-hand side menu locate the drag and drop the File Source block.
- Double-click the File Source block and enter the following values:
- File: location of where the unlock.dll was stored.
- Repeat: Yes.
Once values have been entered you can click apply then ok.
Second File Source
Now right-click the File source block and copy it then paste it to the canvas.
- Double-click the new File Source block and change the File value to the location of where your lock.dll is stored.
- Click apply then ok.
- Right-click the second File Source block and disable it, as we can only have one enabled at a time.
Multiply Const
From the right-hand side menu locate then drag and drop the Multiply Const block to the canvas area.
- Double-click the Multiply Const block and enter the following values:
- Constant: 6
- Vector Length: 1
- Click apply and ok.
Throttle
From the right-hand side menu locate then drag and drop the Throttle block.
- Double click the Throttle block and enter the following values:
- Sample Rate: samp_rate.
- Vector Length: 1
- Ignore rx_rate tag: True
- Click apply then ok.
QT GUI Frequency Sink
From the right-hand side menu locate then drag and drop the QT GUI Frequency Sink block.
- Double click the QT GUI Frequency Sink block and enter the following values:
- Center Frequency (Hz): 434e6 (Or Your Frequency)
- Bandwidth (Hz): samp_rate.
Osmocom Source
Now from the right-hand side menu locate and drag and drop the osmocom Source block.
- Double-click the osmocom Source block and enter the following values:
- Sync: Don’t Sync
- Number Channels: 1
- Sample Rate (sps): samp_rate
- ch0:
- Frequency (Hz): 434e6 (Or Your Frequency)
- Frequency Correction (ppm): 0
- RF Gain (db): 0
- IF Gain (db): 20
- BB Gain (db): 20
Now link up all the blocks just like in the images shown below.
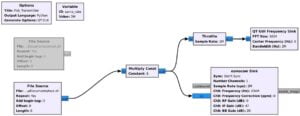
Don’t forget to save the file by clicking File > Save As.
Execution
With the two programs now built, you’re ready for action. Run the receiver program and capture the car fobs locking and unlocking signals switching the file sinks in between captures. With the signals stored, you can begin transmission. Run the unlocking or locking signal through the transmitter program to lock or unlock the vehicle.
Important Notice: This guide is for educational purposes only. Using this information on property you don’t own without explicit written permission is highly ILLEGAL. Meganano does not condone or endorse any such illegal activity.
Conclusion
As we conclude our exploration into the realm of ethical hacking with the HackRF One, it’s evident that this SDR is a formidable ally in the quest for cybersecurity knowledge. The replay attack, showcased in this guide, is just a glimpse into the potential of this powerful tool. As you continue your journey in ethical hacking, may the HackRF One serve as a trusty companion, unlocking new avenues for learning and securing digital landscapes.
Happy Hacking Folks!
You can read all of our Ethical Hacking guides here: Ethical Hacking
You can explore more of our beginners guides to radio here: Radio Adventures


Wow, superb blog structure! How long have you been running a blog for?
you make blogging look easy. The total look
of your web site is fantastic, as well as the content material!